量子机器学习模块
量子计算层
QuantumLayer
QuantumLayer是一个支持量子含参线路作为参数的自动求导模块的封装类。用户定义一个函数作为参数 qprog_with_measure
,该函数需要包含pyQPanda定义的量子线路:一般包含量子线路的编码线路,演化线路和测量操作。
该类可以嵌入量子经典混合机器学习模型,通过经典的梯度下降法,使得量子经典混合模型的目标函数或损失函数最小。
用户可通过参数 diff_method
指定 QuantumLayer
层中量子线路参数的梯度计算方式,QuantumLayer
当前支持有限差分法 finite_diff
以及 parameter-shift
方法。
有限差分法是估算函数梯度最传统和最常用的数值方法之一。主要思想是用差分代替偏导数:
若使用 parameter-shift
方法,我们使用如下目标函数:
理论上可以通过 parameter-shift
这一更精确的方法计算量子线路中参数对哈密顿量的梯度:
- class pyvqnet.qnn.quantumlayer.QuantumLayer(qprog_with_measure, para_num, machine_type_or_cloud_token, num_of_qubits: int, num_of_cbits: int = 1, diff_method: str = 'parameter_shift', delta: float = 0.01, dtype=None, name='')
变分量子层的抽象计算模块。对一个参数化的量子线路进行仿真,得到测量结果。该变分量子层继承了VQNet框架的梯度计算模块,可以计算线路参数的梯度,训练变分量子线路模型或将变分量子线路嵌入混合量子和经典模型。
- Parameters:
qprog_with_measure – 用pyQPanda构建的量子线路运行和测量函数。
para_num – int - 参数个数。
machine_type_or_cloud_token – qpanda量子虚拟机类型或pyQPanda 量子云令牌 : https://pyqpanda-toturial.readthedocs.io/zh/latest/Realchip.html。
num_of_qubits – 量子比特数。
num_of_cbits – 经典比特数,默认为1。
diff_method – 求解量子线路参数梯度的方法,“参数位移”或“有限差分”,默认参数偏移。
delta – 有限差分计算梯度时的 delta。
dtype – 参数的数据类型,defaults:None,使用默认数据类型:kfloat32,代表32位浮点数。
name – 这个模块的名字, 默认为””。
- Returns:
一个可以计算量子线路的模块。
Note
qprog_with_measure是pyQPanda中定义的量子线路函数 :https://pyqpanda-toturial.readthedocs.io/zh/latest/QCircuit.html。
此函数必须包含以下参数作为函数入参(即使某个参数未实际使用),否则无法在QuantumLayer中正常运行。
qprog_with_measure (input,param,qubits,cbits,machine)
input: 输入一维经典数据。如果没有输入可以输入 None。
param: 输入一维的变分量子线路的待训练参数。
qubits: 该QuantumLayer分配的量子比特,类型为pyQpanda.Qubits。
cbits: 由QuantumLayer分配的经典比特,用来辅助测量函数,类型为 pyQpanda.ClassicalCondition。如果线路不使用cbits,也应保留此参数。
machine: 由QuantumLayer创建的模拟器,例如CPUQVM,GPUQVM,QCloud等。
使用QuantumLayer的 m_para 属性获取变分量子线路的训练参数。该参数为QTensor类,可使用to_numpy()接口转化为numpy数组。
Example:
import pyqpanda as pq from pyvqnet.qnn.measure import ProbsMeasure from pyvqnet.qnn.quantumlayer import QuantumLayer import numpy as np from pyvqnet.tensor import QTensor def pqctest (input,param,qubits,cbits,machine): circuit = pq.QCircuit() circuit.insert(pq.H(qubits[0])) circuit.insert(pq.H(qubits[1])) circuit.insert(pq.H(qubits[2])) circuit.insert(pq.H(qubits[3])) circuit.insert(pq.RZ(qubits[0],input[0])) circuit.insert(pq.RZ(qubits[1],input[1])) circuit.insert(pq.RZ(qubits[2],input[2])) circuit.insert(pq.RZ(qubits[3],input[3])) circuit.insert(pq.CNOT(qubits[0],qubits[1])) circuit.insert(pq.RZ(qubits[1],param[0])) circuit.insert(pq.CNOT(qubits[0],qubits[1])) circuit.insert(pq.CNOT(qubits[1],qubits[2])) circuit.insert(pq.RZ(qubits[2],param[1])) circuit.insert(pq.CNOT(qubits[1],qubits[2])) circuit.insert(pq.CNOT(qubits[2],qubits[3])) circuit.insert(pq.RZ(qubits[3],param[2])) circuit.insert(pq.CNOT(qubits[2],qubits[3])) #print(circuit) prog = pq.QProg() prog.insert(circuit) # pauli_dict = {'Z0 X1':10,'Y2':-0.543} rlt_prob = ProbsMeasure([0,2],prog,machine,qubits) return rlt_prob pqc = QuantumLayer(pqctest,3,"CPU",4,1) #classic data as input input = QTensor([[1,2,3,4],[40,22,2,3],[33,3,25,2.0]] ) #forward circuits rlt = pqc(input) grad = QTensor(np.ones(rlt.data.shape)*1000) #backward circuits rlt.backward(grad) print(rlt) # [ # [0.2500000, 0.2500000, 0.2500000, 0.2500000], # [0.2500000, 0.2500000, 0.2500000, 0.2500000], # [0.2500000, 0.2500000, 0.2500000, 0.2500000] # ]
如果使用GPU,参考下面的例子:
Example:
import pyqpanda as pq from pyvqnet.qnn.measure import ProbsMeasure from pyvqnet.qnn.quantumlayer import QuantumLayer import numpy as np from pyvqnet.tensor import QTensor,DEV_GPU_0 def pqctest (input,param,qubits,cbits,machine): circuit = pq.QCircuit() circuit.insert(pq.H(qubits[0])) circuit.insert(pq.H(qubits[1])) circuit.insert(pq.H(qubits[2])) circuit.insert(pq.H(qubits[3])) circuit.insert(pq.RZ(qubits[0],input[0])) circuit.insert(pq.RZ(qubits[1],input[1])) circuit.insert(pq.RZ(qubits[2],input[2])) circuit.insert(pq.RZ(qubits[3],input[3])) circuit.insert(pq.CNOT(qubits[0],qubits[1])) circuit.insert(pq.RZ(qubits[1],param[0])) circuit.insert(pq.CNOT(qubits[0],qubits[1])) circuit.insert(pq.CNOT(qubits[1],qubits[2])) circuit.insert(pq.RZ(qubits[2],param[1])) circuit.insert(pq.CNOT(qubits[1],qubits[2])) circuit.insert(pq.CNOT(qubits[2],qubits[3])) circuit.insert(pq.RZ(qubits[3],param[2])) circuit.insert(pq.CNOT(qubits[2],qubits[3])) #print(circuit) prog = pq.QProg() prog.insert(circuit) # pauli_dict = {'Z0 X1':10,'Y2':-0.543} rlt_prob = ProbsMeasure([0,2],prog,machine,qubits) return rlt_prob #这里的"CPU" 指的是qpanda量子计算模拟器使用CPU,跟pyvqnet是否使用GPU无关。 pqc = QuantumLayer(pqctest,3,"CPU",4,1) #这里使用toGPU将QuantumLayer 移动到GPU上 pqc.toGPU() #classic data as input input = QTensor([[1,2,3,4],[40,22,2,3],[33,3,25,2.0]] ) input.toGPU() #forward circuits rlt = pqc(input) grad = QTensor(np.ones(rlt.data.shape)*1000,device=DEV_GPU_0) #backward circuits rlt.backward(grad) print(rlt)
QuantumLayerV2
如您更加熟悉pyQPanda语法,可以使用QuantumLayerV2,自定义量子比特 qubits
,经典比特 cbits
,后端模拟器 machine
加入QuantumLayerV2的参数 qprog_with_measure
函数中。
- class pyvqnet.qnn.quantumlayer.QuantumLayerV2(qprog_with_measure, para_num, diff_method: str = 'parameter_shift', delta: float = 0.01, dtype=None, name='')
变分量子层的抽象计算模块。对一个参数化的量子线路进行仿真,得到测量结果。该变分量子层继承了VQNet框架的梯度计算模块,可以计算线路参数的梯度,训练变分量子线路模型或将变分量子线路嵌入混合量子和经典模型。
- Parameters:
qprog_with_measure – 用pyQPand构建的量子线路运行和测量函数。
para_num – int - 参数个数。
diff_method – 求解量子线路参数梯度的方法,“参数位移”或“有限差分”,默认参数偏移。
delta – 有限差分计算梯度时的 delta。
dtype – 参数的数据类型,defaults:None,使用默认数据类型:kfloat32,代表32位浮点数。
name – 这个模块的名字, 默认为””。
- Returns:
一个可以计算量子线路的模块。
Note
qprog_with_measure是pyQPanda中定义的量子线路函数 :https://pyqpanda-toturial.readthedocs.io/zh/latest/QCircuit.html。
此函数必须包含以下参数作为函数入参(即使某个参数未实际使用),否则无法在QuantumLayerV2中正常运行。
与QuantumLayer相比。该接口传入的变分线路运行函数中,用户应该手动创建量子比特和模拟器: https://pyqpanda-toturial.readthedocs.io/zh/latest/QuantumMachine.html,
如果qprog_with_measure需要quantum measure,用户还需要手动创建需要分配cbits: https://pyqpanda-toturial.readthedocs.io/zh/latest/Measure.html
量子线路函数 qprog_with_measure (input,param,nqubits,ncubits)的使用可参考下面的例子。
input: 输入一维经典数据。如果没有,输入 None。
param: 输入一维的变分量子线路的待训练参数。
Example:
import pyqpanda as pq from pyvqnet.qnn.measure import ProbsMeasure from pyvqnet.qnn.quantumlayer import QuantumLayerV2 import numpy as np from pyvqnet.tensor import QTensor def pqctest (input,param): num_of_qubits = 4 machine = pq.CPUQVM() machine.init_qvm() qubits = machine.qAlloc_many(num_of_qubits) circuit = pq.QCircuit() circuit.insert(pq.H(qubits[0])) circuit.insert(pq.H(qubits[1])) circuit.insert(pq.H(qubits[2])) circuit.insert(pq.H(qubits[3])) circuit.insert(pq.RZ(qubits[0],input[0])) circuit.insert(pq.RZ(qubits[1],input[1])) circuit.insert(pq.RZ(qubits[2],input[2])) circuit.insert(pq.RZ(qubits[3],input[3])) circuit.insert(pq.CNOT(qubits[0],qubits[1])) circuit.insert(pq.RZ(qubits[1],param[0])) circuit.insert(pq.CNOT(qubits[0],qubits[1])) circuit.insert(pq.CNOT(qubits[1],qubits[2])) circuit.insert(pq.RZ(qubits[2],param[1])) circuit.insert(pq.CNOT(qubits[1],qubits[2])) circuit.insert(pq.CNOT(qubits[2],qubits[3])) circuit.insert(pq.RZ(qubits[3],param[2])) circuit.insert(pq.CNOT(qubits[2],qubits[3])) #print(circuit) prog = pq.QProg() prog.insert(circuit) rlt_prob = ProbsMeasure([0,2],prog,machine,qubits) return rlt_prob pqc = QuantumLayerV2(pqctest,3) #classic data as input input = QTensor([[1.0,2,3,4],[4,2,2,3],[3,3,2,2]] ) #forward circuits rlt = pqc(input) grad = QTensor(np.ones(rlt.data.shape)*1000) #backward circuits rlt.backward(grad) print(rlt) # [ # [0.2500000, 0.2500000, 0.2500000, 0.2500000], # [0.2500000, 0.2500000, 0.2500000, 0.2500000], # [0.2500000, 0.2500000, 0.2500000, 0.2500000] # ]
如果使用GPU,参考下面的例子:
Example:
import pyqpanda as pq from pyvqnet.qnn.measure import ProbsMeasure from pyvqnet.qnn.quantumlayer import QuantumLayerV2 import numpy as np from pyvqnet.tensor import QTensor,DEV_GPU_0 def pqctest (input,param): num_of_qubits = 4 machine = pq.CPUQVM() machine.init_qvm() qubits = machine.qAlloc_many(num_of_qubits) circuit = pq.QCircuit() circuit.insert(pq.H(qubits[0])) circuit.insert(pq.H(qubits[1])) circuit.insert(pq.H(qubits[2])) circuit.insert(pq.H(qubits[3])) circuit.insert(pq.RZ(qubits[0],input[0])) circuit.insert(pq.RZ(qubits[1],input[1])) circuit.insert(pq.RZ(qubits[2],input[2])) circuit.insert(pq.RZ(qubits[3],input[3])) circuit.insert(pq.CNOT(qubits[0],qubits[1])) circuit.insert(pq.RZ(qubits[1],param[0])) circuit.insert(pq.CNOT(qubits[0],qubits[1])) circuit.insert(pq.CNOT(qubits[1],qubits[2])) circuit.insert(pq.RZ(qubits[2],param[1])) circuit.insert(pq.CNOT(qubits[1],qubits[2])) circuit.insert(pq.CNOT(qubits[2],qubits[3])) circuit.insert(pq.RZ(qubits[3],param[2])) circuit.insert(pq.CNOT(qubits[2],qubits[3])) #print(circuit) prog = pq.QProg() prog.insert(circuit) rlt_prob = ProbsMeasure([0,2],prog,machine,qubits) return rlt_prob pqc = QuantumLayerV2(pqctest,3) #layer move to gpu pqc.toGPU() #classic data as input input = QTensor([[1.0,2,3,4],[4,2,2,3],[3,3,2,2]] ) #data move to gpu input.toGPU(DEV_GPU_0) #forward circuits rlt = pqc(input) grad = QTensor(np.ones(rlt.data.shape)*1000,device= DEV_GPU_0) #backward circuits rlt.backward(grad) print(rlt)
QuantumBatchAsyncQcloudLayer
当您安装最新版本pyqpanda,可以使用本接口定义一个变分线路,并提交到originqc的真实芯片上运行。
- class pyvqnet.qnn.quantumlayer.QuantumBatchAsyncQcloudLayer(origin_qprog_func, qcloud_token, para_num, num_qubits, num_cubits, pauli_str_dict=None, shots=1000, initializer=None, dtype=None, name='', diff_method='parameter_shift', submit_kwargs={}, query_kwargs={})
使用 pyqpanda QCLOUD 从版本 3.8.2.2 开始的 originqc 真实芯片的抽象计算模块。 它提交参数化量子电路到真实芯片并获得测量结果。
Note
qcloud_token 为您到 https://qcloud.originqc.com.cn/ 中申请的api token。 origin_qprog_func 需要返回pypqanda.QProg类型的数据,如果没有设置pauli_str_dict,需要保证该QProg中已经插入了measure。 origin_qprog_func 的形式必须按照如下:
origin_qprog_func(input,param,qubits,cbits,machine)
input: 输入1~2维经典数据,二维的情况下,第一个维度为批处理大小。
param: 输入一维的变分量子线路的待训练参数。
machine: 由QuantumBatchAsyncQcloudLayer创建的模拟器QCloud,无需用户额外在函数中定义。
qubits: 由QuantumBatchAsyncQcloudLayer创建的模拟器QCloud创建的量子比特,数量为 num_qubits, 类型为pyQpanda.Qubits,无需用户额外在函数中定义。
cbits: 由QuantumBatchAsyncQcloudLayer分配的经典比特, 数量为 num_cubits, 类型为 pyQpanda.ClassicalCondition,无需用户额外在函数中定义。。
- Parameters:
origin_qprog_func – QPanda 构建的变分量子电路函数,必须返回QProg。
qcloud_token – str - 量子机的类型或用于执行的云令牌。
para_num – int - 参数数量,参数是大小为[para_num]的QTensor。
num_qubits – int - 量子电路中的量子比特数量。
num_cubits – int - 量子电路中用于测量的经典比特数量。
pauli_str_dict – dict|list - 表示量子电路中泡利运算符的字典或字典列表。 默认为“无”,则进行测量操作,如果输入泡利算符的字典,则会计算单个期望或者多个期望。
shot – int - 测量次数。 默认值为 1000。
initializer – 参数值的初始化器。 默认为“无”,使用0~2*pi正态分布。
dtype – 参数的数据类型。 默认值为 None,即使用默认数据类型pyvqnet.kfloat32。
name – 模块的名称。 默认为空字符串。
diff_method – 梯度计算的微分方法。 默认为“parameter_shift”,当前不支持其他微分方法。
submit_kwargs – 用于提交量子电路的附加关键字参数,默认:{“chip_id”:pyqpanda.real_chip_type.origin_72,”is_amend”:True,”is_mapping”:True,”is_optimization”:True,”compile_level”:3,”default_task_group_size”:200,”test_qcloud_fake”:False},当设置test_qcloud_fake为True则使用随机数据验证代码正确性。
query_kwargs – 用于查询量子结果的附加关键字参数,默认:{“timeout”:2,”print_query_info”:True,”sub_circuits_split_size”:1}。
- Returns:
一个可以计算量子电路的模块。
Example:
import numpy as np import pyqpanda as pq import pyvqnet from pyvqnet.qnn import QuantumLayer,QuantumBatchAsyncQcloudLayer from pyvqnet.qnn import expval_qcloud def qfun(input,param, m_machine, m_qlist,cubits): measure_qubits = [0,2] m_prog = pq.QProg() cir = pq.QCircuit() cir.insert(pq.RZ(m_qlist[0],input[0])) cir.insert(pq.CNOT(m_qlist[0],m_qlist[1])) cir.insert(pq.RY(m_qlist[1],param[0])) cir.insert(pq.CNOT(m_qlist[0],m_qlist[2])) cir.insert(pq.RZ(m_qlist[1],input[1])) cir.insert(pq.RY(m_qlist[2],param[1])) cir.insert(pq.H(m_qlist[2])) m_prog.insert(cir) for idx, ele in enumerate(measure_qubits): m_prog << pq.Measure(m_qlist[ele], cubits[idx]) # pylint: disable=expression-not-assigned return m_prog l = QuantumBatchAsyncQcloudLayer(qfun, "3047DE8A59764BEDAC9C3282093B16AF1", 2, 6, 6, pauli_str_dict=None, shots = 1000, initializer=None, dtype=None, name="", diff_method="parameter_shift", submit_kwargs={}, query_kwargs={}) x = pyvqnet.tensor.QTensor([[0.56,1.2],[0.56,1.2],[0.56,1.2],[0.56,1.2],[0.56,1.2]],requires_grad= True) y = l(x) print(y) y.backward() print(l.m_para.grad) print(x.grad) def qfun2(input,param, m_machine, m_qlist,cubits): measure_qubits = [0,2] m_prog = pq.QProg() cir = pq.QCircuit() cir.insert(pq.RZ(m_qlist[0],input[0])) cir.insert(pq.CNOT(m_qlist[0],m_qlist[1])) cir.insert(pq.RY(m_qlist[1],param[0])) cir.insert(pq.CNOT(m_qlist[0],m_qlist[2])) cir.insert(pq.RZ(m_qlist[1],input[1])) cir.insert(pq.RY(m_qlist[2],param[1])) cir.insert(pq.H(m_qlist[2])) m_prog.insert(cir) return m_prog l = QuantumBatchAsyncQcloudLayer(qfun2, "3047DE8A59764BEDAC9C3282093B16AF", 2, 6, 6, pauli_str_dict={'Z0 X1':10,'':-0.5,'Y2':-0.543}, shots = 1000, initializer=None, dtype=None, name="", diff_method="parameter_shift", submit_kwargs={}, query_kwargs={}) x = pyvqnet.tensor.QTensor([[0.56,1.2],[0.56,1.2],[0.56,1.2],[0.56,1.2]],requires_grad= True) y = l(x) print(y) y.backward() print(l.m_para.grad) print(x.grad)
QuantumLayerMultiProcess
如您更加熟悉pyQPanda语法,可以使用QuantumLayerMultiProcess,自定义量子比特 qubits
,经典比特 cbits
,后端模拟器 machine
加入QuantumLayerMultiProcess的参数 qprog_with_measure
函数中。
- class pyvqnet.qnn.quantumlayer.QuantumLayerMultiProcess(qprog_with_measure, para_num, num_of_qubits: int, num_of_cbits: int = 1, diff_method: str = 'parameter_shift', delta: float = 0.01, dtype=None, name='')
变分量子层的抽象计算模块。使用多进程技术对一个批次数据计算梯度时候的量子线路进行加速。对于线路深度较少的线路,该层的多线程加速效果并不明显。
该层对一个参数化的量子线路进行仿真,得到测量结果。该变分量子层继承了VQNet框架的梯度计算模块,可以计算线路参数的梯度,训练变分量子线路模型或将变分量子线路嵌入混合量子和经典模型。
- Parameters:
qprog_with_measure – 用pyQPanda构建的量子线路运行和测量函数。
para_num – int - 参数个数。
num_of_qubits – 量子比特数。
num_of_cbits – 经典比特数,默认为1。
diff_method – 求解量子线路参数梯度的方法,“参数位移”或“有限差分”,默认参数偏移。
delta – 有限差分计算梯度时的 delta。
dtype – 参数的数据类型,defaults:None,使用默认数据类型:kfloat32,代表32位浮点数。
name – 这个模块的名字, 默认为””。
- Returns:
一个可以计算量子线路的模块。
Note
qprog_with_measure是pyQPanda中定义的量子线路函数 :https://pyqpanda-toturial.readthedocs.io/zh/latest/QCircuit.html。
此函数应包含以下参数,否则无法在QuantumLayerMultiProcess中正常运行。
与QuantumLayerV2类似,该接口传入的变分线路运行函数中,用户应该手动创建量子比特和模拟器: https://pyqpanda-toturial.readthedocs.io/zh/latest/QuantumMachine.html,
如果qprog_with_measure需要quantum measure,用户应该手动创建cbits: https://pyqpanda-toturial.readthedocs.io/zh/latest/Measure.html
量子线路函数 qprog_with_measure (input,param,nqubits,ncubits)的使用可参考下面的例子。对于线路深度较少的线路,该层的多线程加速效果并不明显。
input: 输入一维经典数据。
param: 输入一维量子线路的参数。
nqubits: 预先设定的量子比特数量。如果没有,输入 0。
ncubits: 预先设定的经典比特数量。如果没有,输入 0。
Example:
import pyqpanda as pq from pyvqnet.qnn.measure import ProbsMeasure from pyvqnet.qnn.quantumlayer import QuantumLayerMultiProcess import numpy as np from pyvqnet.tensor import QTensor def pqctest (input,param,nqubits,ncubits): machine = pq.CPUQVM() machine.init_qvm() qubits = machine.qAlloc_many(nqubits) circuit = pq.QCircuit() circuit.insert(pq.H(qubits[0])) circuit.insert(pq.H(qubits[1])) circuit.insert(pq.H(qubits[2])) circuit.insert(pq.H(qubits[3])) circuit.insert(pq.RZ(qubits[0],input[0])) circuit.insert(pq.RZ(qubits[1],input[1])) circuit.insert(pq.RZ(qubits[2],input[2])) circuit.insert(pq.RZ(qubits[3],input[3])) circuit.insert(pq.CNOT(qubits[0],qubits[1])) circuit.insert(pq.RZ(qubits[1],param[0])) circuit.insert(pq.CNOT(qubits[0],qubits[1])) circuit.insert(pq.CNOT(qubits[1],qubits[2])) circuit.insert(pq.RZ(qubits[2],param[1])) circuit.insert(pq.CNOT(qubits[1],qubits[2])) circuit.insert(pq.CNOT(qubits[2],qubits[3])) circuit.insert(pq.RZ(qubits[3],param[2])) circuit.insert(pq.CNOT(qubits[2],qubits[3])) #print(circuit) prog = pq.QProg() prog.insert(circuit) rlt_prob = ProbsMeasure([0,2],prog,machine,qubits) return rlt_prob pqc = QuantumLayerMultiProcess(pqctest,3,4,1) #classic data as input input = QTensor([[1.0,2,3,4],[4,2,2,3],[3,3,2,2]] ) #forward circuits rlt = pqc(input) grad = QTensor(np.ones(rlt.data.shape)*1000) #backward circuits rlt.backward(grad) print(rlt) # [ # [0.2500000, 0.2500000, 0.2500000, 0.2500000], # [0.2500000, 0.2500000, 0.2500000, 0.2500000], # [0.2500000, 0.2500000, 0.2500000, 0.2500000] # ]
NoiseQuantumLayer
在真实的量子计算机中,受制于量子比特自身的物理特性,常常存在不可避免的计算误差。为了能在量子虚拟机中更好的模拟这种误差,VQNet同样支持含噪声量子虚拟机。含噪声量子虚拟机的模拟更贴近真实的量子计算机,我们可以自定义支持的逻辑门类型,自定义逻辑门支持的噪声模型。 现有可支持的量子噪声模型依据QPanda中定义,具体参考链接 QPANDA2 中的介绍。
使用 NoiseQuantumLayer 定义一个量子线路自动微分类,该类支持QPanda噪声虚拟机。用户定义一个函数作为参数 qprog_with_measure
,该函数需要包含pyQPanda定义的量子线路,同样需要传入一个参数 noise_set_config
,使用pyQPanda接口,设置噪声模型。
- class pyvqnet.qnn.quantumlayer.NoiseQuantumLayer(qprog_with_measure, para_num, machine_type, num_of_qubits: int, num_of_cbits: int = 1, diff_method: str = 'parameter_shift', delta: float = 0.01, noise_set_config=None, dtype=None, name='')
变分量子层的抽象计算模块。对一个参数化的量子线路进行仿真,得到测量结果。该变分量子层继承了VQNet框架的梯度计算模块,可以计算线路参数的梯度,训练变分量子线路模型或将变分量子线路嵌入混合量子和经典模型。
这一层可以在量子线路中使用噪声模型。
- Parameters:
qprog_with_measure – 用pyQPanda构建的量子线路运行和测量函数。
para_num – int - 参数个数。
machine_type – qpanda机器类型。
num_of_qubits – 量子比特数。
num_of_cbits – 经典比特数,默认为1。
diff_method – 求解量子线路参数梯度的方法,“参数位移”或“有限差分”,默认参数偏移。
delta – 有限差分计算梯度时的 delta。
noise_set_config – 噪声设置函数。
dtype – 参数的数据类型,defaults:None,使用默认数据类型:kfloat32,代表32位浮点数。
name – 这个模块的名字, 默认为””。
- Returns:
一个可以计算含噪声量子线路的模块。
Note
qprog_with_measure是pyQPanda中定义的量子线路函数 :https://pyqpanda-toturial.readthedocs.io/zh/latest/QCircuit.html。
此函数必须包含以下参数作为函数入参(即使某个参数未实际使用),否则无法在NoiseQuantumLayer中正常运行。
qprog_with_measure (input,param,qubits,cbits,machine)
input: 输入一维经典数据。如果没有输入可以输入 None。
param: 输入一维的变分量子线路的待训练参数。
qubits: 该NoiseQuantumLayer分配的量子比特,类型为pyQpanda.Qubits。
cbits: cbits由NoiseQuantumLayer分配的经典比特,用来辅助测量函数,类型为 pyQpanda.ClassicalCondition。如果线路不使用cbits,也应保留此参数。
machine: 由NoiseQuantumLayer创建的模拟器。
Example:
import pyqpanda as pq from pyvqnet.qnn.measure import ProbsMeasure from pyvqnet.qnn.quantumlayer import NoiseQuantumLayer import numpy as np from pyqpanda import * from pyvqnet.tensor import QTensor def circuit(weights,param,qubits,cbits,machine): circuit = pq.QCircuit() circuit.insert(pq.H(qubits[0])) circuit.insert(pq.RY(qubits[0], weights[0])) circuit.insert(pq.RY(qubits[0], param[0])) prog = pq.QProg() prog.insert(circuit) prog << measure_all(qubits, cbits) result = machine.run_with_configuration(prog, cbits, 100) counts = np.array(list(result.values())) states = np.array(list(result.keys())).astype(float) # Compute probabilities for each state probabilities = counts / 100 # Get state expectation expectation = np.sum(states * probabilities) return expectation def default_noise_config(qvm,q): p = 0.01 qvm.set_noise_model(NoiseModel.BITFLIP_KRAUS_OPERATOR, GateType.PAULI_X_GATE, p) qvm.set_noise_model(NoiseModel.BITFLIP_KRAUS_OPERATOR, GateType.PAULI_Y_GATE, p) qvm.set_noise_model(NoiseModel.BITFLIP_KRAUS_OPERATOR, GateType.PAULI_Z_GATE, p) qvm.set_noise_model(NoiseModel.BITFLIP_KRAUS_OPERATOR, GateType.RX_GATE, p) qvm.set_noise_model(NoiseModel.BITFLIP_KRAUS_OPERATOR, GateType.RY_GATE, p) qvm.set_noise_model(NoiseModel.BITFLIP_KRAUS_OPERATOR, GateType.RZ_GATE, p) qvm.set_noise_model(NoiseModel.BITFLIP_KRAUS_OPERATOR, GateType.RY_GATE, p) qvm.set_noise_model(NoiseModel.BITFLIP_KRAUS_OPERATOR, GateType.HADAMARD_GATE, p) qves =[] for i in range(len(q)-1): qves.append([q[i],q[i+1]])# qves.append([q[len(q)-1],q[0]]) qvm.set_noise_model(NoiseModel.DAMPING_KRAUS_OPERATOR, GateType.CNOT_GATE, p, qves) return qvm qvc = NoiseQuantumLayer(circuit,24,"noise",1,1,diff_method= "parameter_shift", delta=0.01,noise_set_config = default_noise_config) input = QTensor([ [0., 1., 1., 1.], [0., 0., 1., 1.], [1., 0., 1., 1.] ] ) rlt = qvc(input) grad = QTensor(np.ones(rlt.data.shape)*1000) rlt.backward(grad) print(qvc.m_para.grad) #[1195., 105., 70., 0., # 45., -45., 50., 15., # -80., 50., 10., -30., # 10., 60., 75., -110., # 55., 45., 25., 5., # 5., 50., -25., -15.]
下面给出一个 noise_set_config
的例子,这里使得 RX
, RY
, RZ
, X
, Y
, Z
, H
等逻辑门加入了 p = 0.01 的 BITFLIP_KRAUS_OPERATOR噪声模型。
def noise_set_config(qvm,q):
p = 0.01
qvm.set_noise_model(NoiseModel.BITFLIP_KRAUS_OPERATOR, GateType.PAULI_X_GATE, p)
qvm.set_noise_model(NoiseModel.BITFLIP_KRAUS_OPERATOR, GateType.PAULI_Y_GATE, p)
qvm.set_noise_model(NoiseModel.BITFLIP_KRAUS_OPERATOR, GateType.PAULI_Z_GATE, p)
qvm.set_noise_model(NoiseModel.BITFLIP_KRAUS_OPERATOR, GateType.RX_GATE, p)
qvm.set_noise_model(NoiseModel.BITFLIP_KRAUS_OPERATOR, GateType.RY_GATE, p)
qvm.set_noise_model(NoiseModel.BITFLIP_KRAUS_OPERATOR, GateType.RZ_GATE, p)
qvm.set_noise_model(NoiseModel.BITFLIP_KRAUS_OPERATOR, GateType.RY_GATE, p)
qvm.set_noise_model(NoiseModel.BITFLIP_KRAUS_OPERATOR, GateType.HADAMARD_GATE, p)
qves =[]
for i in range(len(q)-1):
qves.append([q[i],q[i+1]])#
qves.append([q[len(q)-1],q[0]])
qvm.set_noise_model(NoiseModel.DAMPING_KRAUS_OPERATOR, GateType.CNOT_GATE, p, qves)
return qvm
VQCLayer
基于pyQPanda的可变量子线路VariationalQuantumCircuit,VQNet提供了抽象量子计算层 VQCLayer
。用户只需要定义一个类 VQC_wrapper
,
其中定义相应的量子线路逻辑门和测量函数即可基于pyQPanda的 VariationalQuantumCircuit
,进行机器学习模型的构建。
在 VQC_wrapper
中,用户使用普通逻辑门函数 build_common_circuits
构建模型中线路结构变化的子线路,使用VQG在 build_vqc_circuits
构建结构不变,参数变化的子线路。使用
run
函数定义线路运行方式以及测量。
- class pyvqnet.qnn.quantumlayer.VQC_wrapper
VQC_wrapper
是一个抽象类,用于在VQNet上运行VariationalQuantumCircuit。build_common_circuits
线路根据输入的不同而变化。build_vqc_circuits
构建带有可训练重量的VQC线路。run
VQC的运行函数。Example:
import pyqpanda as pq from pyqpanda import * from pyvqnet.qnn.quantumlayer import VQCLayer,VQC_wrapper class QVC_demo(VQC_wrapper): def __init__(self): super(QVC_demo, self).__init__() def build_common_circuits(self,input,qlists,): qc = pq.QCircuit() for i in range(len(qlists)): if input[i]==1: qc.insert(pq.X(qlists[i])) return qc def build_vqc_circuits(self,input,weights,machine,qlists,clists): def get_cnot(qubits): vqc = VariationalQuantumCircuit() for i in range(len(qubits)-1): vqc.insert(pq.VariationalQuantumGate_CNOT(qubits[i],qubits[i+1])) vqc.insert(pq.VariationalQuantumGate_CNOT(qubits[len(qubits)-1],qubits[0])) return vqc def build_circult(weights, xx, qubits,vqc): def Rot(weights_j, qubits): vqc = VariationalQuantumCircuit() vqc.insert(pq.VariationalQuantumGate_RZ(qubits, weights_j[0])) vqc.insert(pq.VariationalQuantumGate_RY(qubits, weights_j[1])) vqc.insert(pq.VariationalQuantumGate_RZ(qubits, weights_j[2])) return vqc #2,4,3 for i in range(2): weights_i = weights[i,:,:] for j in range(len(qubits)): weights_j = weights_i[j] vqc.insert(Rot(weights_j,qubits[j])) cnots = get_cnot(qubits) vqc.insert(cnots) vqc.insert(pq.VariationalQuantumGate_Z(qubits[0]))#pauli z(0) return vqc weights = weights.reshape([2,4,3]) vqc = VariationalQuantumCircuit() return build_circult(weights, input,qlists,vqc)
将该实例化对象 VQC_wrapper
作为参数传入 VQCLayer
- class pyvqnet.qnn.quantumlayer.VQCLayer(vqc_wrapper, para_num, machine_type_or_cloud_token, num_of_qubits: int, num_of_cbits: int = 1, diff_method: str = 'parameter_shift', delta: float = 0.01, dtype=None, name='')
pyQPanda中变分量子线路的抽象计算模块。详情请访问: https://pyqpanda-toturial.readthedocs.io/zh/latest/VQG.html。
- Parameters:
vqc_wrapper – VQC_wrapper类。
para_num – int - 参数个数。
machine_type – qpanda机器类型。
num_of_qubits – 量子比特数。
num_of_cbits – 经典比特数,默认为1。
diff_method – 求解量子线路参数梯度的方法,“参数位移”或“有限差分”,默认参数偏移。
delta – 有限差分计算梯度时的 delta。
dtype – 参数的数据类型,defaults:None,使用默认数据类型:kfloat32,代表32位浮点数。
name – 这个模块的名字, 默认为””。
- Returns:
一个可以计算量子VQC线路的模块。
Example:
import pyqpanda as pq from pyqpanda import * from pyvqnet.qnn.quantumlayer import VQCLayer,VQC_wrapper class QVC_demo(VQC_wrapper): def __init__(self): super(QVC_demo, self).__init__() def build_common_circuits(self,input,qlists,): qc = pq.QCircuit() for i in range(len(qlists)): if input[i]==1: qc.insert(pq.X(qlists[i])) return qc def build_vqc_circuits(self,input,weights,machine,qlists,clists): def get_cnot(qubits): vqc = VariationalQuantumCircuit() for i in range(len(qubits)-1): vqc.insert(pq.VariationalQuantumGate_CNOT(qubits[i],qubits[i+1])) vqc.insert(pq.VariationalQuantumGate_CNOT(qubits[len(qubits)-1],qubits[0])) return vqc def build_circult(weights, xx, qubits,vqc): def Rot(weights_j, qubits): vqc = VariationalQuantumCircuit() vqc.insert(pq.VariationalQuantumGate_RZ(qubits, weights_j[0])) vqc.insert(pq.VariationalQuantumGate_RY(qubits, weights_j[1])) vqc.insert(pq.VariationalQuantumGate_RZ(qubits, weights_j[2])) return vqc #2,4,3 for i in range(2): weights_i = weights[i,:,:] for j in range(len(qubits)): weights_j = weights_i[j] vqc.insert(Rot(weights_j,qubits[j])) cnots = get_cnot(qubits) vqc.insert(cnots) vqc.insert(pq.VariationalQuantumGate_Z(qubits[0]))#pauli z(0) return vqc weights = weights.reshape([2,4,3]) vqc = VariationalQuantumCircuit() return build_circult(weights, input,qlists,vqc) def run(self,vqc,input,machine,qlists,clists): prog = QProg() vqc_all = VariationalQuantumCircuit() # add encode circuits vqc_all.insert(self.build_common_circuits(input,qlists)) vqc_all.insert(vqc) qcir = vqc_all.feed() prog.insert(qcir) #print(pq.convert_qprog_to_originir(prog, machine)) prob = machine.prob_run_dict(prog, qlists[0], -1) prob = list(prob.values()) return prob qvc_vqc = QVC_demo() VQCLayer(qvc_vqc,24,"CPU",4)
Qconv
Qconv是一种量子卷积算法接口。 量子卷积操作采用量子线路对经典数据进行卷积操作,其无需计算乘法和加法操作,只需将数据编码到量子态,然后通过量子线路进行演化操作和测量得到最终的卷积结果。 根据卷积核的范围中的输入数据数量申请相同数量的量子比特,然后构建量子线路进行计算。
其量子线路由每个qubit上首先插入 \(RY\) , \(RZ\) 门进行编码,接着在任意两个qubit上使用 \(Z\) 以及 \(U3\) 进行信息纠缠和交换。下图为4qubits的例子
- class pyvqnet.qnn.qcnn.qconv.QConv(input_channels, output_channels, quantum_number, stride=(1, 1), padding=(0, 0), kernel_initializer=normal, machine: str = 'CPU', dtype=None, name='')
量子卷积模块。用量子线路取代Conv2D内核,conv模块的输入为形状(批次大小、输入通道、高度、宽度) Samuel et al. (2020) 。
- Parameters:
input_channels – int - 输入通道数。
output_channels – int - 输出通道数。
quantum_number – int - 单个内核的大小。
stride – tuple - 步长,默认为(1,1)。
padding – tuple - 填充,默认为(0,0)。
kernel_initializer – callable - 默认为正态分布。
machine – str - 使用的虚拟机,默认使用CPU模拟。
dtype – 参数的数据类型,defaults:None,使用默认数据类型:kfloat32,代表32位浮点数。
name – 这个模块的名字, 默认为””。
- Returns:
量子卷积层。
Example:
from pyvqnet.tensor import tensor from pyvqnet.qnn.qcnn.qconv import QConv x = tensor.ones([1,3,4,4]) layer = QConv(input_channels=3, output_channels=2, quantum_number=4, stride=(2, 2)) y = layer(x) print(y) # [ # [[[-0.0889078, -0.0889078], # [-0.0889078, -0.0889078]], # [[0.7992646, 0.7992646], # [0.7992646, 0.7992646]]] # ]
QLinear
QLinear 实现了一种量子全连接算法。首先将数据编码到量子态,然后通过量子线路进行演化操作和测量得到最终的全连接结果。
- class pyvqnet.qnn.qlinear.QLinear(input_channels, output_channels, machine: str = "CPU"))
量子全连接模块。全连接模块的输入为形状(输入通道、输出通道)。请注意,该层不带变分量子参数。
- Parameters:
input_channels – int - 输入通道数。
output_channels – int - 输出通道数。
machine – str - 使用的虚拟机,默认使用CPU模拟。
- Returns:
量子全连接层。
Exmaple:
from pyvqnet.tensor import QTensor from pyvqnet.qnn.qlinear import QLinear params = [[0.37454012, 0.95071431, 0.73199394, 0.59865848, 0.15601864, 0.15599452], [1.37454012, 0.95071431, 0.73199394, 0.59865848, 0.15601864, 0.15599452], [1.37454012, 1.95071431, 0.73199394, 0.59865848, 0.15601864, 0.15599452], [1.37454012, 1.95071431, 1.73199394, 1.59865848, 0.15601864, 0.15599452]] m = QLinear(6, 2) input = QTensor(params, requires_grad=True) output = m(input) output.backward() print(output) #[ #[0.0568473, 0.1264389], #[0.1524036, 0.1264389], #[0.1524036, 0.1442845], #[0.1524036, 0.1442845] #]
grad
- pyvqnet.qnn.quantumlayer.grad(quantum_prog_func, input_params, *args)
grad 函数提供了一种对用户设计的含参量子线路参数的梯度进行计算的接口。 用户可按照如下例子,使用pyqpanda设计线路运行函数
quantum_prog_func
,并作为参数送入grad函数。 grad函数的第二个参数则是想要计算量子逻辑门参数梯度的坐标。 返回值的形状为 [num of parameters,num of output]。- Parameters:
quantum_prog_func – pyqpanda设计的量子线路运行函数。
input_params – 待求梯度的参数。
*args – 其他输入到quantum_prog_func函数的参数。
- Returns:
参数的梯度
Examples:
from pyvqnet.qnn import grad, ProbsMeasure import pyqpanda as pq def pqctest(param): machine = pq.CPUQVM() machine.init_qvm() qubits = machine.qAlloc_many(2) circuit = pq.QCircuit() circuit.insert(pq.RX(qubits[0], param[0])) circuit.insert(pq.RY(qubits[1], param[1])) circuit.insert(pq.CNOT(qubits[0], qubits[1])) circuit.insert(pq.RX(qubits[1], param[2])) prog = pq.QProg() prog.insert(circuit) EXP = ProbsMeasure([1],prog,machine,qubits) return EXP g = grad(pqctest, [0.1,0.2, 0.3]) print(g) # [[-0.04673668 0.04673668] # [-0.09442394 0.09442394] # [-0.14409127 0.14409127]]
量子逻辑门
处理量子比特的方式就是量子逻辑门。 使用量子逻辑门,我们有意识的使量子态发生演化。量子逻辑门是构成量子算法的基础。
基本量子逻辑门
在VQNet中,我们使用本源量子自研的 pyQPanda 的各个逻辑门搭建量子线路,进行量子模拟。 当前pyQPanda支持的逻辑门可参考pyQPanda 量子逻辑门 部分的定义。 此外VQNet还封装了部分在量子机器学习中常用的量子逻辑门组合:
BasicEmbeddingCircuit
- pyvqnet.qnn.template.BasicEmbeddingCircuit(input_feat, qlist)
将n个二进制特征编码为n个量子比特的基态。
例如, 对于
features=([0, 1, 1])
, 在量子系统下其基态为 \(|011 \rangle\)。- Parameters:
input_feat –
(n)
大小的二进制输入。qlist – 构建该模板线路量子比特。
- Returns:
量子线路。
Example:
import numpy as np import pyqpanda as pq from pyvqnet.qnn.template import BasicEmbeddingCircuit input_feat = np.array([0,1,1]).reshape([3]) machine = pq.init_quantum_machine(pq.QMachineType.CPU) qlist = machine.qAlloc_many(3) circuit = BasicEmbeddingCircuit(input_feat,qlist) print(circuit) # ┌─┐ # q_0: |0>─┤X├ # ├─┤ # q_1: |0>─┤X├ # └─┘
AngleEmbeddingCircuit
- pyvqnet.qnn.template.AngleEmbeddingCircuit(input_feat, qubits, rotation: str = 'X')
将 \(N\) 特征编码到 \(n\) 量子比特的旋转角度中, 其中 \(N \leq n\)。
旋转可以选择为 : ‘X’ , ‘Y’ , ‘Z’, 如
rotation
的参数定义为:rotation='X'
将特征用作RX旋转的角度。rotation='Y'
将特征用作RY旋转的角度。rotation='Z'
将特征用作RZ旋转的角度。
features
的长度必须小于或等于量子比特的数量。如果features
中的长度少于量子比特,则线路不应用剩余的旋转门。- Parameters:
input_feat – 表示参数的numpy数组。
qubits – pyQPanda分配的量子比特。
rotation – 使用什么旋转,默认为“X”。
- Returns:
量子线路。
Example:
import numpy as np import pyqpanda as pq from pyvqnet.qnn.template import AngleEmbeddingCircuit machine = pq.init_quantum_machine(pq.QMachineType.CPU) m_qlist = machine.qAlloc_many(2) m_clist = machine.cAlloc_many(2) m_prog = pq.QProg() input_feat = np.array([2.2, 1]) C = AngleEmbeddingCircuit(input_feat,m_qlist,'X') print(C) C = AngleEmbeddingCircuit(input_feat,m_qlist,'Y') print(C) C = AngleEmbeddingCircuit(input_feat,m_qlist,'Z') print(C) pq.destroy_quantum_machine(machine) # ┌────────────┐ # q_0: |0>─┤RX(2.200000)├ # ├────────────┤ # q_1: |0>─┤RX(1.000000)├ # └────────────┘ # ┌────────────┐ # q_0: |0>─┤RY(2.200000)├ # ├────────────┤ # q_1: |0>─┤RY(1.000000)├ # └────────────┘ # ┌────────────┐ # q_0: |0>─┤RZ(2.200000)├ # ├────────────┤ # q_1: |0>─┤RZ(1.000000)├ # └────────────┘
AmplitudeEmbeddingCircuit
- pyvqnet.qnn.template.AmplitudeEmbeddingCircuit(input_feat, qubits)
将 \(2^n\) 特征编码为 \(n\) 量子比特的振幅向量。为了表示一个有效的量子态向量,
features
的L2范数必须是1。- Parameters:
input_feat – 表示参数的numpy数组。
qubits – pyQPanda分配的量子比特列表。
- Returns:
量子线路。
Example:
import numpy as np import pyqpanda as pq from pyvqnet.qnn.template import AmplitudeEmbeddingCircuit input_feat = np.array([2.2, 1, 4.5, 3.7]) machine = pq.init_quantum_machine(pq.QMachineType.CPU) m_qlist = machine.qAlloc_many(2) m_clist = machine.cAlloc_many(2) m_prog = pq.QProg() cir = AmplitudeEmbeddingCircuit(input_feat,m_qlist) print(cir) pq.destroy_quantum_machine(machine) # ┌────────────┐ ┌────────────┐ # q_0: |0>─────────────── ─── ┤RY(0.853255)├ ─── ┤RY(1.376290)├ # ┌────────────┐ ┌─┐ └──────┬─────┘ ┌─┐ └──────┬─────┘ # q_1: |0>─┤RY(2.355174)├ ┤X├ ───────■────── ┤X├ ───────■────── # └────────────┘ └─┘ └─┘
IQPEmbeddingCircuits
- pyvqnet.qnn.template.IQPEmbeddingCircuits(input_feat, qubits, rep: int = 1)
使用IQP线路的对角门将 \(n\) 特征编码为 \(n\) 量子比特。
编码是由 Havlicek et al. (2018) 提出。
通过指定
n_repeats
,可以重复基本IQP线路。- Parameters:
input_feat – 表示参数的numpy数组。
qubits – pyQPanda分配的量子比特列表。
rep – 重复量子线路块,默认次数1。
- Returns:
量子线路。
Example:
import numpy as np import pyqpanda as pq from pyvqnet.qnn.template import IQPEmbeddingCircuits machine = pq.init_quantum_machine(pq.QMachineType.CPU) input_feat = np.arange(1,100) qlist = machine.qAlloc_many(3) circuit = IQPEmbeddingCircuits(input_feat,qlist,rep = 1) print(circuit) # ┌─┐ ┌────────────┐ # q_0: |0>─┤H├ ┤RZ(1.000000)├ ───■── ────────────── ───■── ───■── ────────────── ───■── ────── ────────────── ────── # ├─┤ ├────────────┤ ┌──┴─┐ ┌────────────┐ ┌──┴─┐ │ │ # q_1: |0>─┤H├ ┤RZ(2.000000)├ ┤CNOT├ ┤RZ(2.000000)├ ┤CNOT├ ───┼── ────────────── ───┼── ───■── ────────────── ───■── # ├─┤ ├────────────┤ └────┘ └────────────┘ └────┘ ┌──┴─┐ ┌────────────┐ ┌──┴─┐ ┌──┴─┐ ┌────────────┐ ┌──┴─┐ # q_2: |0>─┤H├ ┤RZ(3.000000)├ ────── ────────────── ────── ┤CNOT├ ┤RZ(3.000000)├ ┤CNOT├ ┤CNOT├ ┤RZ(3.000000)├ ┤CNOT├ # └─┘ └────────────┘ └────┘ └────────────┘ └────┘ └────┘ └────────────┘ └────┘
RotCircuit
- pyvqnet.qnn.template.RotCircuit(para, qubits)
任意单量子比特旋转。qlist的数量应该是1,参数的数量应该是3。
\[\begin{split}R(\phi,\theta,\omega) = RZ(\omega)RY(\theta)RZ(\phi)= \begin{bmatrix} e^{-i(\phi+\omega)/2}\cos(\theta/2) & -e^{i(\phi-\omega)/2}\sin(\theta/2) \\ e^{-i(\phi-\omega)/2}\sin(\theta/2) & e^{i(\phi+\omega)/2}\cos(\theta/2) \end{bmatrix}.\end{split}\]- Parameters:
para – 表示参数 \([\phi, \theta, \omega]\) 的numpy数组。
qubits – pyQPanda分配的量子比特,只接受单个量子比特。
- Returns:
量子线路。
Example:
import numpy as np import pyqpanda as pq from pyvqnet.tensor import QTensor from pyvqnet.qnn.template import RotCircuit machine = pq.init_quantum_machine(pq.QMachineType.CPU) m_clist = machine.cAlloc_many(2) m_prog = pq.QProg() m_qlist = machine.qAlloc_many(1) param = np.array([3,4,5]) c = RotCircuit(QTensor(param),m_qlist) print(c) pq.destroy_quantum_machine(machine) # ┌────────────┐ ┌────────────┐ ┌────────────┐ # q_0: |0>─┤RZ(5.000000)├ ┤RY(4.000000)├ ┤RZ(3.000000)├ # └────────────┘ └────────────┘ └────────────┘
CRotCircuit
- pyvqnet.qnn.template.CRotCircuit(para, control_qubits, rot_qubits)
受控Rot操作符。
\[\begin{split}CR(\phi, \theta, \omega) = \begin{bmatrix} 1 & 0 & 0 & 0 \\ 0 & 1 & 0 & 0\\ 0 & 0 & e^{-i(\phi+\omega)/2}\cos(\theta/2) & -e^{i(\phi-\omega)/2}\sin(\theta/2)\\ 0 & 0 & e^{-i(\phi-\omega)/2}\sin(\theta/2) & e^{i(\phi+\omega)/2}\cos(\theta/2) \end{bmatrix}.\end{split}\]- Parameters:
para – 表示参数 \([\phi, \theta, \omega]\) 的numpy数组。
control_qubits – pyQPanda分配的控制量子比特,量子比特的数量应为1。
rot_qubits – 由pyQPanda分配的Rot量子比特,量子比特的数量应为1。
- Returns:
量子线路。
Example:
import numpy as np import pyqpanda as pq from pyvqnet.tensor import QTensor from pyvqnet.qnn.template import CRotCircuit machine = pq.init_quantum_machine(pq.QMachineType.CPU) m_clist = machine.cAlloc_many(2) m_prog = pq.QProg() m_qlist = machine.qAlloc_many(1) param = np.array([3,4,5]) control_qlist = machine.qAlloc_many(1) c = CRotCircuit(QTensor(param),control_qlist,m_qlist) print(c) pq.destroy_quantum_machine(machine) # ┌────────────┐ ┌────────────┐ ┌────────────┐ # q_0: |0>─┤RZ(5.000000)├ ┤RY(4.000000)├ ┤RZ(3.000000)├ # └──────┬─────┘ └──────┬─────┘ └──────┬─────┘ # q_1: |0>────────■────── ───────■────── ───────■──────
CSWAPcircuit
- pyvqnet.qnn.template.CSWAPcircuit(qubits)
受控SWAP线路。
\[\begin{split}CSWAP = \begin{bmatrix} 1 & 0 & 0 & 0 & 0 & 0 & 0 & 0 \\ 0 & 1 & 0 & 0 & 0 & 0 & 0 & 0 \\ 0 & 0 & 1 & 0 & 0 & 0 & 0 & 0 \\ 0 & 0 & 0 & 1 & 0 & 0 & 0 & 0 \\ 0 & 0 & 0 & 0 & 1 & 0 & 0 & 0 \\ 0 & 0 & 0 & 0 & 0 & 0 & 1 & 0 \\ 0 & 0 & 0 & 0 & 0 & 1 & 0 & 0 \\ 0 & 0 & 0 & 0 & 0 & 0 & 0 & 1 \end{bmatrix}.\end{split}\]Note
提供的第一个量子比特对应于 control qubit 。
- Parameters:
qubits – pyQPanda分配的量子比特列表第一个量子比特是控制量子比特。qlist的长度必须为3。
- Returns:
量子线路。
Example:
from pyvqnet.qnn.template import CSWAPcircuit import pyqpanda as pq machine = pq.init_quantum_machine(pq.QMachineType.CPU) m_qlist = machine.qAlloc_many(3) c = CSWAPcircuit([m_qlist[1],m_qlist[2],m_qlist[0]]) print(c) pq.destroy_quantum_machine(machine) # q_0: |0>─X─ # │ # q_1: |0>─■─ # │ # q_2: |0>─X─
Controlled_Hadamard
- pyvqnet.qnn.template.Controlled_Hadamard(qubits)
受控Hadamard逻辑门
\[\begin{split}CH = \begin{bmatrix} 1 & 0 & 0 & 0 \\ 0 & 1 & 0 & 0 \\ 0 & 0 & \frac{1}{\sqrt{2}} & \frac{1}{\sqrt{2}} \\ 0 & 0 & \frac{1}{\sqrt{2}} & -\frac{1}{\sqrt{2}} \end{bmatrix}.\end{split}\]- Parameters:
qubits – 使用pyqpanda申请的量子比特。
Examples:
import pyqpanda as pq machine = pq.CPUQVM() machine.init_qvm() qubits = machine.qAlloc_many(2) from pyvqnet.qnn import Controlled_Hadamard cir = Controlled_Hadamard(qubits) print(cir) # q_0: |0>──────────────── ──■─ ────────────── # ┌─────────────┐ ┌─┴┐ ┌────────────┐ # q_1: |0>─┤RY(-0.785398)├ ┤CZ├ ┤RY(0.785398)├ # └─────────────┘ └──┘ └────────────┘
CCZ
- pyvqnet.qnn.template.CCZ(qubits)
受控-受控-Z (controlled-controlled-Z) 逻辑门。
\[\begin{split}CCZ = \begin{pmatrix} 1 & 0 & 0 & 0 & 0 & 0 & 0 & 0\\ 0 & 1 & 0 & 0 & 0 & 0 & 0 & 0\\ 0 & 0 & 1 & 0 & 0 & 0 & 0 & 0\\ 0 & 0 & 0 & 1 & 0 & 0 & 0 & 0\\ 0 & 0 & 0 & 0 & 1 & 0 & 0 & 0\\ 0 & 0 & 0 & 0 & 0 & 1 & 0 & 0\\ 0 & 0 & 0 & 0 & 0 & 0 & 1 & 0\\ 0 & 0 & 0 & 0 & 0 & 0 & 0 & -1 \end{pmatrix}\end{split}\]- Parameters:
qubits – 使用pyqpanda申请的量子比特。
- Returns:
pyqpanda QCircuit
Example:
import pyqpanda as pq machine = pq.CPUQVM() machine.init_qvm() qubits = machine.qAlloc_many(3) from pyvqnet.qnn import CCZ cir = CCZ(qubits) print(cir) # q_0: |0>─────── ─────── ───■── ─── ────── ─────── ───■── ───■── ┤T├──── ───■── # │ ┌─┐ │ ┌──┴─┐ ├─┴───┐ ┌──┴─┐ # q_1: |0>────■── ─────── ───┼── ─── ───■── ┤T├──── ───┼── ┤CNOT├ ┤T.dag├ ┤CNOT├ # ┌──┴─┐ ┌─────┐ ┌──┴─┐ ┌─┐ ┌──┴─┐ ├─┴───┐ ┌──┴─┐ ├─┬──┘ ├─┬───┘ ├─┬──┘ # q_2: |0>─┤CNOT├ ┤T.dag├ ┤CNOT├ ┤T├ ┤CNOT├ ┤T.dag├ ┤CNOT├ ┤T├─── ┤H├──── ┤H├─── # └────┘ └─────┘ └────┘ └─┘ └────┘ └─────┘ └────┘ └─┘ └─┘ └─┘
BlockEncode
- pyvqnet.qnn.template.BlockEncode(A, qlists)
构建一个单一的 pyqpanda 电路 \(U(A)\) 使得任意矩阵 \(A\) 被编码在左上角的块中。
- Parameters:
A – 在电路中编码的输入矩阵。
qlists – 要编码的量子位列表。
- Returns:
一个 pyqpanda QCircuit。
\[\begin{split}\begin{align} U(A) &= \begin{bmatrix} A & \sqrt{I-AA^\dagger} \\ \sqrt{I-A^\dagger A} & -A^\dagger \end{bmatrix}. \end{align}\end{split}\]Example:
from pyvqnet.tensor import QTensor import pyvqnet import pyqpanda as pq from pyvqnet.qnn import BlockEncode A = QTensor([[0.1, 0.2], [0.3, 0.4]], dtype=pyvqnet.kfloat32) machine = pq.CPUQVM() machine.init_qvm() qlist = machine.qAlloc_many(2) cbits = machine.cAlloc_many(2) cir = BlockEncode(A, qlist) prog = pq.QProg() prog.insert(cir) result = machine.directly_run(prog) print(cir) # ┌───────────┐ # q_0: |0>─┤0 ├ # │ Unitary │ # q_1: |0>─┤1 ├ # └───────────┘
Random_Init_Quantum_State
- pyvqnet.qnn.template.Random_Init_Quantum_State(qlists)
使用振幅编码产生任意的量子初态编码到线路上。注意线路的深度由于振幅编码会产生很大的变化。
- Parameters:
qlists – pyqpanda 申请的量子比特。
- Returns:
pyqpanda QCircuit。
Example:
import pyqpanda as pq from pyvqnet.qnn.template import Random_Init_Quantum_State cir = pq.QCircuit() m_machine = pq.init_quantum_machine(pq.QMachineType.CPU) m_qlist = m_machine.qAlloc_many(3) c = Random_Init_Quantum_State(m_qlist) print(c) # q_0: |0>─────────────── ─── ────────────── ─── ┤RY(0.583047)├ ─── ┤RY(0.176308)├ ─── ────────────── > # ┌────────────┐ ┌─┐ └──────┬─────┘ ┌─┐ └──────┬─────┘ ┌────────────┐ > # q_1: |0>─────────────── ─── ┤RY(1.062034)├ ┤X├ ───────■────── ┤X├ ───────■────── ─── ┤RY(1.724022)├ > # ┌────────────┐ ┌─┐ └──────┬─────┘ └┬┘ │ └┬┘ │ ┌─┐ └──────┬─────┘ > # q_2: |0>─┤RY(1.951150)├ ┤X├ ───────■────── ─■─ ───────■────── ─■─ ───────■────── ┤X├ ───────■────── > # └────────────┘ └─┘ └─┘ > # ┌────────────┐ ┌────────────┐ # q_0: |0>─── ┤RY(1.251911)├ ─── ┤RY(1.389063)├ # ┌─┐ └──────┬─────┘ ┌─┐ └──────┬─────┘ # q_1: |0>┤X├ ───────■────── ┤X├ ───────■────── # └┬┘ │ └┬┘ │ # q_2: |0>─■─ ───────■────── ─■─ ───────■──────
FermionicSingleExcitation
- pyvqnet.qnn.template.FermionicSingleExcitation(weight, wires, qubits)
对泡利矩阵的张量积求幂的耦合簇单激励算子。矩阵形式下式给出:
\[\hat{U}_{pr}(\theta) = \mathrm{exp} \{ \theta_{pr} (\hat{c}_p^\dagger \hat{c}_r -\mathrm{H.c.}) \},\]- Parameters:
weight – 量子比特 p 上的变参.
wires – 表示区间[r, p]中的量子比特索引子集。最小长度必须为2。第一索引值被解释为r,最后一个索引值被解释为p。 中间的索引被CNOT门作用,以计算量子位集的奇偶校验。
qubits – pyqpanda申请的量子比特。
- Returns:
pyqpanda QCircuit
Examples:
from pyvqnet.qnn import FermionicSingleExcitation, expval weight = 0.5 import pyqpanda as pq machine = pq.CPUQVM() machine.init_qvm() qlists = machine.qAlloc_many(3) cir = FermionicSingleExcitation(weight, [1, 0, 2], qlists) prog = pq.QProg() prog.insert(cir) pauli_dict = {'Z0': 1} exp2 = expval(machine, prog, pauli_dict, qlists) print(f"vqnet {exp2}") #vqnet 1.13
FermionicDoubleExcitation
- pyvqnet.qnn.template.FermionicDoubleExcitation(weight, wires1, wires2, qubits)
对泡利矩阵的张量积求幂的耦合聚类双激励算子,矩阵形式由下式给出:
\[\hat{U}_{pqrs}(\theta) = \mathrm{exp} \{ \theta (\hat{c}_p^\dagger \hat{c}_q^\dagger \hat{c}_r \hat{c}_s - \mathrm{H.c.}) \},\]其中 \(\hat{c}\) 和 \(\hat{c}^\dagger\) 是费米子湮灭和 创建运算符和索引 \(r, s\) 和 \(p, q\) 在占用的和 分别为空分子轨道。 使用 Jordan-Wigner 变换 上面定义的费米子算子可以写成 根据 Pauli 矩阵(有关更多详细信息,请参见 arXiv:1805.04340)
\[\begin{split}\hat{U}_{pqrs}(\theta) = \mathrm{exp} \Big\{ \frac{i\theta}{8} \bigotimes_{b=s+1}^{r-1} \hat{Z}_b \bigotimes_{a=q+1}^{p-1} \hat{Z}_a (\hat{X}_s \hat{X}_r \hat{Y}_q \hat{X}_p + \hat{Y}_s \hat{X}_r \hat{Y}_q \hat{Y}_p +\\ \hat{X}_s \hat{Y}_r \hat{Y}_q \hat{Y}_p + \hat{X}_s \hat{X}_r \hat{X}_q \hat{Y}_p - \mathrm{H.c.} ) \Big\}\end{split}\]- Parameters:
weight – 可变参数
wires1 – 代表的量子比特的索引列表区间 [s, r] 中占据量子比特的子集。第一个索引被解释为 s,最后一索引被解释为 r。 CNOT 门对中间的索引进行操作,以计算一组量子位的奇偶性。
wires2 – 代表的量子比特的索引列表区间 [q, p] 中占据量子比特的子集。第一根索引被解释为 q,最后一索引被解释为 p。 CNOT 门对中间的索引进行操作,以计算一组量子位的奇偶性。
qubits – pyqpanda申请的量子比特。
- Returns:
pyqpanda QCircuit
Examples:
import pyqpanda as pq from pyvqnet.qnn import FermionicDoubleExcitation, expval machine = pq.CPUQVM() machine.init_qvm() qlists = machine.qAlloc_many(5) weight = 1.5 cir = FermionicDoubleExcitation(weight, wires1=[0, 1], wires2=[2, 3, 4], qubits=qlists) prog = pq.QProg() prog.insert(cir) pauli_dict = {'Z0': 1} exp2 = expval(machine, prog, pauli_dict, qlists) print(f"vqnet {exp2}") #vqnet 1.58
UCCSD
- pyvqnet.qnn.template.UCCSD(weights, wires, s_wires, d_wires, init_state, qubits)
实现酉耦合簇单激发和双激发拟设(UCCSD)。UCCSD 是 VQE 拟设,通常用于运行量子化学模拟。
在一阶 Trotter 近似内,UCCSD 酉函数由下式给出:
\[\hat{U}(\vec{\theta}) = \prod_{p > r} \mathrm{exp} \Big\{\theta_{pr} (\hat{c}_p^\dagger \hat{c}_r-\mathrm{H.c.}) \Big\} \prod_{p > q > r > s} \mathrm{exp} \Big\{\theta_{pqrs} (\hat{c}_p^\dagger \hat{c}_q^\dagger \hat{c}_r \hat{c}_s-\mathrm{H.c.}) \Big\}\]其中 \(\hat{c}\) 和 \(\hat{c}^\dagger\) 是费米子湮灭和 创建运算符和索引 \(r, s\) 和 \(p, q\) 在占用的和 分别为空分子轨道。(更多细节见 arXiv:1805.04340):
- Parameters:
weights – 包含参数的大小
(len(s_wires)+ len(d_wires))
张量 \(\theta_{pr}\) 和 \(\theta_{pqrs}\) 输入 Z 旋转FermionicSingleExcitation
和FermionicDoubleExcitation
。wires – 模板作用的量子比特索引
s_wires – 包含量子比特索引的列表序列
[r,...,p]
由单一激发产生 \(\vert r, p \rangle = \hat{c}_p^\dagger \hat{c}_r \vert \mathrm{HF} \rangle\), 其中 \(\vert \mathrm{HF} \rangle\) 表示 Hartee-Fock 参考态。d_wires – 列表序列,每个列表包含两个列表 指定索引
[s, ...,r]
和[q,..., p]
定义双激励 \(\vert s, r, q, p \rangle = \hat{c}_p^\dagger \hat{c}_q^\dagger \hat{c}_r\hat{c}_s \vert \mathrm{HF} \rangle\) 。init_state – 长度
len(wires)
occupation-number vector 表示 高频状态。init_state
在量子比特初始化状态。qubits – pyqpanda分配的量子位。
Examples:
import pyqpanda as pq from pyvqnet.tensor import tensor from pyvqnet.qnn import UCCSD, expval machine = pq.CPUQVM() machine.init_qvm() qlists = machine.qAlloc_many(6) weight = tensor.zeros([8]) cir = UCCSD(weight,wires = [0,1,2,3,4,5,6], s_wires=[[0, 1, 2], [0, 1, 2, 3, 4], [1, 2, 3], [1, 2, 3, 4, 5]], d_wires=[[[0, 1], [2, 3]], [[0, 1], [2, 3, 4, 5]], [[0, 1], [3, 4]], [[0, 1], [4, 5]]], init_state=[1, 1, 0, 0, 0, 0], qubits=qlists) prog = pq.QProg() prog.insert(cir) pauli_dict = {'Z0': 1} exp2 = expval(machine, prog, pauli_dict, qlists) print(f"vqnet {exp2}") #vqnet -1.04
QuantumPoolingCircuit
- pyvqnet.qnn.template.QuantumPoolingCircuit(sources_wires, sinks_wires, params, qubits)
对数据进行降采样的量子电路。
为了减少电路中的量子位数量,首先在系统中创建成对的量子位。在最初配对所有量子位之后,将广义2量子位酉元应用于每一对量子位上。并在应用这两个量子位酉元之后,在神经网络的其余部分忽略每对量子位中的一个量子位。
- Parameters:
sources_wires – 将被忽略的源量子位索引。
sinks_wires – 将保留的目标量子位索引。
params – 输入参数。
qubits – 由 pyqpanda 分配的 qubits 列表。
- Returns:
pyqpanda QCircuit
Examples:
from pyvqnet.qnn import QuantumPoolingCircuit import pyqpanda as pq from pyvqnet import tensor machine = pq.CPUQVM() machine.init_qvm() qlists = machine.qAlloc_many(4) p = tensor.full([6], 0.35) cir = QuantumPoolingCircuit([0, 1], [2, 3], p, qlists) print(cir) # ┌────┐ ┌────────────┐ ! # > # q_0: |0>──────────────── ┤CNOT├ ┤RZ(0.350000)├ ───■── ────────────── ────! ─────────────── ────── ────────────── # > # └──┬─┘ └────────────┘ │ ! ┌────┐ ┌────────────┐ # > # q_1: |0>──────────────── ───┼── ────────────── ───┼── ────────────── ────! ─────────────── ┤CNOT├ ┤RZ(0.350000)├ # > # ┌─────────────┐ │ ┌────────────┐ ┌──┴─┐ ┌────────────┐ ! └──┬─┘ └────────────┘ # > # q_2: |0>─┤RZ(-1.570796)├ ───■── ┤RY(0.350000)├ ┤CNOT├ ┤RY(0.350000)├ ────! ─────────────── ───┼── ────────────── # > # └─────────────┘ └────────────┘ └────┘ └────────────┘ ! ┌─────────────┐ │ ┌────────────┐ # > # q_3: |0>──────────────── ────── ────────────── ────── ────────────── ────! ┤RZ(-1.570796)├ ───■── ┤RY(0.350000)├ # > # ! └─────────────┘ └────────────┘ # > # ! # q_0: |0>────── ────────────── ────! # ! # q_1: |0>───■── ────────────── ────! # │ ! # q_2: |0>───┼── ────────────── ────! # ┌──┴─┐ ┌────────────┐ ! # q_3: |0>┤CNOT├ ┤RY(0.350000)├ ────!
常用量子线路组合
VQNet提供了量子机器学习研究中常用的一些量子线路
HardwareEfficientAnsatz
- class pyvqnet.qnn.ansatz.HardwareEfficientAnsatz(n_qubits, single_rot_gate_list, qubits, entangle_gate='CNOT', entangle_rules='linear', depth=1)
论文介绍的Hardware Efficient Ansatz的实现: Hardware-efficient Variational Quantum Eigensolver for Small Molecules 。
- Parameters:
n_qubits – 量子比特数。
single_rot_gate_list – 单个量子位旋转门列表由一个或多个作用于每个量子位的旋转门构成。目前支持 Rx、Ry、Rz。
qubits – 由 pyqpanda 分配的量子位。
entangle_gate – 非参数化纠缠门。支持CNOT、CZ。默认: CNOT。
entangle_rules – 电路中如何使用纠缠门。
linear
意味着纠缠门将作用于每个相邻的量子位。all
意味着纠缠门将作用于任何两个 qbuits。 默认值:linear
。depth – ansatz 的深度,默认:1。
Example:
import pyqpanda as pq from pyvqnet.tensor import QTensor,tensor from pyvqnet.qnn.ansatz import HardwareEfficientAnsatz machine = pq.CPUQVM() machine.init_qvm() qlist = machine.qAlloc_many(4) c = HardwareEfficientAnsatz(4, ["rx", "RY", "rz"], qlist, entangle_gate="cnot", entangle_rules="linear", depth=1) w = tensor.ones([c.get_para_num()]) cir = c.create_ansatz(w) print(cir) # ┌────────────┐ ┌────────────┐ ┌────────────┐ ┌────────────┐ ┌────────────┐ ┌────────────┐ # q_0: |0>─┤RX(1.000000)├ ┤RY(1.000000)├ ┤RZ(1.000000)├ ───■── ┤RX(1.000000)├ ┤RY(1.000000)├ ┤RZ(1.000000)├ ────────────── ────────────── # ├────────────┤ ├────────────┤ ├────────────┤ ┌──┴─┐ └────────────┘ ├────────────┤ ├────────────┤ ┌────────────┐ # q_1: |0>─┤RX(1.000000)├ ┤RY(1.000000)├ ┤RZ(1.000000)├ ┤CNOT├ ───■────────── ┤RX(1.000000)├ ┤RY(1.000000)├ ┤RZ(1.000000)├ ────────────── # ├────────────┤ ├────────────┤ ├────────────┤ └────┘ ┌──┴─┐ └────────────┘ ├────────────┤ ├────────────┤ ┌────────────┐ # q_2: |0>─┤RX(1.000000)├ ┤RY(1.000000)├ ┤RZ(1.000000)├ ────── ┤CNOT├──────── ───■────────── ┤RX(1.000000)├ ┤RY(1.000000)├ ┤RZ(1.000000)├ # ├────────────┤ ├────────────┤ ├────────────┤ └────┘ ┌──┴─┐ ├────────────┤ ├────────────┤ ├────────────┤ # q_3: |0>─┤RX(1.000000)├ ┤RY(1.000000)├ ┤RZ(1.000000)├ ────── ────────────── ┤CNOT├──────── ┤RX(1.000000)├ ┤RY(1.000000)├ ┤RZ(1.000000)├ # └────────────┘ └────────────┘ └────────────┘ └────┘ └────────────┘ └────────────┘ └────────────┘
BasicEntanglerTemplate
- class pyvqnet.qnn.template.BasicEntanglerTemplate(weights=None, num_qubits=1, rotation=pyqpanda.RX)
由每个量子位上的单参数单量子位旋转组成的层,后跟一个闭合链或环组合的多个CNOT 门。
CNOT 门环将每个量子位与其邻居连接起来,最后一个量子位被认为是第一个量子位的邻居。
层数 \(L\) 由参数
weights
的第一个维度决定。- Parameters:
weights – 形状的权重张量 (L, len(qubits))。 每个权重都用作量子含参门中的参数。默认值为:
None
,则使用 (1,1) 正态分布随机数作为权重。num_qubits – 量子比特数,默认为1。
rotation – 使用单参数单量子比特门,
pyqpanda.RX
被用作默认值。
Example:
import pyqpanda as pq import numpy as np from pyvqnet.qnn.template import BasicEntanglerTemplate np.random.seed(42) num_qubits = 5 shape = [1, num_qubits] weights = np.random.random(size=shape) machine = pq.CPUQVM() machine.init_qvm() qubits = machine.qAlloc_many(num_qubits) circuit = BasicEntanglerTemplate(weights=weights, num_qubits=num_qubits, rotation=pq.RZ) result = circuit.create_circuit(qubits) circuit.print_circuit(qubits) prob = machine.prob_run_dict(result, qubits[0], -1) prob = list(prob.values()) print(prob) # ┌────────────┐ ┌────┐ # q_0: |0>─┤RZ(0.374540)├ ───■── ────── ────── ────── ┤CNOT├ # ├────────────┤ ┌──┴─┐ └──┬─┘ # q_1: |0>─┤RZ(0.950714)├ ┤CNOT├ ───■── ────── ────── ───┼── # ├────────────┤ └────┘ ┌──┴─┐ │ # q_2: |0>─┤RZ(0.731994)├ ────── ┤CNOT├ ───■── ────── ───┼── # ├────────────┤ └────┘ ┌──┴─┐ │ # q_3: |0>─┤RZ(0.598658)├ ────── ────── ┤CNOT├ ───■── ───┼── # ├────────────┤ └────┘ ┌──┴─┐ │ # q_4: |0>─┤RZ(0.156019)├ ────── ────── ────── ┤CNOT├ ───■── # └────────────┘ └────┘ # [1.0, 0.0]
StronglyEntanglingTemplate
- class pyvqnet.qnn.template.StronglyEntanglingTemplate(weights=None, num_qubits=1, ranges=None)
由单个量子比特旋转和纠缠器组成的层,参考 circuit-centric classifier design .
参数
weights
包含每一层的权重。 因此得出层数 \(L\) 等于weights
的第一个维度。其包含2-qubit CNOT 门,作用于 \(M\) 个量子比特上,\(i = 1,...,M\)。 每个门的第二个量子位标号由公式 \((i+r)\mod M\) 给出,其中 \(r\) 是一个称为
range
的超参数,并且 \(0 < r < M\)。- Parameters:
weights – 形状为
(L, M, 3)
的权重张量,默认值:None,使用形状为(1,1,3)
的随机张量。num_qubits – 量子比特数,默认值:1。
ranges – 确定每个后续层的范围超参数的序列; 默认值:None,使用 \(r=l \ mod M\) 作为ranges 的值。
Example:
import pyqpanda as pq import numpy as np from pyvqnet.qnn.template import StronglyEntanglingTemplate np.random.seed(42) num_qubits = 3 shape = [2, num_qubits, 3] weights = np.random.random(size=shape) machine = pq.CPUQVM() machine.init_qvm() qubits = machine.qAlloc_many(num_qubits) circuit = StronglyEntanglingTemplate(weights, num_qubits=num_qubits) result = circuit.create_circuit(qubits) circuit.print_circuit(qubits) prob = machine.prob_run_dict(result, qubits[0], -1) prob = list(prob.values()) print(prob) # ┌────────────┐ ┌────────────┐ ┌────────────┐ ┌────┐ ┌────────────┐ > # q_0: |0>─┤RZ(0.374540)├ ┤RY(0.950714)├ ┤RZ(0.731994)├ ───■── ────── ┤CNOT├──────────── ┤RZ(0.708073)├ > # ├────────────┤ ├────────────┤ ├────────────┤ ┌──┴─┐ └──┬┬┴───────────┐ ├────────────┤ > # q_1: |0>─┤RZ(0.598658)├ ┤RY(0.156019)├ ┤RZ(0.155995)├ ┤CNOT├ ───■── ───┼┤RZ(0.832443)├ ┤RY(0.212339)├ > # ├────────────┤ ├────────────┤ ├────────────┤ └────┘ ┌──┴─┐ │└────────────┘ ├────────────┤ > # q_2: |0>─┤RZ(0.058084)├ ┤RY(0.866176)├ ┤RZ(0.601115)├ ────── ┤CNOT├ ───■────────────── ┤RZ(0.183405)├ > # └────────────┘ └────────────┘ └────────────┘ └────┘ └────────────┘ > # # ┌────────────┐ ┌────────────┐ ┌────┐ # q_0: |0>┤RY(0.020584)├ ┤RZ(0.969910)├ ───■── ┤CNOT├ ────── # ├────────────┤ └────────────┘ │ └──┬─┘ ┌────┐ # q_1: |0>┤RZ(0.181825)├ ────────────── ───┼── ───■── ┤CNOT├ # ├────────────┤ ┌────────────┐ ┌──┴─┐ └──┬─┘ # q_2: |0>┤RY(0.304242)├ ┤RZ(0.524756)├ ┤CNOT├ ────── ───■── # └────────────┘ └────────────┘ └────┘ #[0.6881335561525671, 0.31186644384743273]
ComplexEntangelingTemplate
- class pyvqnet.qnn.ComplexEntangelingTemplate(weights, num_qubits, depth)
由 U3 门和 CNOT 门组成的强纠缠层。 此线路模板来自以下论文:https://arxiv.org/abs/1804.00633。
- Parameters:
weights – 参数,[depth,num_qubits,3]的形状
num_qubits – 量子比特数。
depth – 子电路的深度。
Example:
from pyvqnet.qnn import ComplexEntangelingTemplate import pyqpanda as pq from pyvqnet.tensor import * depth =3 num_qubits = 8 shape = [depth, num_qubits, 3] weights = tensor.randn(shape) machine = pq.CPUQVM() machine.init_qvm() qubits = machine.qAlloc_many(num_qubits) circuit = ComplexEntangelingTemplate(weights, num_qubits=num_qubits,depth=depth) result = circuit.create_circuit(qubits) circuit.print_circuit(qubits) # q_0: |0>─┤U3(1.115555,-0.025096,1.326895)├── ───■── ────── ───────────────────────────────── ────────────────────────────────── > # ├───────────────────────────────┴─┐ ┌──┴─┐ ┌───────────────────────────────┐ > # q_1: |0>─┤U3(-0.884622,-0.239700,-0.701955)├ ┤CNOT├ ───■── ┤U3(0.811768,0.537290,-0.433107)├ ────────────────────────────────── > # ├────────────────────────────────┬┘ └────┘ ┌──┴─┐ └───────────────────────────────┘ ┌────────────────────────────────┐ > # q_2: |0>─┤U3(-0.387148,-0.322480,0.238582)├─ ────── ┤CNOT├ ───■───────────────────────────── ┤U3(-0.188015,-1.828407,0.070222)├ > # ├────────────────────────────────┤ └────┘ ┌──┴─┐ └────────────────────────────────┘ > # q_3: |0>─┤U3(-0.679633,1.638090,-1.341497)├─ ────── ────── ┤CNOT├─────────────────────────── ───■────────────────────────────── > # ├──────────────────────────────┬─┘ └────┘ ┌──┴─┐ > # q_4: |0>─┤U3(2.073888,1.251795,0.238305)├─── ────── ────── ───────────────────────────────── ┤CNOT├──────────────────────────── > # ├──────────────────────────────┤ └────┘ > # q_5: |0>─┤U3(0.247473,2.772012,1.864166)├─── ────── ────── ───────────────────────────────── ────────────────────────────────── > # ├──────────────────────────────┴─┐ > # q_6: |0>─┤U3(-1.421337,-0.866551,0.739282)├─ ────── ────── ───────────────────────────────── ────────────────────────────────── > # ├────────────────────────────────┤ > # q_7: |0>─┤U3(-3.707045,0.690364,-0.979904)├─ ────── ────── ───────────────────────────────── ────────────────────────────────── > # └────────────────────────────────┘ > # > # q_0: |0>────────────────────────────────── ────────────────────────────────── ──────────────────────────────── > # > # q_1: |0>────────────────────────────────── ────────────────────────────────── ──────────────────────────────── > # > # q_2: |0>────────────────────────────────── ────────────────────────────────── ──────────────────────────────── > # ┌────────────────────────────────┐ > # q_3: |0>┤U3(0.516395,-0.823623,-0.804430)├ ────────────────────────────────── ──────────────────────────────── > # └────────────────────────────────┘ ┌────────────────────────────────┐ > # q_4: |0>───■────────────────────────────── ┤U3(-1.420068,1.063462,-0.107385)├ ──────────────────────────────── > # ┌──┴─┐ └────────────────────────────────┘ ┌──────────────────────────────┐ > # q_5: |0>┤CNOT├──────────────────────────── ───■────────────────────────────── ┤U3(0.377809,0.204278,0.386830)├ > # └────┘ ┌──┴─┐ └──────────────────────────────┘ > # q_6: |0>────────────────────────────────── ┤CNOT├──────────────────────────── ───■──────────────────────────── > # └────┘ ┌──┴─┐ > # q_7: |0>────────────────────────────────── ────────────────────────────────── ┤CNOT├────────────────────────── > # └────┘ > # ┌────┐ ┌────────────────────────────────┐ > # q_0: |0>┤CNOT├──────────────────────────────── ┤U3(-0.460444,-1.150054,0.318044)├ ───■── ────── ────────────────────────────────── > # └──┬─┘ └────────────────────────────────┘ ┌──┴─┐ ┌────────────────────────────────┐ > # q_1: |0>───┼────────────────────────────────── ────────────────────────────────── ┤CNOT├ ───■── ┤U3(-1.255487,0.589956,-0.378491)├ > # │ └────┘ ┌──┴─┐ └────────────────────────────────┘ > # q_2: |0>───┼────────────────────────────────── ────────────────────────────────── ────── ┤CNOT├ ───■────────────────────────────── > # │ └────┘ ┌──┴─┐ > # q_3: |0>───┼────────────────────────────────── ────────────────────────────────── ────── ────── ┤CNOT├──────────────────────────── > # │ └────┘ > # q_4: |0>───┼────────────────────────────────── ────────────────────────────────── ────── ────── ────────────────────────────────── > # │ > # q_5: |0>───┼────────────────────────────────── ────────────────────────────────── ────── ────── ────────────────────────────────── > # │┌────────────────────────────────┐ > # q_6: |0>───┼┤U3(-0.760777,-0.867848,0.016680)├ ────────────────────────────────── ────── ────── ────────────────────────────────── > # │└────────────────────────────────┘ ┌────────────────────────────────┐ > # q_7: |0>───■────────────────────────────────── ┤U3(-1.462434,-0.173843,1.211081)├ ────── ────── ────────────────────────────────── > # └────────────────────────────────┘ > # > # q_0: |0>───────────────────────────────── ───────────────────────────────── ──────────────────────────────── > # > # q_1: |0>───────────────────────────────── ───────────────────────────────── ──────────────────────────────── > # ┌───────────────────────────────┐ > # q_2: |0>┤U3(0.558638,0.218889,-0.241834)├ ───────────────────────────────── ──────────────────────────────── > # └───────────────────────────────┘ ┌───────────────────────────────┐ > # q_3: |0>───■───────────────────────────── ┤U3(0.740361,-0.336978,0.171089)├ ──────────────────────────────── > # ┌──┴─┐ └───────────────────────────────┘ ┌──────────────────────────────┐ > # q_4: |0>┤CNOT├─────────────────────────── ───■───────────────────────────── ┤U3(0.585393,0.204842,0.682543)├ > # └────┘ ┌──┴─┐ └──────────────────────────────┘ > # q_5: |0>───────────────────────────────── ┤CNOT├─────────────────────────── ───■──────────────────────────── > # └────┘ ┌──┴─┐ > # q_6: |0>───────────────────────────────── ───────────────────────────────── ┤CNOT├────────────────────────── > # └────┘ > # q_7: |0>───────────────────────────────── ───────────────────────────────── ──────────────────────────────── > # > # ┌────┐ ┌───────────────────────────────┐ > # q_0: |0>─────────────────────────────────── ┤CNOT├────────────────────────────── ┤U3(0.657827,1.434924,-0.328996)├ > # └──┬─┘ └───────────────────────────────┘ > # q_1: |0>─────────────────────────────────── ───┼──────────────────────────────── ───────────────────────────────── > # │ > # q_2: |0>─────────────────────────────────── ───┼──────────────────────────────── ───────────────────────────────── > # │ > # q_3: |0>─────────────────────────────────── ───┼──────────────────────────────── ───────────────────────────────── > # │ > # q_4: |0>─────────────────────────────────── ───┼──────────────────────────────── ───────────────────────────────── > # ┌─────────────────────────────────┐ │ > # q_5: |0>┤U3(-2.134247,-0.783461,-0.200094)├ ───┼──────────────────────────────── ───────────────────────────────── > # └─────────────────────────────────┘ │┌──────────────────────────────┐ > # q_6: |0>───■─────────────────────────────── ───┼┤U3(1.816030,0.572931,1.683584)├ ───────────────────────────────── > # ┌──┴─┐ │└──────────────────────────────┘ ┌───────────────────────────────┐ > # q_7: |0>┤CNOT├───────────────────────────── ───■──────────────────────────────── ┤U3(0.661537,0.214565,-0.325014)├ > # └────┘ └───────────────────────────────┘ > # ┌────┐ # q_0: |0>───■── ────── ────── ────── ────── ────── ────── ┤CNOT├ # ┌──┴─┐ └──┬─┘ # q_1: |0>┤CNOT├ ───■── ────── ────── ────── ────── ────── ───┼── # └────┘ ┌──┴─┐ │ # q_2: |0>────── ┤CNOT├ ───■── ────── ────── ────── ────── ───┼── # └────┘ ┌──┴─┐ │ # q_3: |0>────── ────── ┤CNOT├ ───■── ────── ────── ────── ───┼── # └────┘ ┌──┴─┐ │ # q_4: |0>────── ────── ────── ┤CNOT├ ───■── ────── ────── ───┼── # └────┘ ┌──┴─┐ │ # q_5: |0>────── ────── ────── ────── ┤CNOT├ ───■── ────── ───┼── # └────┘ ┌──┴─┐ │ # q_6: |0>────── ────── ────── ────── ────── ┤CNOT├ ───■── ───┼── # └────┘ ┌──┴─┐ │ # q_7: |0>────── ────── ────── ────── ────── ────── ┤CNOT├ ───■──
Quantum_Embedding
- class pyvqnet.qnn.Quantum_Embedding(qubits, machine, num_repetitions_input, depth_input, num_unitary_layers, num_repetitions)
使用 RZ,RY,RZ 创建变分量子电路,将经典数据编码为量子态。 参考 Quantum embeddings for machine learning。 在初始化该类后,其成员函数
compute_circuit
为运行函数,可作为参数输入QuantumLayerV2
类构成量子机器学习模型的一层。- Parameters:
qubits – 使用pyqpanda 申请的量子比特。
machine – 使用pyqpanda 申请的量子虚拟机。
num_repetitions_input – 在子模块中对输入进行编码的重复次数。
depth_input – 输入数据的特征维度。
num_unitary_layers – 每个子模块中变分量子门的重复次数。
num_repetitions – 子模块的重复次数。
Example:
from pyvqnet.qnn import QuantumLayerV2,Quantum_Embedding from pyvqnet.tensor import tensor import pyqpanda as pq depth_input = 2 num_repetitions = 2 num_repetitions_input = 2 num_unitary_layers = 2 loacl_machine = pq.CPUQVM() loacl_machine.init_qvm() nq = depth_input * num_repetitions_input qubits = loacl_machine.qAlloc_many(nq) cubits = loacl_machine.cAlloc_many(nq) data_in = tensor.ones([12, depth_input]) qe = Quantum_Embedding(qubits, loacl_machine, num_repetitions_input, depth_input, num_unitary_layers, num_repetitions) qlayer = QuantumLayerV2(qe.compute_circuit, qe.param_num) data_in.requires_grad = True y = qlayer.forward(data_in) print(y) # [ # [0.2302894], # [0.2302894], # [0.2302894], # [0.2302894], # [0.2302894], # [0.2302894], # [0.2302894], # [0.2302894], # [0.2302894], # [0.2302894], # [0.2302894], # [0.2302894] # ]
对量子线路进行测量
expval_qcloud
- pyvqnet.qnn.measure.expval_qcloud(machine, prog, pauli_str_dict, qlists, clists, shots=1000, qtype=pq.real_chip_type.origin_72)
提供的 QCloud 哈密顿可观测量值的期望值。
如果可观测量是 \(0.7Z\otimes X\otimes I+0.2I\otimes Z\otimes I\) 。 那么
Hamiltonian
dict
将是{{'Z0, X1':0.7} ,{'Z1':0.2}}
。- Parameters:
machine – qpanda 创建的机器
prog – qpanda 创建的量子程序
pauli_str_dict – 哈密顿可观测量
qlists – pyQPanda 分配的量子位
clists – pyQPanda 分配的 cbit
shots – 测量次数,默认:1000。
qtype – 设置qmachine测量的类型,默认为””表示非qcloud。 为真实芯片设置`pq.real_chip_type.origin_72`。
- Returns:
期望值.
Example:
from pyqpanda import * input = [0.56, 0.1] m_machine = QCloud() m_machine.init_qvm("xxxxxxxxxxxxxxxxxxxxxxxxxxxxxxxxxxxxx") m_prog = pq.QProg() m_qlist = m_machine.qAlloc_many(4) m_clist = m_machine.cAlloc_many(4) cir = pq.QCircuit() cir.insert(pq.RZ(m_qlist[0],input[0])) cir.insert(pq.CNOT(m_qlist[0],m_qlist[1])) cir.insert(pq.CNOT(m_qlist[0],m_qlist[3])) cir.insert(pq.RY(m_qlist[1],input[1])) cir.insert(pq.CNOT(m_qlist[0],m_qlist[2])) m_prog.insert(cir) pauli_dict = {'Z0 X1':10,'Y2':-0.543} from pyvqnet.qnn import expval_qcloud exp2 = expval_qcloud(m_machine,m_prog,pauli_dict,m_qlist,m_clist,shots=100) print(exp2)
expval
- pyvqnet.qnn.measure.expval(machine, prog, pauli_str_dict, qubits)
提供的哈密顿量观测值的期望值。
如果观测值是 \(0.7Z\otimes X\otimes I+0.2I\otimes Z\otimes I\), 那么 Hamiltonian dict 将是
{{'Z0, X1':0.7} ,{'Z1':0.2}}
。expval api现在只支持pyQPanda
CPUQVM
。更多详情请访问 https://pyqpanda-toturial.readthedocs.io/zh/latest/index.html。- Parameters:
machine – 由pyQPanda创建的量子虚拟机。
prog – pyQPanda创建的量子工程。
pauli_str_dict – 哈密顿量观测值。
qubits – pyQPanda分配的量子比特。
- Returns:
期望值。
Example:
import pyqpanda as pq from pyvqnet.qnn.measure import expval input = [0.56, 0.1] machine = pq.init_quantum_machine(pq.QMachineType.CPU) m_prog = pq.QProg() m_qlist = machine.qAlloc_many(3) cir = pq.QCircuit() cir.insert(pq.RZ(m_qlist[0],input[0])) cir.insert(pq.CNOT(m_qlist[0],m_qlist[1])) cir.insert(pq.RY(m_qlist[1],input[1])) cir.insert(pq.CNOT(m_qlist[0],m_qlist[2])) m_prog.insert(cir) pauli_dict = {'Z0 X1':10,'Y2':-0.543} exp2 = expval(machine,m_prog,pauli_dict,m_qlist) print(exp2) pq.destroy_quantum_machine(machine) #0.9983341664682731
QuantumMeasure
- pyvqnet.qnn.measure.QuantumMeasure(measure_qubits: list, prog, machine, qubits, shots: int = 1000, qtype='')
计算量子线路测量。返回通过蒙特卡罗方法获得的测量结果。
更多详情请访问 https://pyqpanda-toturial.readthedocs.io/zh/latest/Measure.html?highlight=measure_all 。
QuantumMeasure api现在只支持QPanda
CPUQVM
或QCloud
。- Parameters:
measure_qubits – 列表包含测量比特索引。
prog – pyQPanda创建的量子工程。
machine – pyQPanda分配的量子虚拟机。
qubits – pyQPanda分配的量子比特。
shots – 测量次数,默认值为1000次。
qtype – 设置 qmachine 测量的类型,默认为 “” 表示非 qcloud。 为真实芯片设置`pq.real_chip_type.origin_72`。
- Returns:
返回通过蒙特卡罗方法获得的测量结果。
Example:
from pyvqnet.qnn.measure import QuantumMeasure import pyqpanda as pq input = [0.56,0.1] measure_qubits = [0,2] machine = pq.init_quantum_machine(pq.QMachineType.CPU) m_prog = pq.QProg() m_qlist = machine.qAlloc_many(3) cir = pq.QCircuit() cir.insert(pq.RZ(m_qlist[0],input[0])) cir.insert(pq.CNOT(m_qlist[0],m_qlist[1])) cir.insert(pq.RY(m_qlist[1],input[1])) cir.insert(pq.CNOT(m_qlist[0],m_qlist[2])) cir.insert(pq.H(m_qlist[0])) cir.insert(pq.H(m_qlist[1])) cir.insert(pq.H(m_qlist[2])) m_prog.insert(cir) rlt_quant = QuantumMeasure(measure_qubits,m_prog,machine,m_qlist) print(rlt_quant) #[240, 246, 246, 268]
ProbsMeasure
- pyvqnet.qnn.measure.ProbsMeasure(measure_qubits: list, prog, machine, qubits)
计算线路概率测量。
更多详情请访问 https://pyqpanda-toturial.readthedocs.io/zh/latest/PMeasure.html。
ProbsMeasure api现在只支持pyQPanda
CPUQVM
或QCloud
。- Parameters:
measure_qubits – 列表包含测量比特索引
prog – qpanda创建的量子工程。
machine – pyQPanda分配的量子虚拟机。
qubits – pyQPanda分配的量子比特。
- Returns:
按字典顺序测量量子比特。
Example:
from pyvqnet.qnn.measure import ProbsMeasure import pyqpanda as pq input = [0.56,0.1] measure_qubits = [0,2] machine = pq.init_quantum_machine(pq.QMachineType.CPU) m_prog = pq.QProg() m_qlist = machine.qAlloc_many(3) cir = pq.QCircuit() cir.insert(pq.RZ(m_qlist[0],input[0])) cir.insert(pq.CNOT(m_qlist[0],m_qlist[1])) cir.insert(pq.RY(m_qlist[1],input[1])) cir.insert(pq.CNOT(m_qlist[0],m_qlist[2])) cir.insert(pq.H(m_qlist[0])) cir.insert(pq.H(m_qlist[1])) cir.insert(pq.H(m_qlist[2])) m_prog.insert(cir) rlt_prob = ProbsMeasure([0,2],m_prog,machine,m_qlist) print(rlt_prob) #[0.2499999999999947, 0.2499999999999947, 0.2499999999999947, 0.2499999999999947]
DensityMatrixFromQstate
- pyvqnet.qnn.measure.DensityMatrixFromQstate(state, indices)
计算量子态在一组特定量子比特上的密度矩阵。
- Parameters:
state – 一维列表状态向量。 这个列表的大小应该是
(2**N,)
对于量子比特个数N
,qstate 应该从 000 ->111 开始。indices – 所考虑子系统中的量子比特索引列表。
- Returns:
大小为“(2**len(indices), 2**len(indices))”的密度矩阵。
Example:
from pyvqnet.qnn.measure import DensityMatrixFromQstate qstate = [(0.9306699299765968+0j), (0.18865613455240968+0j), (0.1886561345524097+0j), (0.03824249173404786+0j), -0.048171819846746615j, -0.00976491131165138j, -0.23763904794287155j, -0.048171819846746615j] print(DensityMatrixFromQstate(qstate,[0,1])) # [[0.86846704+0.j 0.1870241 +0.j 0.17604699+0.j 0.03791166+0.j] # [0.1870241 +0.j 0.09206345+0.j 0.03791166+0.j 0.01866219+0.j] # [0.17604699+0.j 0.03791166+0.j 0.03568649+0.j 0.00768507+0.j] # [0.03791166+0.j 0.01866219+0.j 0.00768507+0.j 0.00378301+0.j]]
VN_Entropy
- pyvqnet.qnn.measure.VN_Entropy(state, indices, base=None)
根据给定 qubits 列表上的状态向量计算Von Neumann熵 。
\[S( \rho ) = -\text{Tr}( \rho \log ( \rho ))\]- Parameters:
state – 一维列表状态向量。 这个列表的大小应该是
(2**N,)
对于量子比特个数N
,qstate 应该从 000 ->111 开始。indices – 所考虑子系统中的量子比特索引列表。
base – 对数的底。 如果没有,则使用自然对数。
- Returns:
冯诺依曼熵的浮点值.
Example:
from pyvqnet.qnn.measure import VN_Entropy qstate = [(0.9022961387408862 + 0j), -0.06676534788028633j, (0.18290448232350312 + 0j), -0.3293638014158896j, (0.03707657410649268 + 0j), -0.06676534788028635j, (0.18290448232350312 + 0j), -0.013534006039561714j] print(VN_Entropy(qstate, [0, 1])) #0.14592917648464448
Mutal_Info
- pyvqnet.qnn.measure.Mutal_Info(state, indices0, indices1, base=None)
根据给定两个子 qubits 列表上的状态向量计算互信息 。
\[I(A, B) = S(\rho^A) + S(\rho^B) - S(\rho^{AB})\]其中 \(S\) 是冯诺依曼熵。
互信息是衡量两个子系统之间相关性的指标。更具体地说,它量化了一个系统通过测量另一个系统获得的信息量。
每个状态都可以作为计算基础中的状态向量给出。
- Parameters:
state – 一维列表状态向量。 这个列表的大小应该是
(2**N,)
对于量子比特个数N
, qstate 应该从 000 ->111 开始。indices0 – 第一个子系统中的量子比特索引列表。
indices1 – 第二个子系统中的量子比特索引列表。
base – 对数的底。 如果为None,则使用自然对数,默认为None。
- Returns:
子系统之间的相互信息
Example:
from pyvqnet.qnn.measure import Mutal_Info qstate = [(0.9022961387408862 + 0j), -0.06676534788028633j, (0.18290448232350312 + 0j), -0.3293638014158896j, (0.03707657410649268 + 0j), -0.06676534788028635j, (0.18290448232350312 + 0j), -0.013534006039561714j] print(Mutal_Info(qstate, [0], [2], 2)) #0.13763425302805887
MeasurePauliSum
- pyvqnet.qnn.measure.MeasurePauliSum(machine, prog, obs_list, qlists)
根据提供的哈密顿观量的期望值。
- Parameters:
machine – pyQPanda分配的量子虚拟机。
prog – qpanda创建的量子工程。
pauli_str_dict – 需要观测的哈密顿量。
qlists – pyQPanda分配的量子比特。
- Returns:
期望值
Example:
from pyvqnet.qnn.measure import MeasurePauliSum import pyqpanda as pq x = [0.56, 0.1] obs_list = [{'wires': [0, 2, 3], 'observables': ['X', 'Y', 'Z'], 'coefficient': [1, 0.5, 0.4]}, {'wires': [0, 1, 2], 'observables': ['X', 'Y', 'Z'], 'coefficient': [1, 0.5, 0.4]}] m_machine = pq.CPUQVM() m_machine.init_qvm() m_prog = pq.QProg() m_qlist = m_machine.qAlloc_many(4) cir = pq.QCircuit() cir.insert(pq.RZ(m_qlist[0], x[0])) cir.insert(pq.RZ(m_qlist[1], x[0])) cir.insert(pq.CNOT(m_qlist[0], m_qlist[1])) cir.insert(pq.RY(m_qlist[2], x[1])) cir.insert(pq.CNOT(m_qlist[0], m_qlist[2])) cir.insert(pq.RZ(m_qlist[3], x[1])) m_prog.insert(cir) result = MeasurePauliSum(m_machine, m_prog, obs_list, m_qlist) print(result) m_machine.finalize() # [0.413, 0.3980016661112104]
VarMeasure
- pyvqnet.qnn.measure.VarMeasure(machine, prog, actual_qlist)
提供的可观察量的方差。
- Parameters:
machine – pyQPanda分配的量子虚拟机。
prog – qpanda创建的量子工程。
actual_qlist – 由 pyQpanda.qAlloc_many() 分配的量子位。
- Returns:
方差值
Example:
import pyqpanda as pq from pyvqnet.qnn.measure import VarMeasure cir = pq.QCircuit() machine = pq.CPUQVM() # outside machine.init_qvm() # outside qubits = machine.qAlloc_many(2) cir.insert(pq.RX(qubits[0], 0.5)) cir.insert(pq.H(qubits[1])) cir.insert(pq.CNOT(qubits[0], qubits[1])) prog1 = pq.QProg() prog1.insert(cir) var_result = VarMeasure(machine, prog1, qubits[0]) print(var_result) # 0.2298488470659339
Purity
- pyvqnet.qnn.measure.Purity(state, qubits_idx)
从态矢中计算特定量子比特上的纯度。
\[\gamma = \text{Tr}(\rho^2)\]式中 \(\rho\) 为密度矩阵。标准化量子态的纯度满足 \(\frac{1}{d} \leq \gamma \leq 1\) , 其中 \(d\) 是希尔伯特空间的维数。 纯态的纯度是1。
- Parameters:
state – 从pyqpanda get_qstate()获取的量子态
qubits_idx – 要计算纯度的量子比特位索引
- Returns:
纯度
Examples:
from pyvqnet.qnn import Purity qstate = [(0.9306699299765968 + 0j), (0.18865613455240968 + 0j), (0.1886561345524097 + 0j), (0.03824249173404786 + 0j), -0.048171819846746615j, -0.00976491131165138j, -0.23763904794287155j, -0.048171819846746615j] pp = Purity(qstate, [1]) print(pp) #0.902503479761881
量子机器学习算法接口
QGAN制备任意分布初态
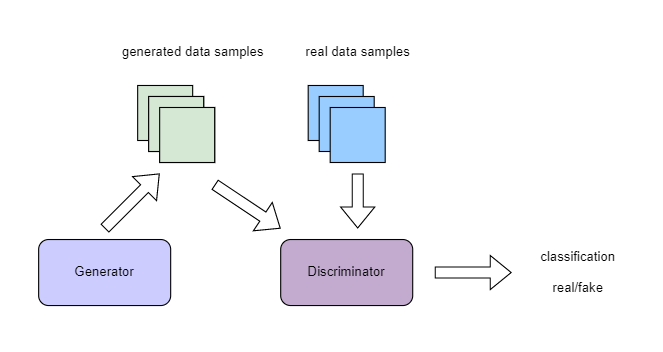
基于2019年 Christa Zoufal 的论文 Quantum Generative Adversarial Networks for learning and loading random distributions , VQNet提供了一个QGAN制备任意分布初态的例子。该算法使用纯量子变分线路制备特定随机分布的生成量子态,可以减少原先生成特定量子态所需的逻辑门,降低量子线路复杂度。 QGAN使用经典的GAN模型结构,分为Generator生成器与Discriminator鉴别器两个子模型,Generator为量子线路产生特定分布,而Generator生成的分布generated data samples 以及真实的随机分布training data samples 输入Discriminator模型进行鉴别真伪。
构建VQNet的量子生成对抗网络接口 QGANAPI
类,我们可以对真实分布的数据 real_data 使用量子生成器进行初态制备。这里使用量子比特数为3,量子生成器内部含参线路模块重复次数为1。
使用的评价指标为KL散度。
import pickle
import os
import pyqpanda as pq
from pyvqnet.qnn.qgan.qgan_utils import QGANAPI
import numpy as np
##################################
num_of_qubits = 3 # paper config
rep = 1
number_of_data = 10000
# Load data samples from different distributions
mu = 1
sigma = 1
real_data = np.random.lognormal(mean=mu, sigma=sigma, size=number_of_data)
# intial
save_dir = None
qgan_model = QGANAPI(
real_data,
# numpy generated data distribution, 1 - dim.
num_of_qubits,
batch_size=2000,
num_epochs=2000,
q_g_cir=None,
bounds = [0.0,2**num_of_qubits -1],
reps=rep,
metric="kl",
tol_rel_ent=0.01,
if_save_param_dir=save_dir
)
接下来使用其训练接口 train
训练。
# train
qgan_model.train() # train qgan
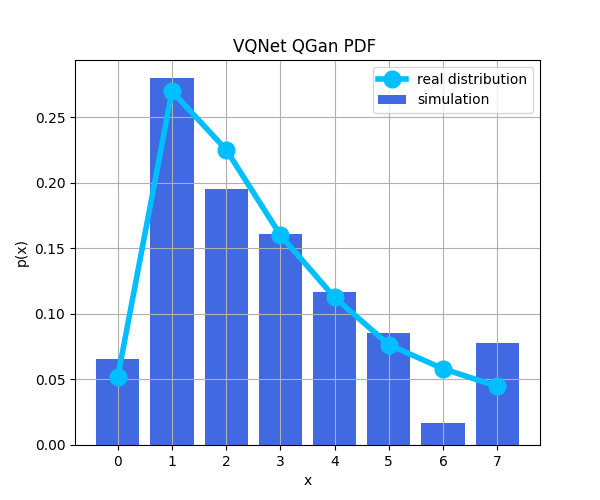
eval
画出其与真实分布之间的概率分布函数对比:
# show probability distribution function of generated distribution and real distribution
qgan_model.eval(real_data) #draw pdf
get_trained_quantum_parameters
获取训练参数并输出为一个numpy数组形式。如果 save_dir
不为空,则该类将保存参数到文件中。可以通过 load_param_and_eval
函数载入参数,并可以通过
get_circuits_with_trained_param
获取训练完参数的量子生成器pyQPanda线路。
# get trained quantum parameters
param = qgan_model.get_trained_quantum_parameters()
print(f" trained param {param}")
#load saved parameters files
if save_dir is not None:
path = os.path.join(
save_dir, qgan_model._start_time + "trained_qgan_param.pickle")
with open(path, "rb") as file:
t3 = pickle.load(file)
param = t3["quantum_parameters"]
print(f" trained param {param}")
#show probability distribution function of generated distribution and real distribution
qgan_model.load_param_and_eval(param)
#calculate metric
print(qgan_model.eval_metric(param, "kl"))
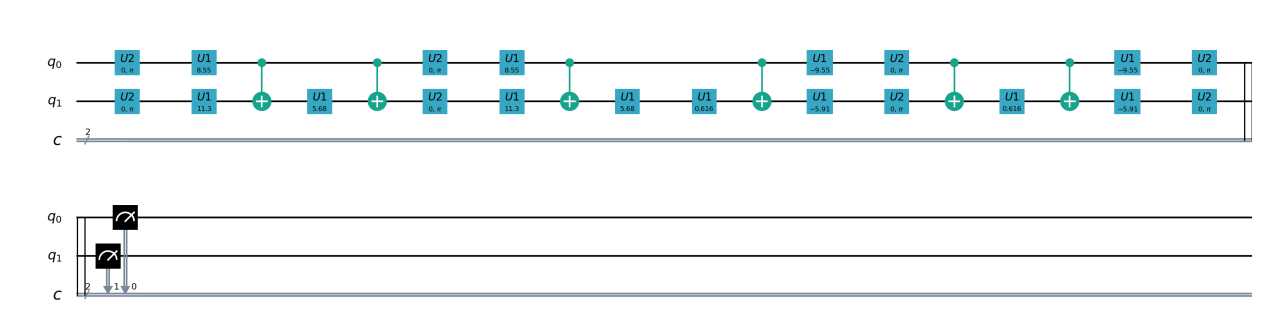
#get generator quantum circuit
machine = pq.CPUQVM()
machine.init_qvm()
qubits = machine.qAlloc_many(num_of_qubits)
qpanda_cir = qgan_model.get_circuits_with_trained_param(qubits)
print(qpanda_cir)
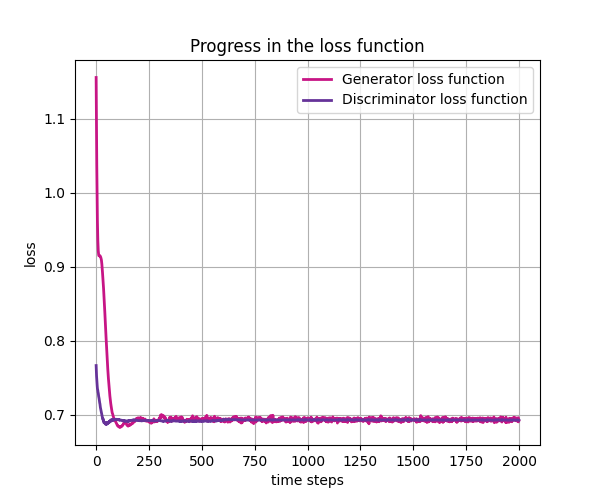
生成lognormal分布的损失函数以及概率分布函数图,一般来说需要使用不同的随机种子多次训练该模型可得到较好结果:
量子核SVM算法
在机器学习任务中,数据通常不能被原始空间中的超平面分隔。寻找此类超平面的一种常见技术是对数据应用非线性变换函数。 此函数称为特征映射,通过特征映射,我们可以在这个新的特征空间中计算数据点之间的距离有多近,从而进行机器学习的分类任务。
本例参照 Supervised learning with quantum enhanced feature spaces 论文的第一个方法构建变分线路进行数据分类任务。
gen_vqc_qsvm_data
为生成该例子所需的数据。 vqc_qsvm
为变分量子线路类,用来对输入数据进行分类。
vqc_qsvm.plot()
函数可视化了数据的分布情况。
from pyvqnet.qnn.svm import vqc_qsvm, gen_vqc_qsvm_data import matplotlib.pyplot as plt import numpy as np batch_size = 40 maxiter = 40 training_size = 20 test_size = 10 gap = 0.3 #线路模块重复次数 rep = 3 #定义接口类 VQC_QSVM = vqc_qsvm(batch_size, maxiter, rep) #随机生成数据 train_features, test_features, train_labels, test_labels, samples = \ gen_vqc_qsvm_data(training_size=training_size, test_size=test_size, gap=gap) VQC_QSVM.plot(train_features, test_features, train_labels, test_labels, samples) #训练 VQC_QSVM.train(train_features, train_labels) #测试数据测试 rlt, acc_1 = VQC_QSVM.predict(test_features, test_labels) print(f"testing_accuracy {acc_1}")
除了上述直接用变分量子线路将经典数据特征映射到量子特征空间,在论文 Supervised learning with quantum enhanced feature spaces 中还介绍了使用量子线路直接估计核函数,并使用经典支持向量机进行分类的方法。类比经典SVM中的各种核函数 \(K(i,j)\) , 使用量子核函数定义经典数据在量子特征空间 \(\phi(\mathbf{x}_i)\) 的内积 :
使用VQNet和pyQPanda,我们定义一个 QuantumKernel_VQNet
产生量子核函数,并使用 sklearn
的 SVC
进行分类:
import numpy as np
import pyqpanda as pq
from sklearn.svm import SVC
from pyqpanda import *
from pyqpanda.Visualization.circuit_draw import *
from pyvqnet.qnn.svm import QuantumKernel_VQNet, gen_vqc_qsvm_data
import matplotlib
try:
matplotlib.use('TkAgg')
except:
pass
train_features, test_features,train_labels, test_labels, samples = gen_vqc_qsvm_data(20,5,0.3)
quantum_kernel = QuantumKernel_VQNet(n_qbits=2)
quantum_svc = SVC(kernel=quantum_kernel.evaluate)
quantum_svc.fit(train_features, train_labels)
score = quantum_svc.score(test_features, test_labels)
print(f"quantum kernel classification test score: {score}")
同时扰动随机近似优化器
- class pyvqnet.qnn.SPSA(maxiter: int = 1000, last_avg: int = 1, c0: float = _C0, c1: float = 0.2, c2: float = 0.602, c3: float = 0.101, c4: float = 0, init_para=None, model=None, calibrate_flag=False)
同时扰动随机近似 (SPSA) 优化器。
SPSA 提供了一种用于逼近多元可微成本函数梯度的随机方法。 为实现这一点,使用扰动参数向量对成本函数进行两次评估:原始参数向量的每个分量同时随随机生成的值移动。 SPSA 网站 上提供了进一步的介绍。
- Parameters:
maxiter – 要执行的最大迭代次数。默认值:1000。
last_avg – last_avg 迭代的平均参数。 如果 last_avg = 1,则只考虑最后一次迭代。默认值:1。
c0 – 初始a。更新参数的步长。默认值:0.2*pi
c1 – 初始的c。用于近似梯度的步长。默认值:0.1。
c2 – 论文中的alpha,用于在每次迭代时调整a(c0)。默认值:0.602。
c3 – 论文中的gamma,每次迭代时用来调整c(c1)。默认值:0.101。
c4 – 同样用来控制a的参数。默认值:0。
init_para – 初始化参数。默认值:无。
model – 参数模型:模型。默认值:无。
calibrate_flag – 是否校准超参数 a 和 c,默认值:False。
- Returns:
一个SPSA优化器实例
Warning
SPSA只支持一维的输入参数。
Example:
from pyvqnet.qnn import AngleEmbeddingCircuit, expval, QuantumLayerV2, SPSA from pyvqnet.qnn.template import BasicEntanglerTemplate import pyqpanda as pq from pyvqnet.nn.module import Module #定义一个量子变分线路模型 class Model_spsa(Module): def __init__(self): super(Model_spsa, self).__init__() self.qvc = QuantumLayerV2(layer_fn_spsa_pq, 3) def forward(self, x): y = self.qvc(x) return y #本例线路是最小化该VQC的期望值 def layer_fn_spsa_pq(input, weights): num_of_qubits = 1 machine = pq.CPUQVM() machine.init_qvm() qubits = machine.qAlloc_many(num_of_qubits) c1 = AngleEmbeddingCircuit(input, qubits) weights =weights.reshape([4,1]) bc_class = BasicEntanglerTemplate(weights, 1) c2 = bc_class.create_circuit(qubits) m_prog = pq.QProg() m_prog.insert(c1) m_prog.insert(c2) pauli_dict = {'Z0': 1} exp2 = expval(machine, m_prog, pauli_dict, qubits) return exp2 model = Model_spsa() #定义一个SPSA优化器 optimizer = SPSA(maxiter=20, init_para=model.parameters(), model=model, )
- pyvqnet.qnn.SPSA._step(input_data)
优化 sapa 优化器
- Parameters:
input_data – 输入训练数据QTensor
- Returns:
train_para:最终参数。
theta_best:最后 last_avg 次优化后的平均参数。
Example:
import numpy as np import pyqpanda as pq import sys sys.path.insert(0, "../") import pyvqnet from pyvqnet.nn.module import Module from pyvqnet.qnn import SPSA from pyvqnet.tensor.tensor import QTensor from pyvqnet.qnn import AngleEmbeddingCircuit, expval, QuantumLayerV2, expval from pyvqnet.qnn.template import BasicEntanglerTemplate #定义一个量子变分线路模型 class Model_spsa(Module): def __init__(self): super(Model_spsa, self).__init__() self.qvc = QuantumLayerV2(layer_fn_spsa_pq, 3) def forward(self, x): y = self.qvc(x) return y #本例线路是最小化该VQC的期望值 def layer_fn_spsa_pq(input, weights): num_of_qubits = 1 machine = pq.CPUQVM() machine.init_qvm() qubits = machine.qAlloc_many(num_of_qubits) c1 = AngleEmbeddingCircuit(input, qubits) weights =weights.reshape([4,1]) bc_class = BasicEntanglerTemplate(weights, 1) c2 = bc_class.create_circuit(qubits) m_prog = pq.QProg() m_prog.insert(c1) m_prog.insert(c2) pauli_dict = {'Z0': 1} exp2 = expval(machine, m_prog, pauli_dict, qubits) return exp2 model = Model_spsa() #定义一个SPSA优化器 optimizer = SPSA(maxiter=20, init_para=model.parameters(), model=model, ) #初始化参数 data = QTensor(np.array([[0.27507603]])) p = model.parameters() p[0].data = pyvqnet._core.Tensor( np.array([3.97507603, 3.12950603, 1.00854038, 1.25907603])) #调用SPSA进行迭代优化 optimizer._step(input_data=data) #计算优化后的VQC期望值 y = model(data) print(y)
变分量子线路自动微分模拟
VQNet基于自动微分算子构建以及一些常用量子逻辑门、量子线路以及测量方法,可使用自动微分代替量子线路parameter-shift方法计算梯度。 我们可以像其他 Module 一样,使用VQC算子构成复杂神经网络。在 Module 中需要定义虚拟机 QMachine,并且需要对machine中 states 根据输入的batchsize进行reset_states。请具体看下例:
Example:
from pyvqnet.nn import Module,Linear,ModuleList from pyvqnet.qnn.vqc.qcircuit import VQC_HardwareEfficientAnsatz,RZZ,RZ from pyvqnet.qnn.vqc import Probability,QMachine from pyvqnet import tensor class QM(Module): def __init__(self, name=""): super().__init__(name) self.linearx = Linear(4,2) self.ansatz = VQC_HardwareEfficientAnsatz(4, ["rx", "RY", "rz"], entangle_gate="cnot", entangle_rules="linear", depth=2) #基于VQC的RZ 在0比特上 self.encode1 = RZ(wires=0) #基于VQC的RZ 在1比特上 self.encode2 = RZ(wires=1) #基于VQC的概率测量 在0,2比特上 self.measure = Probability(wires=[0,2]) #量子设备QMachine,使用4个比特。 self.device = QMachine(4) def forward(self, x, *args, **kwargs): #必须要将states reset到与输入一样的batchsize。 self.device.reset_states(x.shape[0]) y = self.linearx(x) #将输入编码到RZ门上,注意输入必须是 [batchsize,1]的shape self.encode1(params = y[:, [0]],q_machine = self.device,) #将输入编码到RZ门上,注意输入必须是 [batchsize,1]的shape self.encode2(params = y[:, [1]],q_machine = self.device,) self.ansatz(q_machine =self.device) return self.measure(q_machine =self.device) bz =3 inputx = tensor.arange(1.0,bz*4+1).reshape([bz,4]) inputx.requires_grad= True #像其他Module一样定义 qlayer = QM() #前传 y = qlayer(inputx) #反传 y.backward() print(y)如果要使用一些带训练参数的变分量子线路逻辑门,而不止像上例一样将数据编码到线路上,可以参考下面例子:
Example:
from pyvqnet.nn import Module,Linear,ModuleList from pyvqnet.qnn.vqc.qcircuit import VQC_HardwareEfficientAnsatz,RZZ,RZ,rz,ry,cnot from pyvqnet.qnn.vqc import Probability,QMachine from pyvqnet import tensor class QM(Module): def __init__(self, name=""): super().__init__(name) self.linearx = Linear(4,2) self.ansatz = VQC_HardwareEfficientAnsatz(4, ["rx", "RY", "rz"], entangle_gate="cnot", entangle_rules="linear", depth=2) #基于VQC的RZ 在0比特上 self.encode1 = RZ(wires=0) #基于VQC的RZ 在1比特上 self.encode2 = RZ(wires=1) #设置RZ 有要训练参数has_params = True,需要训练trainable= True self.vqc = RZ(has_params = True,trainable = True,wires=1) #基于VQC的概率测量 在0,2比特上 self.measure = Probability(wires=[0,2]) #量子设备QMachine,使用4个比特。 self.device = QMachine(4) def forward(self, x, *args, **kwargs): #必须要将states reset到与输入一样的batchsize。 self.device.reset_states(x.shape[0]) y = self.linearx(x) #将输入编码到RZ门上,注意输入必须是 [batchsize,1]的shape self.encode1(params = y[:, [0]],q_machine = self.device,) #将输入编码到RZ门上,注意输入必须是 [batchsize,1]的shape self.encode2(params = y[:, [1]],q_machine = self.device,) #使用RZ门构成的含参变分线路,会加入训练。 self.vqc(q_machine =self.device) self.ansatz(q_machine =self.device) return self.measure(q_machine =self.device) bz =3 inputx = tensor.arange(1.0,bz*4+1).reshape([bz,4]) inputx.requires_grad= True #像其他Module一样定义 qlayer = QM() #前传 y = qlayer(inputx) #反传 y.backward() print(y)
模拟器,量子逻辑门以及测量接口
QMachine
- class pyvqnet.qnn.vqc.QMachine(num_wires, dtype=pyvqnet.kcomplex64)
变分量子计算的模拟器类,包含states属性为量子线路的statevectors。
Note
使用 pyvqnet.qnn.vqc.QMachine.reset_states(batchsize) 方法可以使模拟器支持批量数据处理
- Parameters:
num_wires – 量子比特的个数。
dtype – 计算数据的数据类型,默认pyvqnet.kcomplex64,对应参数精度为pyvqnet.kfloat32。
- Returns:
输出QMachine。
Example:
from pyvqnet.qnn.vqc import QMachine qm = QMachine(4) print(qm.states) # [[[[[1.+0.j 0.+0.j] # [0.+0.j 0.+0.j]] # [[0.+0.j 0.+0.j] # [0.+0.j 0.+0.j]]] # [[[0.+0.j 0.+0.j] # [0.+0.j 0.+0.j]] # [[0.+0.j 0.+0.j] # [0.+0.j 0.+0.j]]]]]
i
- pyvqnet.qnn.vqc.i(q_machine, wires, params=None, use_dagger=False)
对q_machine中的态矢作用量子逻辑门 I 。
- Parameters:
q_machine – 量子虚拟机设备。
wires – 量子比特索引。
params – 参数矩阵,默认为None。
use_dagger – 是否共轭转置,默认为False。
- Returns:
输出QTensor。
Example:
from pyvqnet.qnn.vqc import i,QMachine qm = QMachine(4) i(q_machine=qm, wires=1,) print(qm.states) # [[[[[1.+0.j 0.+0.j] # [0.+0.j 0.+0.j]] # [[0.+0.j 0.+0.j] # [0.+0.j 0.+0.j]]] # [[[0.+0.j 0.+0.j] # [0.+0.j 0.+0.j]] # [[0.+0.j 0.+0.j] # [0.+0.j 0.+0.j]]]]]
I
- class pyvqnet.qnn.vqc.I(has_params: bool = False, trainable: bool = False, init_params=None, wires=None, dtype=pyvqnet.kcomplex64, use_dagger=False)
定义一个I逻辑门类 。
- Parameters:
has_params – 是否具有参数,例如RX,RY等门需要设置为True,不含参数的需要设置为False,默认为False。
trainable – 是否自带含待训练参数,如果该层使用外部输入数据构建逻辑门矩阵,设置为False,如果待训练参数需要从该层初始化,则为True,默认为False。
init_params – 初始化参数,用来编码经典数据QTensor,默认为None。
wires – 线路作用的比特索引,默认为None。
dtype – 逻辑门内部矩阵的数据精度,可以设置为pyvqnet.kcomplex64,或pyvqnet.kcomplex128,分别对应float输入或者double入参。
use_dagger – 是否使用该门的转置共轭版本,默认为False。
- Returns:
一个Module,可以用来训练模型。
Example:
from pyvqnet.qnn.vqc import I,QMachine device = QMachine(4) layer = I(wires=0) batchsize = 1 device.reset_states(1) layer(q_machine = device) print(device.states)
hadamard
- pyvqnet.qnn.vqc.hadamard(q_machine, wires, params=None, use_dagger=False)
对q_machine中的态矢作用量子逻辑门 hadamard 。
- Parameters:
q_machine – 量子虚拟机设备。
wires – 量子比特索引。
params – 参数矩阵,默认为None。
use_dagger – 是否共轭转置,默认为False。
- Returns:
输出QTensor。
Example:
from pyvqnet.qnn.vqc import hadamard,QMachine qm = QMachine(4) hadamard(q_machine=qm, wires=1,) print(qm.states) # [[[[[0.7071068+0.j 0. +0.j] # [0. +0.j 0. +0.j]] # # [[0.7071068+0.j 0. +0.j] # [0. +0.j 0. +0.j]]] # # # [[[0. +0.j 0. +0.j] # [0. +0.j 0. +0.j]] # # [[0. +0.j 0. +0.j] # [0. +0.j 0. +0.j]]]]]
Hadamard
- class pyvqnet.qnn.vqc.Hadamard(has_params: bool = False, trainable: bool = False, init_params=None, wires=None, dtype=pyvqnet.kcomplex64, use_dagger=False)
定义一个Hadamard逻辑门类 。
- Parameters:
has_params – 是否具有参数,例如RX,RY等门需要设置为True,不含参数的需要设置为False,默认为False。
trainable – 是否自带含待训练参数,如果该层使用外部输入数据构建逻辑门矩阵,设置为False,如果待训练参数需要从该层初始化,则为True,默认为False。
init_params – 初始化参数,用来编码经典数据QTensor,默认为None。
wires – 线路作用的比特索引,默认为None。
dtype – 逻辑门内部矩阵的数据精度,可以设置为pyvqnet.kcomplex64,或pyvqnet.kcomplex128,分别对应float输入或者double入参。
use_dagger – 是否使用该门的转置共轭版本,默认为False。
- Returns:
一个Module,可以用来训练模型。
Example:
from pyvqnet.qnn.vqc import Hadamard,QMachine device = QMachine(4) layer = Hadamard(wires=0) batchsize = 1 device.reset_states(1) layer(q_machine = device) print(device.states)
t
- pyvqnet.qnn.vqc.t(q_machine, wires, params=None, use_dagger=False)
对q_machine中的态矢作用量子逻辑门 t 。
- Parameters:
q_machine – 量子虚拟机设备。
wires – 量子比特索引。
params – 参数矩阵,默认为None。
use_dagger – 是否共轭转置,默认为False。
- Returns:
输出QTensor。
Example:
from pyvqnet.qnn.vqc import t,QMachine qm = QMachine(4) t(q_machine=qm, wires=1,) print(qm.states) # [[[[[1.+0.j 0.+0.j] # [0.+0.j 0.+0.j]] # # [[0.+0.j 0.+0.j] # [0.+0.j 0.+0.j]]] # # # [[[0.+0.j 0.+0.j] # [0.+0.j 0.+0.j]] # # [[0.+0.j 0.+0.j] # [0.+0.j 0.+0.j]]]]]
T
- class pyvqnet.qnn.vqc.T(has_params: bool = False, trainable: bool = False, init_params=None, wires=None, dtype=pyvqnet.kcomplex64, use_dagger=False)
定义一个T逻辑门类 。
- Parameters:
has_params – 是否具有参数,例如RX,RY等门需要设置为True,不含参数的需要设置为False,默认为False。
trainable – 是否自带含待训练参数,如果该层使用外部输入数据构建逻辑门矩阵,设置为False,如果待训练参数需要从该层初始化,则为True,默认为False。
init_params – 初始化参数,用来编码经典数据QTensor,默认为None。
wires – 线路作用的比特索引,默认为None。
dtype – 逻辑门内部矩阵的数据精度,可以设置为pyvqnet.kcomplex64,或pyvqnet.kcomplex128,分别对应float输入或者double入参。
use_dagger – 是否使用该门的转置共轭版本,默认为False。
- Returns:
一个Module,可以用来训练模型。
Example:
from pyvqnet.qnn.vqc import T,QMachine device = QMachine(4) layer = T(wires=0) batchsize = 1 device.reset_states(1) layer(q_machine = device) print(device.states)
s
- pyvqnet.qnn.vqc.s(q_machine, wires, params=None, use_dagger=False)
对q_machine中的态矢作用量子逻辑门 s 。
- Parameters:
q_machine – 量子虚拟机设备。
wires – 量子比特索引。
params – 参数矩阵,默认为None。
use_dagger – 是否共轭转置,默认为False。
- Returns:
输出QTensor。
Example:
from pyvqnet.qnn.vqc import s,QMachine qm = QMachine(4) s(q_machine=qm, wires=1,) print(qm.states) # [[[[[1.+0.j 0.+0.j] # [0.+0.j 0.+0.j]] # # [[0.+0.j 0.+0.j] # [0.+0.j 0.+0.j]]] # # # [[[0.+0.j 0.+0.j] # [0.+0.j 0.+0.j]] # # [[0.+0.j 0.+0.j] # [0.+0.j 0.+0.j]]]]]
S
- class pyvqnet.qnn.vqc.S(has_params: bool = False, trainable: bool = False, init_params=None, wires=None, dtype=pyvqnet.kcomplex64, use_dagger=False)
定义一个S逻辑门类 。
- Parameters:
has_params – 是否具有参数,例如RX,RY等门需要设置为True,不含参数的需要设置为False,默认为False。
trainable – 是否自带含待训练参数,如果该层使用外部输入数据构建逻辑门矩阵,设置为False,如果待训练参数需要从该层初始化,则为True,默认为False。
init_params – 初始化参数,用来编码经典数据QTensor,默认为None。
wires – 线路作用的比特索引,默认为None。
dtype – 逻辑门内部矩阵的数据精度,可以设置为pyvqnet.kcomplex64,或pyvqnet.kcomplex128,分别对应float输入或者double入参。
use_dagger – 是否使用该门的转置共轭版本,默认为False。
- Returns:
一个Module,可以用来训练模型。
Example:
from pyvqnet.qnn.vqc import S,QMachine device = QMachine(4) layer = S(wires=0) batchsize = 1 device.reset_states(1) layer(q_machine = device) print(device.states)
paulix
- pyvqnet.qnn.vqc.paulix(q_machine, wires, params=None, use_dagger=False)
对q_machine中的态矢作用量子逻辑门 paulix 。
- Parameters:
q_machine – 量子虚拟机设备。
wires – 量子比特索引。
params – 参数矩阵,默认为None。
use_dagger – 是否共轭转置,默认为False。
- Returns:
输出QTensor。
Example:
from pyvqnet.qnn.vqc import paulix,QMachine qm = QMachine(4) paulix(q_machine=qm, wires=1,) print(qm.states) # [[[[[0.+0.j 0.+0.j] # [0.+0.j 0.+0.j]] # # [[1.+0.j 0.+0.j] # [0.+0.j 0.+0.j]]] # # # [[[0.+0.j 0.+0.j] # [0.+0.j 0.+0.j]] # # [[0.+0.j 0.+0.j] # [0.+0.j 0.+0.j]]]]]
PauliX
- class pyvqnet.qnn.vqc.PauliX(has_params: bool = False, trainable: bool = False, init_params=None, wires=None, dtype=pyvqnet.kcomplex64, use_dagger=False)
定义一个PauliX逻辑门类 。
- Parameters:
has_params – 是否具有参数,例如RX,RY等门需要设置为True,不含参数的需要设置为False,默认为False。
trainable – 是否自带含待训练参数,如果该层使用外部输入数据构建逻辑门矩阵,设置为False,如果待训练参数需要从该层初始化,则为True,默认为False。
init_params – 初始化参数,用来编码经典数据QTensor,默认为None。
wires – 线路作用的比特索引,默认为None。
dtype – 逻辑门内部矩阵的数据精度,可以设置为pyvqnet.kcomplex64,或pyvqnet.kcomplex128,分别对应float输入或者double入参。
use_dagger – 是否使用该门的转置共轭版本,默认为False。
- Returns:
一个Module,可以用来训练模型。
Example:
from pyvqnet.qnn.vqc import PauliX,QMachine device = QMachine(4) layer = PauliX(wires=0) batchsize = 1 device.reset_states(1) layer(q_machine = device) print(device.states)
pauliy
- pyvqnet.qnn.vqc.pauliy(q_machine, wires, params=None, use_dagger=False)
对q_machine中的态矢作用量子逻辑门 pauliy 。
- Parameters:
q_machine – 量子虚拟机设备。
wires – 量子比特索引。
params – 参数矩阵,默认为None。
use_dagger – 是否共轭转置,默认为False。
- Returns:
输出QTensor。
Example:
from pyvqnet.qnn.vqc import pauliy,QMachine qm = QMachine(4) pauliy(q_machine=qm, wires=1,) print(qm.states) # [[[[[0.+0.j 0.+0.j] # [0.+0.j 0.+0.j]] # # [[0.+1.j 0.+0.j] # [0.+0.j 0.+0.j]]] # # # [[[0.+0.j 0.+0.j] # [0.+0.j 0.+0.j]] # # [[0.+0.j 0.+0.j] # [0.+0.j 0.+0.j]]]]]
PauliY
- class pyvqnet.qnn.vqc.PauliY(has_params: bool = False, trainable: bool = False, init_params=None, wires=None, dtype=pyvqnet.kcomplex64, use_dagger=False)
定义一个PauliY逻辑门类 。
- Parameters:
has_params – 是否具有参数,例如RX,RY等门需要设置为True,不含参数的需要设置为False,默认为False。
trainable – 是否自带含待训练参数,如果该层使用外部输入数据构建逻辑门矩阵,设置为False,如果待训练参数需要从该层初始化,则为True,默认为False。
init_params – 初始化参数,用来编码经典数据QTensor,默认为None。
wires – 线路作用的比特索引,默认为None。
dtype – 逻辑门内部矩阵的数据精度,可以设置为pyvqnet.kcomplex64,或pyvqnet.kcomplex128,分别对应float输入或者double入参。
use_dagger – 是否使用该门的转置共轭版本,默认为False。
- Returns:
一个Module,可以用来训练模型。
Example:
from pyvqnet.qnn.vqc import PauliY,QMachine device = QMachine(4) layer = PauliY(wires=0) batchsize = 1 device.reset_states(1) layer(q_machine = device) print(device.states)
pauliz
- pyvqnet.qnn.vqc.pauliz(q_machine, wires, params=None, use_dagger=False)
对q_machine中的态矢作用量子逻辑门 pauliz 。
- Parameters:
q_machine – 量子虚拟机设备。
wires – 量子比特索引。
params – 参数矩阵,默认为None。
use_dagger – 是否共轭转置,默认为False。
- Returns:
输出QTensor。
Example:
from pyvqnet.qnn.vqc import pauliz,QMachine qm = QMachine(4) pauliz(q_machine=qm, wires=1,) print(qm.states) # [[[[[1.+0.j 0.+0.j] # [0.+0.j 0.+0.j]] # # [[0.+0.j 0.+0.j] # [0.+0.j 0.+0.j]]] # # # [[[0.+0.j 0.+0.j] # [0.+0.j 0.+0.j]] # # [[0.+0.j 0.+0.j] # [0.+0.j 0.+0.j]]]]]
PauliZ
- class pyvqnet.qnn.vqc.PauliZ(has_params: bool = False, trainable: bool = False, init_params=None, wires=None, dtype=pyvqnet.kcomplex64, use_dagger=False)
定义一个PauliZ逻辑门类 。
- Parameters:
has_params – 是否具有参数,例如RX,RY等门需要设置为True,不含参数的需要设置为False,默认为False。
trainable – 是否自带含待训练参数,如果该层使用外部输入数据构建逻辑门矩阵,设置为False,如果待训练参数需要从该层初始化,则为True,默认为False。
init_params – 初始化参数,用来编码经典数据QTensor,默认为None。
wires – 线路作用的比特索引,默认为None。
dtype – 逻辑门内部矩阵的数据精度,可以设置为pyvqnet.kcomplex64,或pyvqnet.kcomplex128,分别对应float输入或者double入参。
use_dagger – 是否使用该门的转置共轭版本,默认为False。
- Returns:
一个Module,可以用来训练模型。
Example:
from pyvqnet.qnn.vqc import PauliZ,QMachine device = QMachine(4) layer = PauliZ(wires=0) batchsize = 1 device.reset_states(1) layer(q_machine = device) print(device.states)
x1
- pyvqnet.qnn.vqc.x1(q_machine, wires, params=None, use_dagger=False)
对q_machine中的态矢作用量子逻辑门 x1 。
- Parameters:
q_machine – 量子虚拟机设备。
wires – 量子比特索引。
params – 参数矩阵,默认为None。
use_dagger – 是否共轭转置,默认为False。
- Returns:
输出QTensor。
Example:
from pyvqnet.qnn.vqc import x1,QMachine qm = QMachine(4) x1(q_machine=qm, wires=1,) print(qm.states) # [[[[[0.7071068+0.j 0. +0.j ] # [0. +0.j 0. +0.j ]] # # [[0. -0.7071068j 0. +0.j ] # [0. +0.j 0. +0.j ]]] # # # [[[0. +0.j 0. +0.j ] # [0. +0.j 0. +0.j ]] # # [[0. +0.j 0. +0.j ] # [0. +0.j 0. +0.j ]]]]]
X1
- class pyvqnet.qnn.vqc.X1(has_params: bool = False, trainable: bool = False, init_params=None, wires=None, dtype=pyvqnet.kcomplex64, use_dagger=False)
定义一个X1逻辑门类 。
- Parameters:
has_params – 是否具有参数,例如RX,RY等门需要设置为True,不含参数的需要设置为False,默认为False。
trainable – 是否自带含待训练参数,如果该层使用外部输入数据构建逻辑门矩阵,设置为False,如果待训练参数需要从该层初始化,则为True,默认为False。
init_params – 初始化参数,用来编码经典数据QTensor,默认为None。
wires – 线路作用的比特索引,默认为None。
dtype – 逻辑门内部矩阵的数据精度,可以设置为pyvqnet.kcomplex64,或pyvqnet.kcomplex128,分别对应float输入或者double入参。
use_dagger – 是否使用该门的转置共轭版本,默认为False。
- Returns:
一个Module,可以用来训练模型。
Example:
from pyvqnet.qnn.vqc import X1,QMachine device = QMachine(4) layer = X1(wires=0) batchsize = 1 device.reset_states(1) layer(q_machine = device) print(device.states)
rx
- pyvqnet.qnn.vqc.rx(q_machine, wires, params=None, use_dagger=False)
对q_machine中的态矢作用量子逻辑门 rx 。
- Parameters:
q_machine – 量子虚拟机设备。
wires – 量子比特索引。
params – 参数矩阵,默认为None。
use_dagger – 是否共轭转置,默认为False。
- Returns:
输出QTensor。
Example:
from pyvqnet.qnn.vqc import rx,QMachine from pyvqnet.tensor import QTensor qm = QMachine(4) rx(q_machine=qm, wires=1,params=QTensor([0.5])) print(qm.states) # [[[[[0.9689124+0.j 0. +0.j ] # [0. +0.j 0. +0.j ]] # # [[0. -0.247404j 0. +0.j ] # [0. +0.j 0. +0.j ]]] # # # [[[0. +0.j 0. +0.j ] # [0. +0.j 0. +0.j ]] # # [[0. +0.j 0. +0.j ] # [0. +0.j 0. +0.j ]]]]]
RX
- class pyvqnet.qnn.vqc.RX(has_params: bool = False, trainable: bool = False, init_params=None, wires=None, dtype=pyvqnet.kcomplex64, use_dagger=False)
定义一个RX逻辑门类 。
- Parameters:
has_params – 是否具有参数,例如RX,RY等门需要设置为True,不含参数的需要设置为False,默认为False。
trainable – 是否自带含待训练参数,如果该层使用外部输入数据构建逻辑门矩阵,设置为False,如果待训练参数需要从该层初始化,则为True,默认为False。
init_params – 初始化参数,用来编码经典数据QTensor,默认为None。
wires – 线路作用的比特索引,默认为None。
dtype – 逻辑门内部矩阵的数据精度,可以设置为pyvqnet.kcomplex64,或pyvqnet.kcomplex128,分别对应float输入或者double入参。
use_dagger – 是否使用该门的转置共轭版本,默认为False。
- Returns:
一个Module,可以用来训练模型。
Example:
from pyvqnet.qnn.vqc import RX,QMachine device = QMachine(4) layer = RX(has_params= True, trainable= True, wires=0) batchsize = 2 device.reset_states(batchsize) layer(q_machine = device) print(device.states)
ry
- pyvqnet.qnn.vqc.ry(q_machine, wires, params=None, use_dagger=False)
对q_machine中的态矢作用量子逻辑门 ry 。
- Parameters:
q_machine – 量子虚拟机设备。
wires – 量子比特索引。
params – 参数矩阵,默认为None。
use_dagger – 是否共轭转置,默认为False。
- Returns:
输出QTensor。
Example:
from pyvqnet.qnn.vqc import ry,QMachine from pyvqnet.tensor import QTensor qm = QMachine(4) ry(q_machine=qm, wires=1,params=QTensor([0.5]),) print(qm.states) # [[[[[0.9689124+0.j 0. +0.j] # [0. +0.j 0. +0.j]] # # [[0.247404 +0.j 0. +0.j] # [0. +0.j 0. +0.j]]] # # # [[[0. +0.j 0. +0.j] # [0. +0.j 0. +0.j]] # # [[0. +0.j 0. +0.j] # [0. +0.j 0. +0.j]]]]]
RY
- class pyvqnet.qnn.vqc.RY(has_params: bool = False, trainable: bool = False, init_params=None, wires=None, dtype=pyvqnet.kcomplex64, use_dagger=False)
定义一个RY逻辑门类 。
- Parameters:
has_params – 是否具有参数,例如RX,RY等门需要设置为True,不含参数的需要设置为False,默认为False。
trainable – 是否自带含待训练参数,如果该层使用外部输入数据构建逻辑门矩阵,设置为False,如果待训练参数需要从该层初始化,则为True,默认为False。
init_params – 初始化参数,用来编码经典数据QTensor,默认为None。
wires – 线路作用的比特索引,默认为None。
dtype – 逻辑门内部矩阵的数据精度,可以设置为pyvqnet.kcomplex64,或pyvqnet.kcomplex128,分别对应float输入或者double入参。
use_dagger – 是否使用该门的转置共轭版本,默认为False。
- Returns:
一个Module,可以用来训练模型。
Example:
from pyvqnet.qnn.vqc import RY,QMachine device = QMachine(4) layer = RY(has_params= True, trainable= True, wires=0) batchsize = 2 device.reset_states(batchsize) layer(q_machine = device) print(device.states)
rz
- pyvqnet.qnn.vqc.rz(q_machine, wires, params=None, use_dagger=False)
对q_machine中的态矢作用量子逻辑门 rz 。
- Parameters:
q_machine – 量子虚拟机设备。
wires – 量子比特索引。
params – 参数矩阵,默认为None。
use_dagger – 是否共轭转置,默认为False。
- Returns:
输出QTensor。
Example:
from pyvqnet.qnn.vqc import rz,QMachine from pyvqnet.tensor import QTensor qm = QMachine(4) rz(q_machine=qm, wires=1,params=QTensor([0.5]),) print(qm.states) # [[[[[0.9689124-0.247404j 0. +0.j ] # [0. +0.j 0. +0.j ]] # # [[0. +0.j 0. +0.j ] # [0. +0.j 0. +0.j ]]] # # # [[[0. +0.j 0. +0.j ] # [0. +0.j 0. +0.j ]] # # [[0. +0.j 0. +0.j ] # [0. +0.j 0. +0.j ]]]]]
RZ
- class pyvqnet.qnn.vqc.RZ(has_params: bool = False, trainable: bool = False, init_params=None, wires=None, dtype=pyvqnet.kcomplex64, use_dagger=False)
定义一个RZ逻辑门类 。
- Parameters:
has_params – 是否具有参数,例如RX,RY等门需要设置为True,不含参数的需要设置为False,默认为False。
trainable – 是否自带含待训练参数,如果该层使用外部输入数据构建逻辑门矩阵,设置为False,如果待训练参数需要从该层初始化,则为True,默认为False。
init_params – 初始化参数,用来编码经典数据QTensor,默认为None。
wires – 线路作用的比特索引,默认为None。
dtype – 逻辑门内部矩阵的数据精度,可以设置为pyvqnet.kcomplex64,或pyvqnet.kcomplex128,分别对应float输入或者double入参。
use_dagger – 是否使用该门的转置共轭版本,默认为False。
- Returns:
一个Module,可以用来训练模型。
Example:
from pyvqnet.qnn.vqc import RZ,QMachine device = QMachine(4) layer = RZ(has_params= True, trainable= True, wires=0) batchsize = 2 device.reset_states(batchsize) layer(q_machine = device) print(device.states)
crx
- pyvqnet.qnn.vqc.crx(q_machine, wires, params=None, use_dagger=False)
对q_machine中的态矢作用量子逻辑门 crx 。
- Parameters:
q_machine – 量子虚拟机设备。
wires – 量子比特索引。
params – 参数矩阵,默认为None。
use_dagger – 是否共轭转置,默认为False。
- Returns:
输出QTensor。
Example:
from pyvqnet.qnn.vqc import QMachine import pyvqnet.qnn.vqc as vqc from pyvqnet.tensor import QTensor qm = QMachine(4) vqc.crx(q_machine=qm,wires=[0,2], params=QTensor([0.5]),) print(qm.states) # [[[[[1.+0.j 0.+0.j] # [0.+0.j 0.+0.j]] # # [[0.+0.j 0.+0.j] # [0.+0.j 0.+0.j]]] # # # [[[0.+0.j 0.+0.j] # [0.+0.j 0.+0.j]] # # [[0.+0.j 0.+0.j] # [0.+0.j 0.+0.j]]]]]
CRX
- class pyvqnet.qnn.vqc.CRX(has_params: bool = False, trainable: bool = False, init_params=None, wires=None, dtype=pyvqnet.kcomplex64, use_dagger=False)
定义一个CRX逻辑门类 。
- Parameters:
has_params – 是否具有参数,例如RX,RY等门需要设置为True,不含参数的需要设置为False,默认为False。
trainable – 是否自带含待训练参数,如果该层使用外部输入数据构建逻辑门矩阵,设置为False,如果待训练参数需要从该层初始化,则为True,默认为False。
init_params – 初始化参数,用来编码经典数据QTensor,默认为None。
wires – 线路作用的比特索引,默认为None。
dtype – 逻辑门内部矩阵的数据精度,可以设置为pyvqnet.kcomplex64,或pyvqnet.kcomplex128,分别对应float输入或者double入参。
use_dagger – 是否使用该门的转置共轭版本,默认为False。
- Returns:
一个Module,可以用来训练模型。
Example:
from pyvqnet.qnn.vqc import CRX,QMachine device = QMachine(4) layer = CRX(has_params= True, trainable= True, wires=[0,2]) batchsize = 2 device.reset_states(batchsize) layer(q_machine = device) print(device.states)
cry
- pyvqnet.qnn.vqc.cry(q_machine, wires, params=None, use_dagger=False)
对q_machine中的态矢作用量子逻辑门 cry 。
- Parameters:
q_machine – 量子虚拟机设备。
wires – 量子比特索引。
params – 参数矩阵,默认为None。
use_dagger – 是否共轭转置,默认为False。
- Returns:
输出QTensor。
Example:
from pyvqnet.qnn.vqc import QMachine import pyvqnet.qnn.vqc as vqc from pyvqnet.tensor import QTensor qm = QMachine(4) vqc.cry(q_machine=qm,wires=[0,2], params=QTensor([0.5])) print(qm.states) # [[[[[1.+0.j 0.+0.j] # [0.+0.j 0.+0.j]] # # [[0.+0.j 0.+0.j] # [0.+0.j 0.+0.j]]] # # # [[[0.+0.j 0.+0.j] # [0.+0.j 0.+0.j]] # # [[0.+0.j 0.+0.j] # [0.+0.j 0.+0.j]]]]]
CRY
- class pyvqnet.qnn.vqc.CRY(has_params: bool = False, trainable: bool = False, init_params=None, wires=None, dtype=pyvqnet.kcomplex64, use_dagger=False)
定义一个CRY逻辑门类 。
- Parameters:
has_params – 是否具有参数,例如RX,RY等门需要设置为True,不含参数的需要设置为False,默认为False。
trainable – 是否自带含待训练参数,如果该层使用外部输入数据构建逻辑门矩阵,设置为False,如果待训练参数需要从该层初始化,则为True,默认为False。
init_params – 初始化参数,用来编码经典数据QTensor,默认为None。
wires – 线路作用的比特索引,默认为None。
dtype – 逻辑门内部矩阵的数据精度,可以设置为pyvqnet.kcomplex64,或pyvqnet.kcomplex128,分别对应float输入或者double入参。
use_dagger – 是否使用该门的转置共轭版本,默认为False。
- Returns:
一个Module,可以用来训练模型。
Example:
from pyvqnet.qnn.vqc import CRY,QMachine device = QMachine(4) layer = CRY(has_params= True, trainable= True, wires=[0,2]) batchsize = 2 device.reset_states(batchsize) layer(q_machine = device) print(device.states)
crz
- pyvqnet.qnn.vqc.crz(q_machine, wires, params=None, use_dagger=False)
对q_machine中的态矢作用量子逻辑门 crz 。
- Parameters:
q_machine – 量子虚拟机设备。
wires – 量子比特索引。
params – 参数矩阵,默认为None。
use_dagger – 是否共轭转置,默认为False。
- Returns:
输出QTensor。
Example:
from pyvqnet.qnn.vqc import QMachine import pyvqnet.qnn.vqc as vqc from pyvqnet.tensor import QTensor qm = QMachine(4) vqc.crz(q_machine=qm,wires=[0,2], params=QTensor([0.5])) print(qm.states) # [[[[[1.+0.j 0.+0.j] # [0.+0.j 0.+0.j]] # # [[0.+0.j 0.+0.j] # [0.+0.j 0.+0.j]]] # # # [[[0.+0.j 0.+0.j] # [0.+0.j 0.+0.j]] # # [[0.+0.j 0.+0.j] # [0.+0.j 0.+0.j]]]]]
CRZ
- class pyvqnet.qnn.vqc.CRZ(has_params: bool = False, trainable: bool = False, init_params=None, wires=None, dtype=pyvqnet.kcomplex64, use_dagger=False)
定义一个CRZ逻辑门类 。
- Parameters:
has_params – 是否具有参数,例如RX,RY等门需要设置为True,不含参数的需要设置为False,默认为False。
trainable – 是否自带含待训练参数,如果该层使用外部输入数据构建逻辑门矩阵,设置为False,如果待训练参数需要从该层初始化,则为True,默认为False。
init_params – 初始化参数,用来编码经典数据QTensor,默认为None。
wires – 线路作用的比特索引,默认为None。
dtype – 逻辑门内部矩阵的数据精度,可以设置为pyvqnet.kcomplex64,或pyvqnet.kcomplex128,分别对应float输入或者double入参。
use_dagger – 是否使用该门的转置共轭版本,默认为False。
- Returns:
一个Module,可以用来训练模型。
Example:
from pyvqnet.qnn.vqc import CRZ,QMachine device = QMachine(4) layer = CRZ(has_params= True, trainable= True, wires=[0,2]) batchsize = 2 device.reset_states(batchsize) layer(q_machine = device) print(device.states)
p
- pyvqnet.qnn.vqc.p(q_machine, wires, params=None, use_dagger=False)
对q_machine中的态矢作用量子逻辑门 p 。
- Parameters:
q_machine – 量子虚拟机设备。
wires – 量子比特索引。
params – 参数矩阵,默认为None。
use_dagger – 是否共轭转置,默认为False。
- Returns:
输出QTensor。
Example:
from pyvqnet.qnn.vqc import p,QMachine from pyvqnet.tensor import QTensor qm = QMachine(4) p(q_machine=qm, wires=[1,0],params=QTensor([24.0]),) print(qm.states) # [[[[[1.+0.j 0.+0.j] # [0.+0.j 0.+0.j]] # # [[0.+0.j 0.+0.j] # [0.+0.j 0.+0.j]]] # # # [[[0.+0.j 0.+0.j] # [0.+0.j 0.+0.j]] # # [[0.+0.j 0.+0.j] # [0.+0.j 0.+0.j]]]]]
u1
- pyvqnet.qnn.vqc.u1(q_machine, wires, params=None, use_dagger=False)
对q_machine中的态矢作用量子逻辑门 u1 。
- Parameters:
q_machine – 量子虚拟机设备。
wires – 量子比特索引。
params – 参数矩阵,默认为None。
use_dagger – 是否共轭转置,默认为False。
- Returns:
输出QTensor。
Example:
from pyvqnet.qnn.vqc import u1,QMachine from pyvqnet.tensor import QTensor qm = QMachine(4) u1(q_machine=qm, wires=1,params=QTensor([24.0]),) print(qm.states) # [[[[1.+0.j 0.+0.j] # [0.+0.j 0.+0.j]] # # [[0.+0.j 0.+0.j] # [0.+0.j 0.+0.j]]] # # # [[[0.+0.j 0.+0.j] # [0.+0.j 0.+0.j]] # # [[0.+0.j 0.+0.j] # [0.+0.j 0.+0.j]]]]
U1
- class pyvqnet.qnn.vqc.U1(has_params: bool = False, trainable: bool = False, init_params=None, wires=None, dtype=pyvqnet.kcomplex64, use_dagger=False)
定义一个U1逻辑门类 。
- Parameters:
has_params – 是否具有参数,例如RX,RY等门需要设置为True,不含参数的需要设置为False,默认为False。
trainable – 是否自带含待训练参数,如果该层使用外部输入数据构建逻辑门矩阵,设置为False,如果待训练参数需要从该层初始化,则为True,默认为False。
init_params – 初始化参数,用来编码经典数据QTensor,默认为None。
wires – 线路作用的比特索引,默认为None。
dtype – 逻辑门内部矩阵的数据精度,可以设置为pyvqnet.kcomplex64,或pyvqnet.kcomplex128,分别对应float输入或者double入参。
use_dagger – 是否使用该门的转置共轭版本,默认为False。
- Returns:
一个Module,可以用来训练模型。
Example:
from pyvqnet.qnn.vqc import U1,QMachine device = QMachine(4) layer = U1(has_params= True, trainable= True, wires=0) batchsize = 2 device.reset_states(batchsize) layer(q_machine = device) print(device.states)
u2
- pyvqnet.qnn.vqc.u2(q_machine, wires, params=None, use_dagger=False)
对q_machine中的态矢作用量子逻辑门 u2 。
- Parameters:
q_machine – 量子虚拟机设备。
wires – 量子比特索引。
params – 参数矩阵,默认为None。
use_dagger – 是否共轭转置,默认为False。
- Returns:
输出QTensor。
Example:
from pyvqnet.qnn.vqc import u2,QMachine from pyvqnet.tensor import QTensor qm = QMachine(4) u2(q_machine=qm, wires=1,params=QTensor([[24.0,-3]]),) print(qm.states) # [[[[[0.7071068+0.j 0. +0.j ] # [0. +0.j 0. +0.j ]] # # [[0.2999398-0.6403406j 0. +0.j ] # [0. +0.j 0. +0.j ]]] # # # [[[0. +0.j 0. +0.j ] # [0. +0.j 0. +0.j ]] # # [[0. +0.j 0. +0.j ] # [0. +0.j 0. +0.j ]]]]]
U2
- class pyvqnet.qnn.vqc.U2(has_params: bool = False, trainable: bool = False, init_params=None, wires=None, dtype=pyvqnet.kcomplex64, use_dagger=False)
定义一个U2逻辑门类 。
- Parameters:
has_params – 是否具有参数,例如RX,RY等门需要设置为True,不含参数的需要设置为False,默认为False。
trainable – 是否自带含待训练参数,如果该层使用外部输入数据构建逻辑门矩阵,设置为False,如果待训练参数需要从该层初始化,则为True,默认为False。
init_params – 初始化参数,用来编码经典数据QTensor,默认为None。
wires – 线路作用的比特索引,默认为None。
dtype – 逻辑门内部矩阵的数据精度,可以设置为pyvqnet.kcomplex64,或pyvqnet.kcomplex128,分别对应float输入或者double入参。
use_dagger – 是否使用该门的转置共轭版本,默认为False。
- Returns:
一个Module,可以用来训练模型。
Example:
from pyvqnet.qnn.vqc import U2,QMachine device = QMachine(4) layer = U2(has_params= True, trainable= True, wires=0) batchsize = 2 device.reset_states(batchsize) layer(q_machine = device) print(device.states)
u3
- pyvqnet.qnn.vqc.u3(q_machine, wires, params=None, use_dagger=False)
对q_machine中的态矢作用量子逻辑门 u3 。
- Parameters:
q_machine – 量子虚拟机设备。
wires – 量子比特索引。
params – 参数矩阵,默认为None。
use_dagger – 是否共轭转置,默认为False。
- Returns:
输出QTensor。
Example:
from pyvqnet.qnn.vqc import u3,QMachine from pyvqnet.tensor import QTensor qm = QMachine(4) u3(q_machine=qm, wires=1,params=QTensor([[24.0,-3,1]]),) print(qm.states) # [[[[[0.843854 +0.j 0. +0.j ] # [0. +0.j 0. +0.j ]] # # [[0.5312032+0.0757212j 0. +0.j ] # [0. +0.j 0. +0.j ]]] # # # [[[0. +0.j 0. +0.j ] # [0. +0.j 0. +0.j ]] # # [[0. +0.j 0. +0.j ] # [0. +0.j 0. +0.j ]]]]]
U3
- class pyvqnet.qnn.vqc.U3(has_params: bool = False, trainable: bool = False, init_params=None, wires=None, dtype=pyvqnet.kcomplex64, use_dagger=False)
定义一个U3逻辑门类 。
- Parameters:
has_params – 是否具有参数,例如RX,RY等门需要设置为True,不含参数的需要设置为False,默认为False。
trainable – 是否自带含待训练参数,如果该层使用外部输入数据构建逻辑门矩阵,设置为False,如果待训练参数需要从该层初始化,则为True,默认为False。
init_params – 初始化参数,用来编码经典数据QTensor,默认为None。
wires – 线路作用的比特索引,默认为None。
dtype – 逻辑门内部矩阵的数据精度,可以设置为pyvqnet.kcomplex64,或pyvqnet.kcomplex128,分别对应float输入或者double入参。
use_dagger – 是否使用该门的转置共轭版本,默认为False。
- Returns:
一个Module,可以用来训练模型。
Example:
from pyvqnet.qnn.vqc import U3,QMachine device = QMachine(4) layer = U3(has_params= True, trainable= True, wires=0) batchsize = 2 device.reset_states(batchsize) layer(q_machine = device) print(device.states)
cy
- pyvqnet.qnn.vqc.cy(q_machine, wires, params=None, use_dagger=False)
对q_machine中的态矢作用量子逻辑门 cy 。
- Parameters:
q_machine – 量子虚拟机设备。
wires – 量子比特索引。
params – 参数矩阵,默认为None。
use_dagger – 是否共轭转置,默认为False。
Example:
from pyvqnet.qnn.vqc import cy,QMachine qm = QMachine(4) cy(q_machine=qm,wires=(1,0)) print(qm.states) # [[[[[1.+0.j,0.+0.j], # [0.+0.j,0.+0.j]], # [[0.+0.j,0.+0.j], # [0.+0.j,0.+0.j]]], # [[[0.+0.j,0.+0.j], # [0.+0.j,0.+0.j]], # [[0.+0.j,0.+0.j], # [0.+0.j,0.+0.j]]]]]
CY
- class pyvqnet.qnn.vqc.CY(has_params: bool = False, trainable: bool = False, init_params=None, wires=None, dtype=pyvqnet.kcomplex64, use_dagger=False)
定义一个CY逻辑门类 。
- Parameters:
has_params – 是否具有参数,例如RX,RY等门需要设置为True,不含参数的需要设置为False,默认为False。
trainable – 是否自带含待训练参数,如果该层使用外部输入数据构建逻辑门矩阵,设置为False,如果待训练参数需要从该层初始化,则为True,默认为False。
init_params – 初始化参数,用来编码经典数据QTensor,默认为None。
wires – 线路作用的比特索引,默认为None。
dtype – 逻辑门内部矩阵的数据精度,可以设置为pyvqnet.kcomplex64,或pyvqnet.kcomplex128,分别对应float输入或者double入参。
use_dagger – 是否使用该门的转置共轭版本,默认为False。
- Returns:
一个Module,可以用来训练模型。
Example:
from pyvqnet.qnn.vqc import CY,QMachine device = QMachine(4) layer = CY(wires=[0,1]) batchsize = 2 device.reset_states(batchsize) layer(q_machine = device) print(device.states)
cnot
- pyvqnet.qnn.vqc.cnot(q_machine, wires, params=None, use_dagger=False)
对q_machine中的态矢作用量子逻辑门 cnot 。
- Parameters:
q_machine – 量子虚拟机设备。
wires – 量子比特索引。
params – 参数矩阵,默认为None。
use_dagger – 是否共轭转置,默认为False。
- Returns:
输出QTensor。
Example:
from pyvqnet.qnn.vqc import cnot,QMachine qm = QMachine(4) cnot(q_machine=qm,wires=[1,0],) print(qm.states) # [[[[[1.+0.j 0.+0.j] # [0.+0.j 0.+0.j]] # # [[0.+0.j 0.+0.j] # [0.+0.j 0.+0.j]]] # # # [[[0.+0.j 0.+0.j] # [0.+0.j 0.+0.j]] # # [[0.+0.j 0.+0.j] # [0.+0.j 0.+0.j]]]]]
CNOT
- class pyvqnet.qnn.vqc.CNOT(has_params: bool = False, trainable: bool = False, init_params=None, wires=None, dtype=pyvqnet.kcomplex64, use_dagger=False)
定义一个CNOT逻辑门类 。
- Parameters:
has_params – 是否具有参数,例如RX,RY等门需要设置为True,不含参数的需要设置为False,默认为False。
trainable – 是否自带含待训练参数,如果该层使用外部输入数据构建逻辑门矩阵,设置为False,如果待训练参数需要从该层初始化,则为True,默认为False。
init_params – 初始化参数,用来编码经典数据QTensor,默认为None。
wires – 线路作用的比特索引,默认为None。
dtype – 逻辑门内部矩阵的数据精度,可以设置为pyvqnet.kcomplex64,或pyvqnet.kcomplex128,分别对应float输入或者double入参。
use_dagger – 是否使用该门的转置共轭版本,默认为False。
- Returns:
一个Module,可以用来训练模型。
Example:
from pyvqnet.qnn.vqc import CNOT,QMachine device = QMachine(4) layer = CNOT(wires=[0,1]) batchsize = 2 device.reset_states(batchsize) layer(q_machine = device) print(device.states)
cr
- pyvqnet.qnn.vqc.cr(q_machine, wires, params=None, use_dagger=False)
对q_machine中的态矢作用量子逻辑门 cr 。
- Parameters:
q_machine – 量子虚拟机设备。
wires – 量子比特索引。
params – 参数矩阵,默认为None。
use_dagger – 是否共轭转置,默认为False。
- Returns:
输出QTensor。
Example:
from pyvqnet.qnn.vqc import cr,QMachine from pyvqnet.tensor import QTensor qm = QMachine(4) cr(q_machine=qm,wires=[1,0],params=QTensor([0.5]),) print(qm.states) # [[[[[1.+0.j 0.+0.j] # [0.+0.j 0.+0.j]] # # [[0.+0.j 0.+0.j] # [0.+0.j 0.+0.j]]] # # # [[[0.+0.j 0.+0.j] # [0.+0.j 0.+0.j]] # # [[0.+0.j 0.+0.j] # [0.+0.j 0.+0.j]]]]]
CR
- class pyvqnet.qnn.vqc.CR(has_params: bool = False, trainable: bool = False, init_params=None, wires=None, dtype=pyvqnet.kcomplex64, use_dagger=False)
定义一个CR逻辑门类 。
- Parameters:
has_params – 是否具有参数,例如RX,RY等门需要设置为True,不含参数的需要设置为False,默认为False。
trainable – 是否自带含待训练参数,如果该层使用外部输入数据构建逻辑门矩阵,设置为False,如果待训练参数需要从该层初始化,则为True,默认为False。
init_params – 初始化参数,用来编码经典数据QTensor,默认为None。
wires – 线路作用的比特索引,默认为None。
dtype – 逻辑门内部矩阵的数据精度,可以设置为pyvqnet.kcomplex64,或pyvqnet.kcomplex128,分别对应float输入或者double入参。
use_dagger – 是否使用该门的转置共轭版本,默认为False。
- Returns:
一个Module,可以用来训练模型。
Example:
from pyvqnet.qnn.vqc import CR,QMachine device = QMachine(4) layer = CR(has_params= True, trainable= True, wires=[0,2]) batchsize = 2 device.reset_states(batchsize) layer(q_machine = device) print(device.states)
swap
- pyvqnet.qnn.vqc.swap(q_machine, wires, params=None, use_dagger=False)
对q_machine中的态矢作用量子逻辑门 swap 。
- Parameters:
q_machine – 量子虚拟机设备。
wires – 量子比特索引。
params – 参数矩阵,默认为None。
use_dagger – 是否共轭转置,默认为False。
- Returns:
输出QTensor。
Example:
from pyvqnet.qnn.vqc import swap,QMachine qm = QMachine(4) swap(q_machine=qm,wires=[1,0],) print(qm.states) # [[[[[1.+0.j 0.+0.j] # [0.+0.j 0.+0.j]] # # [[0.+0.j 0.+0.j] # [0.+0.j 0.+0.j]]] # # # [[[0.+0.j 0.+0.j] # [0.+0.j 0.+0.j]] # # [[0.+0.j 0.+0.j] # [0.+0.j 0.+0.j]]]]]
SWAP
- class pyvqnet.qnn.vqc.SWAP(has_params: bool = False, trainable: bool = False, init_params=None, wires=None, dtype=pyvqnet.kcomplex64, use_dagger=False)
定义一个SWAP逻辑门类 。
- Parameters:
has_params – 是否具有参数,例如RX,RY等门需要设置为True,不含参数的需要设置为False,默认为False。
trainable – 是否自带含待训练参数,如果该层使用外部输入数据构建逻辑门矩阵,设置为False,如果待训练参数需要从该层初始化,则为True,默认为False。
init_params – 初始化参数,用来编码经典数据QTensor,默认为None。
wires – 线路作用的比特索引,默认为None。
dtype – 逻辑门内部矩阵的数据精度,可以设置为pyvqnet.kcomplex64,或pyvqnet.kcomplex128,分别对应float输入或者double入参。
use_dagger – 是否使用该门的转置共轭版本,默认为False。
- Returns:
一个Module,可以用来训练模型。
Example:
from pyvqnet.qnn.vqc import SWAP,QMachine device = QMachine(4) layer = SWAP(wires=[0,1]) batchsize = 2 device.reset_states(batchsize) layer(q_machine = device) print(device.states)
cswap
- pyvqnet.qnn.vqc.cswap(q_machine, wires, params=None, use_dagger=False)
对q_machine中的态矢作用量子逻辑门 cswap 。
- Parameters:
q_machine – 量子虚拟机设备。
wires – 量子比特索引。
params – 参数矩阵,默认为None。
use_dagger – 是否共轭转置,默认为False。
- Returns:
输出QTensor。
Example:
from pyvqnet.qnn.vqc import cswap,QMachine qm = QMachine(4) cswap(q_machine=qm,wires=[1,0,3],) print(qm.states) # [[[[[1.+0.j,0.+0.j], # [0.+0.j,0.+0.j]], # [[0.+0.j,0.+0.j], # [0.+0.j,0.+0.j]]], # [[[0.+0.j,0.+0.j], # [0.+0.j,0.+0.j]], # [[0.+0.j,0.+0.j], # [0.+0.j,0.+0.j]]]]]
CSWAP
- class pyvqnet.qnn.vqc.CSWAP(has_params: bool = False, trainable: bool = False, init_params=None, wires=None, dtype=pyvqnet.kcomplex64, use_dagger=False)
定义一个SWAP逻辑门类 。
\[\begin{split}CSWAP = \begin{bmatrix} 1 & 0 & 0 & 0 & 0 & 0 & 0 & 0 \\ 0 & 1 & 0 & 0 & 0 & 0 & 0 & 0 \\ 0 & 0 & 1 & 0 & 0 & 0 & 0 & 0 \\ 0 & 0 & 0 & 1 & 0 & 0 & 0 & 0 \\ 0 & 0 & 0 & 0 & 1 & 0 & 0 & 0 \\ 0 & 0 & 0 & 0 & 0 & 0 & 1 & 0 \\ 0 & 0 & 0 & 0 & 0 & 1 & 0 & 0 \\ 0 & 0 & 0 & 0 & 0 & 0 & 0 & 1 \end{bmatrix}.\end{split}\]- Parameters:
has_params – 是否具有参数,例如RX,RY等门需要设置为True,不含参数的需要设置为False,默认为False。
trainable – 是否自带含待训练参数,如果该层使用外部输入数据构建逻辑门矩阵,设置为False,如果待训练参数需要从该层初始化,则为True,默认为False。
init_params – 初始化参数,用来编码经典数据QTensor,默认为None。
wires – 线路作用的比特索引,默认为None。
dtype – 逻辑门内部矩阵的数据精度,可以设置为pyvqnet.kcomplex64,或pyvqnet.kcomplex128,分别对应float输入或者double入参。
use_dagger – 是否使用该门的转置共轭版本,默认为False。
- Returns:
一个Module,可以用来训练模型。
Example:
from pyvqnet.qnn.vqc import CSWAP,QMachine device = QMachine(4) layer = CSWAP(wires=[0,1,2]) batchsize = 2 device.reset_states(batchsize) layer(q_machine = device) print(device.states) # [[[[[1.+0.j,0.+0.j], # [0.+0.j,0.+0.j]], # [[0.+0.j,0.+0.j], # [0.+0.j,0.+0.j]]], # [[[0.+0.j,0.+0.j], # [0.+0.j,0.+0.j]], # [[0.+0.j,0.+0.j], # [0.+0.j,0.+0.j]]]], # [[[[1.+0.j,0.+0.j], # [0.+0.j,0.+0.j]], # [[0.+0.j,0.+0.j], # [0.+0.j,0.+0.j]]], # [[[0.+0.j,0.+0.j], # [0.+0.j,0.+0.j]], # [[0.+0.j,0.+0.j], # [0.+0.j,0.+0.j]]]]]
iswap
- pyvqnet.qnn.vqc.iswap(q_machine, wires, params=None, use_dagger=False)
对q_machine中的态矢作用量子逻辑门 iswap 。
- Parameters:
q_machine – 量子虚拟机设备。
wires – 量子比特索引。
params – 参数矩阵,默认为None。
use_dagger – 是否共轭转置,默认为False。
- Returns:
输出QTensor。
Example:
from pyvqnet.qnn.vqc import QMachine import pyvqnet.qnn.vqc as vqc from pyvqnet.tensor import QTensor qm = QMachine(4) vqc.iswap(q_machine=qm,wires=[0,1], params = QTensor([0.5]),) print(qm.states) # [[[[[1.+0.j 0.+0.j] # [0.+0.j 0.+0.j]] # # [[0.+0.j 0.+0.j] # [0.+0.j 0.+0.j]]] # # # [[[0.+0.j 0.+0.j] # [0.+0.j 0.+0.j]] # # [[0.+0.j 0.+0.j] # [0.+0.j 0.+0.j]]]]]
cz
- pyvqnet.qnn.vqc.cz(q_machine, wires, params=None, use_dagger=False)
对q_machine中的态矢作用量子逻辑门 cz 。
- Parameters:
q_machine – 量子虚拟机设备。
wires – 量子比特索引。
params – 参数矩阵,默认为None。
use_dagger – 是否共轭转置,默认为False。
- Returns:
输出QTensor。
Example:
from pyvqnet.qnn.vqc import cz,QMachine qm = QMachine(4) cz(q_machine=qm,wires=[1,0],) print(qm.states) # [[[[[1.+0.j 0.+0.j] # [0.+0.j 0.+0.j]] # # [[0.+0.j 0.+0.j] # [0.+0.j 0.+0.j]]] # # # [[[0.+0.j 0.+0.j] # [0.+0.j 0.+0.j]] # # [[0.+0.j 0.+0.j] # [0.+0.j 0.+0.j]]]]]
CZ
- class pyvqnet.qnn.vqc.CZ(has_params: bool = False, trainable: bool = False, init_params=None, wires=None, dtype=pyvqnet.kcomplex64, use_dagger=False)
定义一个CZ逻辑门类 。
- Parameters:
has_params – 是否具有参数,例如RX,RY等门需要设置为True,不含参数的需要设置为False,默认为False。
trainable – 是否自带含待训练参数,如果该层使用外部输入数据构建逻辑门矩阵,设置为False,如果待训练参数需要从该层初始化,则为True,默认为False。
init_params – 初始化参数,用来编码经典数据QTensor,默认为None。
wires – 线路作用的比特索引,默认为None。
dtype – 逻辑门内部矩阵的数据精度,可以设置为pyvqnet.kcomplex64,或pyvqnet.kcomplex128,分别对应float输入或者double入参。
use_dagger – 是否使用该门的转置共轭版本,默认为False。
- Returns:
一个Module,可以用来训练模型。
Example:
from pyvqnet.qnn.vqc import CZ,QMachine device = QMachine(4) layer = CZ(wires=[0,1]) batchsize = 2 device.reset_states(batchsize) layer(q_machine = device) print(device.states)
rxx
- pyvqnet.qnn.vqc.rxx(q_machine, wires, params=None, use_dagger=False)
对q_machine中的态矢作用量子逻辑门 rxx 。
- Parameters:
q_machine – 量子虚拟机设备。
wires – 量子比特索引。
params – 参数矩阵,默认为None。
use_dagger – 是否共轭转置,默认为False。
- Returns:
输出QTensor。
Example:
from pyvqnet.qnn.vqc import rxx,QMachine from pyvqnet.tensor import QTensor qm = QMachine(4) rxx(q_machine=qm,wires=[1,0],params=QTensor([0.2]),) print(qm.states) # [[[[[0.9950042+0.j 0. +0.j ] # [0. +0.j 0. +0.j ]] # # [[0. +0.j 0. +0.j ] # [0. +0.j 0. +0.j ]]] # # # [[[0. +0.j 0. +0.j ] # [0. +0.j 0. +0.j ]] # # [[0. -0.0998334j 0. +0.j ] # [0. +0.j 0. +0.j ]]]]]
RXX
- class pyvqnet.qnn.vqc.RXX(has_params: bool = False, trainable: bool = False, init_params=None, wires=None, dtype=pyvqnet.kcomplex64, use_dagger=False)
定义一个RXX逻辑门类 。
- Parameters:
has_params – 是否具有参数,例如RX,RY等门需要设置为True,不含参数的需要设置为False,默认为False。
trainable – 是否自带含待训练参数,如果该层使用外部输入数据构建逻辑门矩阵,设置为False,如果待训练参数需要从该层初始化,则为True,默认为False。
init_params – 初始化参数,用来编码经典数据QTensor,默认为None。
wires – 线路作用的比特索引,默认为None。
dtype – 逻辑门内部矩阵的数据精度,可以设置为pyvqnet.kcomplex64,或pyvqnet.kcomplex128,分别对应float输入或者double入参。
use_dagger – 是否使用该门的转置共轭版本,默认为False。
- Returns:
一个Module,可以用来训练模型。
Example:
from pyvqnet.qnn.vqc import RXX,QMachine device = QMachine(4) layer = RXX(has_params= True, trainable= True, wires=[0,2]) batchsize = 2 device.reset_states(batchsize) layer(q_machine = device) print(device.states)
ryy
- pyvqnet.qnn.vqc.ryy(q_machine, wires, params=None, use_dagger=False)
对q_machine中的态矢作用量子逻辑门 ryy 。
- Parameters:
q_machine – 量子虚拟机设备。
wires – 量子比特索引。
params – 参数矩阵,默认为None。
use_dagger – 是否共轭转置,默认为False。
- Returns:
输出QTensor。
Example:
from pyvqnet.qnn.vqc import ryy,QMachine from pyvqnet.tensor import QTensor qm = QMachine(4) ryy(q_machine=qm,wires=[1,0],params=QTensor([0.2]),) print(qm.states) # [[[[[0.9950042+0.j 0. +0.j ] # [0. +0.j 0. +0.j ]] # # [[0. +0.j 0. +0.j ] # [0. +0.j 0. +0.j ]]] # # # [[[0. +0.j 0. +0.j ] # [0. +0.j 0. +0.j ]] # # [[0. +0.0998334j 0. +0.j ] # [0. +0.j 0. +0.j ]]]]]
RYY
- class pyvqnet.qnn.vqc.RYY(has_params: bool = False, trainable: bool = False, init_params=None, wires=None, dtype=pyvqnet.kcomplex64, use_dagger=False)
定义一个RYY逻辑门类 。
- Parameters:
has_params – 是否具有参数,例如RX,RY等门需要设置为True,不含参数的需要设置为False,默认为False。
trainable – 是否自带含待训练参数,如果该层使用外部输入数据构建逻辑门矩阵,设置为False,如果待训练参数需要从该层初始化,则为True,默认为False。
init_params – 初始化参数,用来编码经典数据QTensor,默认为None。
wires – 线路作用的比特索引,默认为None。
dtype – 逻辑门内部矩阵的数据精度,可以设置为pyvqnet.kcomplex64,或pyvqnet.kcomplex128,分别对应float输入或者double入参。
use_dagger – 是否使用该门的转置共轭版本,默认为False。
- Returns:
一个Module,可以用来训练模型。
Example:
from pyvqnet.qnn.vqc import RYY,QMachine device = QMachine(4) layer = RYY(has_params= True, trainable= True, wires=[0,2]) batchsize = 2 device.reset_states(batchsize) layer(q_machine = device) print(device.states)
rzz
- pyvqnet.qnn.vqc.rzz(q_machine, wires, params=None, use_dagger=False)
对q_machine中的态矢作用量子逻辑门 rzz 。
- Parameters:
q_machine – 量子虚拟机设备。
wires – 量子比特索引。
params – 参数矩阵,默认为None。
use_dagger – 是否共轭转置,默认为False。
- Returns:
输出QTensor。
Example:
from pyvqnet.qnn.vqc import rzz,QMachine from pyvqnet.tensor import QTensor qm = QMachine(4) rzz(q_machine=qm,wires=[1,0],params=QTensor([0.2]),) print(qm.states) # [[[[[0.9950042-0.0998334j 0. +0.j ] # [0. +0.j 0. +0.j ]] # # [[0. +0.j 0. +0.j ] # [0. +0.j 0. +0.j ]]] # # # [[[0. +0.j 0. +0.j ] # [0. +0.j 0. +0.j ]] # # [[0. +0.j 0. +0.j ] # [0. +0.j 0. +0.j ]]]]]
RZZ
- class pyvqnet.qnn.vqc.RZZ(has_params: bool = False, trainable: bool = False, init_params=None, wires=None, dtype=pyvqnet.kcomplex64, use_dagger=False)
定义一个RZZ逻辑门类 。
- Parameters:
has_params – 是否具有参数,例如RX,RY等门需要设置为True,不含参数的需要设置为False,默认为False。
trainable – 是否自带含待训练参数,如果该层使用外部输入数据构建逻辑门矩阵,设置为False,如果待训练参数需要从该层初始化,则为True,默认为False。
init_params – 初始化参数,用来编码经典数据QTensor,默认为None。
wires – 线路作用的比特索引,默认为None。
dtype – 逻辑门内部矩阵的数据精度,可以设置为pyvqnet.kcomplex64,或pyvqnet.kcomplex128,分别对应float输入或者double入参。
use_dagger – 是否使用该门的转置共轭版本,默认为False。
- Returns:
一个Module,可以用来训练模型。
Example:
from pyvqnet.qnn.vqc import RZZ,QMachine device = QMachine(4) layer = RZZ(has_params= True, trainable= True, wires=[0,2]) batchsize = 2 device.reset_states(batchsize) layer(q_machine = device) print(device.states)
rzx
- pyvqnet.qnn.vqc.rzx(q_machine, wires, params=None, use_dagger=False)
对q_machine中的态矢作用量子逻辑门 RZX 。
- Parameters:
q_machine – 量子虚拟机设备。
wires – 量子比特索引。
params – 参数矩阵,默认为None。
use_dagger – 是否共轭转置,默认为False。
- Returns:
输出QTensor。
Example:
from pyvqnet.qnn.vqc import rzx,QMachine from pyvqnet.tensor import QTensor qm = QMachine(4) rzx(q_machine=qm,wires=[1,0],params=QTensor([0.2]),) print(qm.states) # [[[[[0.9950042+0.j 0. +0.j ] # [0. +0.j 0. +0.j ]] # # [[0. +0.j 0. +0.j ] # [0. +0.j 0. +0.j ]]] # # # [[[0. -0.0998334j 0. +0.j ] # [0. +0.j 0. +0.j ]] # # [[0. +0.j 0. +0.j ] # [0. +0.j 0. +0.j ]]]]]
RZX
- class pyvqnet.qnn.vqc.RZX(has_params: bool = False, trainable: bool = False, init_params=None, wires=None, dtype=pyvqnet.kcomplex64, use_dagger=False)
定义一个RZX逻辑门类 。
- Parameters:
has_params – 是否具有参数,例如RX,RY等门需要设置为True,不含参数的需要设置为False,默认为False。
trainable – 是否自带含待训练参数,如果该层使用外部输入数据构建逻辑门矩阵,设置为False,如果待训练参数需要从该层初始化,则为True,默认为False。
init_params – 初始化参数,用来编码经典数据QTensor,默认为None。
wires – 线路作用的比特索引,默认为None。
dtype – 逻辑门内部矩阵的数据精度,可以设置为pyvqnet.kcomplex64,或pyvqnet.kcomplex128,分别对应float输入或者double入参。
use_dagger – 是否使用该门的转置共轭版本,默认为False。
- Returns:
一个Module,可以用来训练模型。
Example:
from pyvqnet.qnn.vqc import RZX,QMachine device = QMachine(4) layer = RZX(has_params= True, trainable= True, wires=[0,2]) batchsize = 2 device.reset_states(batchsize) layer(q_machine = device) print(device.states)
toffoli
- pyvqnet.qnn.vqc.toffoli(q_machine, wires, params=None, use_dagger=False)
对q_machine中的态矢作用量子逻辑门 toffoli 。
- Parameters:
q_machine – 量子虚拟机设备。
wires – 量子比特索引。
params – 参数矩阵,默认为None。
use_dagger – 是否共轭转置,默认为False。
- Returns:
输出QTensor。
Example:
from pyvqnet.qnn.vqc import toffoli,QMachine qm = QMachine(4) toffoli(q_machine=qm,wires=[0,1,2],) print(qm.states) # [[[[[1.+0.j 0.+0.j] # [0.+0.j 0.+0.j]] # # [[0.+0.j 0.+0.j] # [0.+0.j 0.+0.j]]] # # # [[[0.+0.j 0.+0.j] # [0.+0.j 0.+0.j]] # # [[0.+0.j 0.+0.j] # [0.+0.j 0.+0.j]]]]]
Toffoli
- class pyvqnet.qnn.vqc.Toffoli(has_params: bool = False, trainable: bool = False, init_params=None, wires=None, dtype=pyvqnet.kcomplex64, use_dagger=False)
定义一个Toffoli逻辑门类 。
- Parameters:
has_params – 是否具有参数,例如RX,RY等门需要设置为True,不含参数的需要设置为False,默认为False。
trainable – 是否自带含待训练参数,如果该层使用外部输入数据构建逻辑门矩阵,设置为False,如果待训练参数需要从该层初始化,则为True,默认为False。
init_params – 初始化参数,用来编码经典数据QTensor,默认为None。
wires – 线路作用的比特索引,默认为None。
dtype – 逻辑门内部矩阵的数据精度,可以设置为pyvqnet.kcomplex64,或pyvqnet.kcomplex128,分别对应float输入或者double入参。
use_dagger – 是否使用该门的转置共轭版本,默认为False。
- Returns:
一个Module,可以用来训练模型。
Example:
from pyvqnet.qnn.vqc import Toffoli,QMachine device = QMachine(4) layer = Toffoli( wires=[0,2,1]) batchsize = 2 device.reset_states(batchsize) layer(q_machine = device) print(device.states)
isingxx
- pyvqnet.qnn.vqc.isingxx(q_machine, wires, params=None, use_dagger=False)
对q_machine中的态矢作用量子逻辑门 isingxx 。
- Parameters:
q_machine – 量子虚拟机设备。
wires – 量子比特索引。
params – 参数矩阵,默认为None。
use_dagger – 是否共轭转置,默认为False。
- Returns:
输出QTensor。
Example:
from pyvqnet.qnn.vqc import QMachine import pyvqnet.qnn.vqc as vqc from pyvqnet.tensor import QTensor qm = QMachine(4) vqc.isingxx(q_machine=qm,wires=[0,1], params = QTensor([0.5]),) print(qm.states) # [[[[[0.9689124+0.j 0. +0.j ] # [0. +0.j 0. +0.j ]] # # [[0. +0.j 0. +0.j ] # [0. +0.j 0. +0.j ]]] # # # [[[0. +0.j 0. +0.j ] # [0. +0.j 0. +0.j ]] # # [[0. -0.247404j 0. +0.j ] # [0. +0.j 0. +0.j ]]]]]
IsingXX
- class pyvqnet.qnn.vqc.IsingXX(has_params: bool = False, trainable: bool = False, init_params=None, wires=None, dtype=pyvqnet.kcomplex64, use_dagger=False)
定义一个IsingXX逻辑门类 。
- Parameters:
has_params – 是否具有参数,例如RX,RY等门需要设置为True,不含参数的需要设置为False,默认为False。
trainable – 是否自带含待训练参数,如果该层使用外部输入数据构建逻辑门矩阵,设置为False,如果待训练参数需要从该层初始化,则为True,默认为False。
init_params – 初始化参数,用来编码经典数据QTensor,默认为None。
wires – 线路作用的比特索引,默认为None。
dtype – 逻辑门内部矩阵的数据精度,可以设置为pyvqnet.kcomplex64,或pyvqnet.kcomplex128,分别对应float输入或者double入参。
use_dagger – 是否使用该门的转置共轭版本,默认为False。
- Returns:
一个Module,可以用来训练模型。
Example:
from pyvqnet.qnn.vqc import IsingXX,QMachine device = QMachine(4) layer = IsingXX(has_params= True, trainable= True, wires=[0,2]) batchsize = 2 device.reset_states(batchsize) layer(q_machine = device) print(device.states)
isingyy
- pyvqnet.qnn.vqc.isingyy(q_machine, wires, params=None, use_dagger=False)
对q_machine中的态矢作用量子逻辑门 isingyy 。
- Parameters:
q_machine – 量子虚拟机设备。
wires – 量子比特索引。
params – 参数矩阵,默认为None。
use_dagger – 是否共轭转置,默认为False。
- Returns:
输出QTensor。
Example:
from pyvqnet.qnn.vqc import QMachine import pyvqnet.qnn.vqc as vqc from pyvqnet.tensor import QTensor qm = QMachine(4) vqc.isingyy(q_machine=qm,wires=[0,1], params = QTensor([0.5]),) print(qm.states) # [[[[[0.9689124+0.j 0. +0.j ] # [0. +0.j 0. +0.j ]] # # [[0. +0.j 0. +0.j ] # [0. +0.j 0. +0.j ]]] # # # [[[0. +0.j 0. +0.j ] # [0. +0.j 0. +0.j ]] # # [[0. +0.247404j 0. +0.j ] # [0. +0.j 0. +0.j ]]]]]
IsingYY
- class pyvqnet.qnn.vqc.IsingYY(has_params: bool = False, trainable: bool = False, init_params=None, wires=None, dtype=pyvqnet.kcomplex64, use_dagger=False)
定义一个IsingYY逻辑门类 。
- Parameters:
has_params – 是否具有参数,例如RX,RY等门需要设置为True,不含参数的需要设置为False,默认为False。
trainable – 是否自带含待训练参数,如果该层使用外部输入数据构建逻辑门矩阵,设置为False,如果待训练参数需要从该层初始化,则为True,默认为False。
init_params – 初始化参数,用来编码经典数据QTensor,默认为None。
wires – 线路作用的比特索引,默认为None。
dtype – 逻辑门内部矩阵的数据精度,可以设置为pyvqnet.kcomplex64,或pyvqnet.kcomplex128,分别对应float输入或者double入参。
use_dagger – 是否使用该门的转置共轭版本,默认为False。
- Returns:
一个Module,可以用来训练模型。
Example:
from pyvqnet.qnn.vqc import IsingYY,QMachine device = QMachine(4) layer = IsingYY(has_params= True, trainable= True, wires=[0,2]) batchsize = 2 device.reset_states(batchsize) layer(q_machine = device) print(device.states)
isingzz
- pyvqnet.qnn.vqc.isingzz(q_machine, wires, params=None, use_dagger=False)
对q_machine中的态矢作用量子逻辑门 isingzz 。
- Parameters:
q_machine – 量子虚拟机设备。
wires – 量子比特索引。
params – 参数矩阵,默认为None。
use_dagger – 是否共轭转置,默认为False。
- Returns:
输出QTensor。
Example:
from pyvqnet.qnn.vqc import QMachine import pyvqnet.qnn.vqc as vqc from pyvqnet.tensor import QTensor qm = QMachine(4) vqc.isingzz(q_machine=qm,wires=[0,1], params = QTensor([0.5]),) print(qm.states) # [[[[[0.9689124-0.247404j 0. +0.j ] # [0. +0.j 0. +0.j ]] # # [[0. +0.j 0. +0.j ] # [0. +0.j 0. +0.j ]]] # # # [[[0. +0.j 0. +0.j ] # [0. +0.j 0. +0.j ]] # # [[0. +0.j 0. +0.j ] # [0. +0.j 0. +0.j ]]]]]
IsingZZ
- class pyvqnet.qnn.vqc.IsingZZ(has_params: bool = False, trainable: bool = False, init_params=None, wires=None, dtype=pyvqnet.kcomplex64, use_dagger=False)
定义一个IsingZZ逻辑门类 。
- Parameters:
has_params – 是否具有参数,例如RX,RY等门需要设置为True,不含参数的需要设置为False,默认为False。
trainable – 是否自带含待训练参数,如果该层使用外部输入数据构建逻辑门矩阵,设置为False,如果待训练参数需要从该层初始化,则为True,默认为False。
init_params – 初始化参数,用来编码经典数据QTensor,默认为None。
wires – 线路作用的比特索引,默认为None。
dtype – 逻辑门内部矩阵的数据精度,可以设置为pyvqnet.kcomplex64,或pyvqnet.kcomplex128,分别对应float输入或者double入参。
use_dagger – 是否使用该门的转置共轭版本,默认为False。
- Returns:
一个Module,可以用来训练模型。
Example:
from pyvqnet.qnn.vqc import IsingZZ,QMachine device = QMachine(4) layer = IsingZZ(has_params= True, trainable= True, wires=[0,2]) batchsize = 2 device.reset_states(batchsize) layer(q_machine = device) print(device.states)
isingxy
- pyvqnet.qnn.vqc.isingxy(q_machine, wires, params=None, use_dagger=False)
对q_machine中的态矢作用量子逻辑门 isingxy 。
- Parameters:
q_machine – 量子虚拟机设备。
wires – 量子比特索引。
params – 参数矩阵,默认为None。
use_dagger – 是否共轭转置,默认为False。
- Returns:
输出QTensor。
Example:
from pyvqnet.qnn.vqc import QMachine import pyvqnet.qnn.vqc as vqc from pyvqnet.tensor import QTensor qm = QMachine(4) vqc.isingxy(q_machine=qm,wires=[0,1], params = QTensor([0.5]),) print(qm.states) # [[[[[1.+0.j 0.+0.j] # [0.+0.j 0.+0.j]] # # [[0.+0.j 0.+0.j] # [0.+0.j 0.+0.j]]] # # # [[[0.+0.j 0.+0.j] # [0.+0.j 0.+0.j]] # # [[0.+0.j 0.+0.j] # [0.+0.j 0.+0.j]]]]]
IsingXY
- class pyvqnet.qnn.vqc.IsingXY(has_params: bool = False, trainable: bool = False, init_params=None, wires=None, dtype=pyvqnet.kcomplex64, use_dagger=False)
定义一个IsingXY逻辑门类 。
- Parameters:
has_params – 是否具有参数,例如RX,RY等门需要设置为True,不含参数的需要设置为False,默认为False。
trainable – 是否自带含待训练参数,如果该层使用外部输入数据构建逻辑门矩阵,设置为False,如果待训练参数需要从该层初始化,则为True,默认为False。
init_params – 初始化参数,用来编码经典数据QTensor,默认为None。
wires – 线路作用的比特索引,默认为None。
dtype – 逻辑门内部矩阵的数据精度,可以设置为pyvqnet.kcomplex64,或pyvqnet.kcomplex128,分别对应float输入或者double入参。
use_dagger – 是否使用该门的转置共轭版本,默认为False。
- Returns:
一个Module,可以用来训练模型。
Example:
from pyvqnet.qnn.vqc import IsingXY,QMachine device = QMachine(4) layer = IsingXY(has_params= True, trainable= True, wires=[0,2]) batchsize = 2 device.reset_states(batchsize) layer(q_machine = device) print(device.states)
phaseshift
- pyvqnet.qnn.vqc.phaseshift(q_machine, wires, params=None, use_dagger=False)
对q_machine中的态矢作用量子逻辑门 phaseshift 。
- Parameters:
q_machine – 量子虚拟机设备。
wires – 量子比特索引。
params – 参数矩阵,默认为None。
use_dagger – 是否共轭转置,默认为False。
- Returns:
输出QTensor。
Example:
from pyvqnet.qnn.vqc import QMachine import pyvqnet.qnn.vqc as vqc from pyvqnet.tensor import QTensor qm = QMachine(4) vqc.phaseshift(q_machine=qm,wires=[0], params = QTensor([0.5]),) print(qm.states) # [[[[[1.+0.j 0.+0.j] # [0.+0.j 0.+0.j]] # # [[0.+0.j 0.+0.j] # [0.+0.j 0.+0.j]]] # # # [[[0.+0.j 0.+0.j] # [0.+0.j 0.+0.j]] # # [[0.+0.j 0.+0.j] # [0.+0.j 0.+0.j]]]]]
PhaseShift
- class pyvqnet.qnn.vqc.PhaseShift(has_params: bool = False, trainable: bool = False, init_params=None, wires=None, dtype=pyvqnet.kcomplex64, use_dagger=False)
定义一个PhaseShift逻辑门类 。
- Parameters:
has_params – 是否具有参数,例如RX,RY等门需要设置为True,不含参数的需要设置为False,默认为False。
trainable – 是否自带含待训练参数,如果该层使用外部输入数据构建逻辑门矩阵,设置为False,如果待训练参数需要从该层初始化,则为True,默认为False。
init_params – 初始化参数,用来编码经典数据QTensor,默认为None。
wires – 线路作用的比特索引,默认为None。
dtype – 逻辑门内部矩阵的数据精度,可以设置为pyvqnet.kcomplex64,或pyvqnet.kcomplex128,分别对应float输入或者double入参。
use_dagger – 是否使用该门的转置共轭版本,默认为False。
- Returns:
一个Module,可以用来训练模型。
Example:
from pyvqnet.qnn.vqc import PhaseShift,QMachine device = QMachine(4) layer = PhaseShift(has_params= True, trainable= True, wires=1) batchsize = 2 device.reset_states(batchsize) layer(q_machine = device) print(device.states)
multirz
- pyvqnet.qnn.vqc.multirz(q_machine, wires, params=None, use_dagger=False)
对q_machine中的态矢作用量子逻辑门 multirz 。
- Parameters:
q_machine – 量子虚拟机设备。
wires – 量子比特索引。
params – 参数矩阵,默认为None。
use_dagger – 是否共轭转置,默认为False。
- Returns:
输出QTensor。
Example:
from pyvqnet.qnn.vqc import QMachine import pyvqnet.qnn.vqc as vqc from pyvqnet.tensor import QTensor qm = QMachine(4) vqc.multirz(q_machine=qm,wires=[0, 1], params = QTensor([0.5]),) print(qm.states) # [[[[[0.9689124-0.247404j 0. +0.j ] # [0. +0.j 0. +0.j ]] # # [[0. +0.j 0. +0.j ] # [0. +0.j 0. +0.j ]]] # # # [[[0. +0.j 0. +0.j ] # [0. +0.j 0. +0.j ]] # # [[0. +0.j 0. +0.j ] # [0. +0.j 0. +0.j ]]]]]
MultiRZ
- class pyvqnet.qnn.vqc.MultiRZ(has_params: bool = False, trainable: bool = False, init_params=None, wires=None, dtype=pyvqnet.kcomplex64, use_dagger=False)
定义一个MultiRZ逻辑门类 。
- Parameters:
has_params – 是否具有参数,例如RX,RY等门需要设置为True,不含参数的需要设置为False,默认为False。
trainable – 是否自带含待训练参数,如果该层使用外部输入数据构建逻辑门矩阵,设置为False,如果待训练参数需要从该层初始化,则为True,默认为False。
init_params – 初始化参数,用来编码经典数据QTensor,默认为None。
wires – 线路作用的比特索引,默认为None。
dtype – 逻辑门内部矩阵的数据精度,可以设置为pyvqnet.kcomplex64,或pyvqnet.kcomplex128,分别对应float输入或者double入参。
use_dagger – 是否使用该门的转置共轭版本,默认为False。
- Returns:
一个Module,可以用来训练模型。
Example:
from pyvqnet.qnn.vqc import MultiRZ,QMachine device = QMachine(4) layer = MultiRZ(has_params= True, trainable= True, wires=[0,2]) batchsize = 2 device.reset_states(batchsize) layer(q_machine = device) print(device.states)
sdg
- pyvqnet.qnn.vqc.sdg(q_machine, wires, params=None, use_dagger=False)
对q_machine中的态矢作用量子逻辑门 sdg 。
- Parameters:
q_machine – 量子虚拟机设备。
wires – 量子比特索引。
params – 参数矩阵,默认为None。
use_dagger – 是否共轭转置,默认为False。
- Returns:
输出QTensor。
Example:
from pyvqnet.qnn.vqc import QMachine import pyvqnet.qnn.vqc as vqc from pyvqnet.tensor import QTensor qm = QMachine(4) vqc.sdg(q_machine=qm,wires=[0],) print(qm.states) # [[[[[1.+0.j 0.+0.j] # [0.+0.j 0.+0.j]] # # [[0.+0.j 0.+0.j] # [0.+0.j 0.+0.j]]] # # # [[[0.+0.j 0.+0.j] # [0.+0.j 0.+0.j]] # # [[0.+0.j 0.+0.j] # [0.+0.j 0.+0.j]]]]]
SDG
- class pyvqnet.qnn.vqc.SDG(has_params: bool = False, trainable: bool = False, init_params=None, wires=None, dtype=pyvqnet.kcomplex64, use_dagger=False)
定义一个SDG逻辑门类 。
- Parameters:
has_params – 是否具有参数,例如RX,RY等门需要设置为True,不含参数的需要设置为False,默认为False。
trainable – 是否自带含待训练参数,如果该层使用外部输入数据构建逻辑门矩阵,设置为False,如果待训练参数需要从该层初始化,则为True,默认为False。
init_params – 初始化参数,用来编码经典数据QTensor,默认为None。
wires – 线路作用的比特索引,默认为None。
dtype – 逻辑门内部矩阵的数据精度,可以设置为pyvqnet.kcomplex64,或pyvqnet.kcomplex128,分别对应float输入或者double入参。
use_dagger – 是否使用该门的转置共轭版本,默认为False。
- Returns:
一个Module,可以用来训练模型。
Example:
from pyvqnet.qnn.vqc import SDG,QMachine device = QMachine(4) layer = SDG(wires=0) batchsize = 1 device.reset_states(1) layer(q_machine = device) print(device.states)
tdg
- pyvqnet.qnn.vqc.tdg(q_machine, wires, params=None, use_dagger=False)
对q_machine中的态矢作用量子逻辑门 tdg 。
- Parameters:
q_machine – 量子虚拟机设备。
wires – 量子比特索引。
params – 参数矩阵,默认为None。
use_dagger – 是否共轭转置,默认为False。
- Returns:
输出QTensor。
Example:
from pyvqnet.qnn.vqc import QMachine import pyvqnet.qnn.vqc as vqc from pyvqnet.tensor import QTensor qm = QMachine(4) vqc.tdg(q_machine=qm,wires=[0],) print(qm.states) # [[[[[1.+0.j 0.+0.j] # [0.+0.j 0.+0.j]] # # [[0.+0.j 0.+0.j] # [0.+0.j 0.+0.j]]] # # # [[[0.+0.j 0.+0.j] # [0.+0.j 0.+0.j]] # # [[0.+0.j 0.+0.j] # [0.+0.j 0.+0.j]]]]]
TDG
- class pyvqnet.qnn.vqc.TDG(has_params: bool = False, trainable: bool = False, init_params=None, wires=None, dtype=pyvqnet.kcomplex64, use_dagger=False)
定义一个TDG逻辑门类 。
- Parameters:
has_params – 是否具有参数,例如RX,RY等门需要设置为True,不含参数的需要设置为False,默认为False。
trainable – 是否自带含待训练参数,如果该层使用外部输入数据构建逻辑门矩阵,设置为False,如果待训练参数需要从该层初始化,则为True,默认为False。
init_params – 初始化参数,用来编码经典数据QTensor,默认为None。
wires – 线路作用的比特索引,默认为None。
dtype – 逻辑门内部矩阵的数据精度,可以设置为pyvqnet.kcomplex64,或pyvqnet.kcomplex128,分别对应float输入或者double入参。
use_dagger – 是否使用该门的转置共轭版本,默认为False。
- Returns:
一个Module,可以用来训练模型。
Example:
from pyvqnet.qnn.vqc import TDG,QMachine device = QMachine(4) layer = TDG(wires=0) batchsize = 1 device.reset_states(1) layer(q_machine = device) print(device.states)
controlledphaseshift
- pyvqnet.qnn.vqc.controlledphaseshift(q_machine, wires, params=None, use_dagger=False)
对q_machine中的态矢作用量子逻辑门 controlledphaseshift 。
- Parameters:
q_machine – 量子虚拟机设备。
wires – 量子比特索引。
params – 参数矩阵,默认为None。
use_dagger – 是否共轭转置,默认为False。
- Returns:
输出QTensor。
Example:
from pyvqnet.qnn.vqc import QMachine import pyvqnet.qnn.vqc as vqc from pyvqnet.tensor import QTensor qm = QMachine(4) for i in range(4): vqc.hadamard(q_machine=qm, wires=i) vqc.controlledphaseshift(q_machine=qm,params=QTensor([0.5]),wires=[0,1],) print(qm.states) # [[[[[0.25 +0.j 0.25 +0.j ] # [0.25 +0.j 0.25 +0.j ]] # # [[0.25 +0.j 0.25 +0.j ] # [0.25 +0.j 0.25 +0.j ]]] # # # [[[0.25 +0.j 0.25 +0.j ] # [0.25 +0.j 0.25 +0.j ]] # # [[0.2193956+0.1198564j 0.2193956+0.1198564j] # [0.2193956+0.1198564j 0.2193956+0.1198564j]]]]]
ControlledPhaseShift
- class pyvqnet.qnn.vqc.ControlledPhaseShift(has_params: bool = False, trainable: bool = False, init_params=None, wires=None, dtype=pyvqnet.kcomplex64, use_dagger=False)
定义一个ControlledPhaseShift逻辑门类 。
- Parameters:
has_params – 是否具有参数,例如RX,RY等门需要设置为True,不含参数的需要设置为False,默认为False。
trainable – 是否自带含待训练参数,如果该层使用外部输入数据构建逻辑门矩阵,设置为False,如果待训练参数需要从该层初始化,则为True,默认为False。
init_params – 初始化参数,用来编码经典数据QTensor,默认为None。
wires – 线路作用的比特索引,默认为None。
dtype – 逻辑门内部矩阵的数据精度,可以设置为pyvqnet.kcomplex64,或pyvqnet.kcomplex128,分别对应float输入或者double入参。
use_dagger – 是否使用该门的转置共轭版本,默认为False。
- Returns:
一个Module,可以用来训练模型。
Example:
from pyvqnet.qnn.vqc import ControlledPhaseShift,QMachine device = QMachine(4) layer = ControlledPhaseShift(has_params= True, trainable= True, wires=[0,2]) batchsize = 2 device.reset_states(batchsize) layer(q_machine = device) print(device.states)
multicnot
- pyvqnet.qnn.vqc.multicnot(q_machine, wires, params=None, use_dagger=False)
对q_machine中的态矢作用量子逻辑门 multicnot 。
- Parameters:
q_machine – 量子虚拟机设备。
wires – 量子比特索引。
params – 参数矩阵,默认为None。
use_dagger – 是否共轭转置,默认为False。
- Returns:
输出QTensor。
Example:
from pyvqnet.qnn.vqc import QMachine import pyvqnet.qnn.vqc as vqc from pyvqnet.tensor import QTensor qm = QMachine(4) vqc.multicnot(q_machine=qm, wires=[0, 1]) print(qm.states) # [[[[[1.+0.j 0.+0.j] # [0.+0.j 0.+0.j]] # # [[0.+0.j 0.+0.j] # [0.+0.j 0.+0.j]]] # # # [[[0.+0.j 0.+0.j] # [0.+0.j 0.+0.j]] # # [[0.+0.j 0.+0.j] # [0.+0.j 0.+0.j]]]]]
MultiCnot
- class pyvqnet.qnn.vqc.MultiCnot(has_params: bool = False, trainable: bool = False, init_params=None, wires=None, dtype=pyvqnet.kcomplex64, use_dagger=False)
定义一个MultiCnot逻辑门类 。
- Parameters:
has_params – 是否具有参数,例如RX,RY等门需要设置为True,不含参数的需要设置为False,默认为False。
trainable – 是否自带含待训练参数,如果该层使用外部输入数据构建逻辑门矩阵,设置为False,如果待训练参数需要从该层初始化,则为True,默认为False。
init_params – 初始化参数,用来编码经典数据QTensor,默认为None。
wires – 线路作用的比特索引,默认为None。
dtype – 逻辑门内部矩阵的数据精度,可以设置为pyvqnet.kcomplex64,或pyvqnet.kcomplex128,分别对应float输入或者double入参。
use_dagger – 是否使用该门的转置共轭版本,默认为False。
- Returns:
一个Module,可以用来训练模型。
Example:
from pyvqnet.qnn.vqc import MultiCnot,QMachine device = QMachine(4) layer = MultiCnot(wires=[0,2]) batchsize = 2 device.reset_states(batchsize) layer(q_machine = device) print(device.states)
multixcnot
- pyvqnet.qnn.vqc.multixcnot(q_machine, wires, params=None, use_dagger=False)
对q_machine中的态矢作用量子逻辑门 multixcnot 。
- Parameters:
q_machine – 量子虚拟机设备。
wires – 量子比特索引。
params – 参数矩阵,默认为None。
use_dagger – 是否共轭转置,默认为False。
- Returns:
输出QTensor。
Example:
from pyvqnet.qnn.vqc import QMachine import pyvqnet.qnn.vqc as vqc from pyvqnet.tensor import QTensor qm = QMachine(4) vqc.multixcnot(q_machine=qm, wires=[0, 1]) print(qm.states) # [[[[[0.+0.j 0.+0.j] # [0.+0.j 0.+0.j]] # # [[1.+0.j 0.+0.j] # [0.+0.j 0.+0.j]]] # # # [[[0.+0.j 0.+0.j] # [0.+0.j 0.+0.j]] # # [[0.+0.j 0.+0.j] # [0.+0.j 0.+0.j]]]]]
MultiXcnot
- class pyvqnet.qnn.vqc.MultiXcnot(has_params: bool = False, trainable: bool = False, init_params=None, wires=None, dtype=pyvqnet.kcomplex64, use_dagger=False)
定义一个MultiXcnot逻辑门类 。
- Parameters:
has_params – 是否具有参数,例如RX,RY等门需要设置为True,不含参数的需要设置为False,默认为False。
trainable – 是否自带含待训练参数,如果该层使用外部输入数据构建逻辑门矩阵,设置为False,如果待训练参数需要从该层初始化,则为True,默认为False。
init_params – 初始化参数,用来编码经典数据QTensor,默认为None。
wires – 线路作用的比特索引,默认为None。
dtype – 逻辑门内部矩阵的数据精度,可以设置为pyvqnet.kcomplex64,或pyvqnet.kcomplex128,分别对应float输入或者double入参。
use_dagger – 是否使用该门的转置共轭版本,默认为False。
- Returns:
一个Module,可以用来训练模型。
Example:
from pyvqnet.qnn.vqc import MultiXcnot,QMachine device = QMachine(4) layer = MultiXcnot(wires=[0,2]) batchsize = 2 device.reset_states(batchsize) layer(q_machine = device) print(device.states)
single_excitation
- pyvqnet.qnn.vqc.single_excitation(q_machine, wires, params=None, use_dagger=False)
对q_machine中的态矢作用量子逻辑门 single_excitation 。
- Parameters:
q_machine – 量子虚拟机设备。
wires – 量子比特索引。
params – 参数矩阵,默认为None。
use_dagger – 是否共轭转置,默认为False。
- Returns:
输出QTensor。
Example:
from pyvqnet.qnn.vqc import QMachine import pyvqnet.qnn.vqc as vqc from pyvqnet.tensor import QTensor qm = QMachine(4) vqc.single_excitation(q_machine=qm, wires=[0, 1], params=QTensor([0.5])) print(qm.states) # [[[[[1.+0.j 0.+0.j] # [0.+0.j 0.+0.j]] # # [[0.+0.j 0.+0.j] # [0.+0.j 0.+0.j]]] # # # [[[0.+0.j 0.+0.j] # [0.+0.j 0.+0.j]] # # [[0.+0.j 0.+0.j] # [0.+0.j 0.+0.j]]]]]
double_excitation
- pyvqnet.qnn.vqc.double_excitation(q_machine, wires, params=None, use_dagger=False)
对q_machine中的态矢作用量子逻辑门 double_excitation 。
- Parameters:
q_machine – 量子虚拟机设备。
wires – 量子比特索引。
params – 参数矩阵,默认为None。
use_dagger – 是否共轭转置,默认为False。
- Returns:
输出QTensor。
Example:
from pyvqnet.qnn.vqc import QMachine import pyvqnet.qnn.vqc as vqc from pyvqnet.tensor import QTensor qm = QMachine(4) for i in range(4): vqc.hadamard(q_machine=qm, wires=i) vqc.isingzz(q_machine=qm, params=QTensor([0.55]), wires=[1,0]) vqc.double_excitation(q_machine=qm, params=QTensor([0.55]), wires=[0,1,2,3]) print(qm.states) # [[[[[0.2406063-0.0678867j 0.2406063-0.0678867j] # [0.2406063-0.0678867j 0.1662296-0.0469015j]] # # [[0.2406063+0.0678867j 0.2406063+0.0678867j] # [0.2406063+0.0678867j 0.2406063+0.0678867j]]] # # # [[[0.2406063+0.0678867j 0.2406063+0.0678867j] # [0.2406063+0.0678867j 0.2406063+0.0678867j]] # # [[0.2969014-0.0837703j 0.2406063-0.0678867j] # [0.2406063-0.0678867j 0.2406063-0.0678867j]]]]]
VQC_BasisEmbedding
- pyvqnet.qnn.vqc.VQC_BasisEmbedding(basis_state, q_machine)
将n个二进制特征编码为n个量子比特的基态。
例如, 对于
basis_state=([0, 1, 1])
, 在量子系统下其基态为 \(|011 \rangle\)。- Parameters:
basis_state –
(n)
大小的二进制输入。q_machine – 量子虚拟机设备。
- Returns:
输出QTensor。
Example:
from pyvqnet.qnn.vqc import VQC_BasisEmbedding,QMachine qm = QMachine(3) VQC_BasisEmbedding(basis_state=[1,1,0],q_machine=qm) print(qm.states) # [[[[0.+0.j 0.+0.j] # [0.+0.j 0.+0.j]] # # [[0.+0.j 0.+0.j] # [1.+0.j 0.+0.j]]]]
VQC_AngleEmbedding
- pyvqnet.qnn.vqc.VQC_AngleEmbedding(input_feat, wires, q_machine: QMachine, rotation: str = 'X')
将 \(N\) 特征编码到 \(n\) 量子比特的旋转角度中, 其中 \(N \leq n\)。
旋转可以选择为 : ‘X’ , ‘Y’ , ‘Z’, 如
rotation
的参数定义为:rotation='X'
将特征用作RX旋转的角度。rotation='Y'
将特征用作RY旋转的角度。rotation='Z'
将特征用作RZ旋转的角度。
wires
代表旋转门在量子比特上的idx。- Parameters:
input_feat – 表示参数的数组。
wires – 量子比特idx。
q_machine – 量子虚拟机设备。
rotation – 旋转门,默认为“X”。
- Returns:
输出QTensor。
Example:
from pyvqnet.qnn.vqc import VQC_AngleEmbedding, QMachine from pyvqnet.tensor import QTensor qm = QMachine(2) VQC_AngleEmbedding(QTensor([2.2, 1]), [0, 1], q_machine=qm, rotation='X') print(qm.states) # [[[ 0.398068 +0.j 0. -0.2174655j] # [ 0. -0.7821081j -0.4272676+0.j ]]] VQC_AngleEmbedding(QTensor([2.2, 1]), [0, 1], q_machine=qm, rotation='Y') print(qm.states) # [[[-0.0240995+0.6589843j 0.4207355+0.2476033j] # [ 0.4042482-0.2184162j 0. -0.3401631j]]] VQC_AngleEmbedding(QTensor([2.2, 1]), [0, 1], q_machine=qm, rotation='Z') print(qm.states) # [[[0.659407 +0.0048471j 0.4870554-0.0332093j] # [0.4569675+0.047989j 0.340018 +0.0099326j]]]
VQC_AmplitudeEmbedding
- pyvqnet.qnn.vqc.VQC_AmplitudeEmbeddingCircuit(input_feature, q_machine)
将 \(2^n\) 特征编码为 \(n\) 量子比特的振幅向量。
- Parameters:
input_feature – 表示参数的numpy数组。
q_machine – 量子虚拟机设备。
- Returns:
输出QTensor。
Example:
from pyvqnet.qnn.vqc import VQC_AmplitudeEmbedding, QMachine from pyvqnet.tensor import QTensor qm = QMachine(3) VQC_AmplitudeEmbedding(QTensor([3.2,-2,-2,0.3,12,0.1,2,-1]), q_machine=qm) print(qm.states) # [[[[ 0.2473717+0.j -0.1546073+0.j] # [-0.1546073+0.j 0.0231911+0.j]] # # [[ 0.9276441+0.j 0.0077304+0.j] # [ 0.1546073+0.j -0.0773037+0.j]]]]
VQC_IQPEmbedding
- pyvqnet.qnn.vqc.VQC_IQPEmbedding(input_feat, q_machine: QMachine, rep: int = 1)
使用IQP线路的对角门将 \(n\) 特征编码为 \(n\) 量子比特。
编码是由 Havlicek et al. (2018) 提出。
通过指定
rep
,可以重复基本IQP线路。- Parameters:
input_feat – 表示参数的数组。
q_machine – 量子虚拟机设备。
rep – 重复量子线路块次数,默认次数为1。
- Returns:
输出QTensor。
Example:
from pyvqnet.qnn.vqc import VQC_IQPEmbedding, QMachine from pyvqnet.tensor import QTensor qm = QMachine(3) VQC_IQPEmbedding(QTensor([3.2,-2,-2]), q_machine=qm) print(qm.states) # [[[[ 0.0309356-0.3521973j 0.3256442+0.1376801j] # [ 0.3256442+0.1376801j 0.2983474+0.1897071j]] # # [[ 0.0309356+0.3521973j -0.3170519-0.1564546j] # [-0.3170519-0.1564546j -0.2310978-0.2675701j]]]]
VQC_RotCircuit
- pyvqnet.qnn.vqc.VQC_RotCircuit(q_machine, wire, params)
任意单量子比特旋转。
\[\begin{split}R(\phi,\theta,\omega) = RZ(\omega)RY(\theta)RZ(\phi)= \begin{bmatrix} e^{-i(\phi+\omega)/2}\cos(\theta/2) & -e^{i(\phi-\omega)/2}\sin(\theta/2) \\ e^{-i(\phi-\omega)/2}\sin(\theta/2) & e^{i(\phi+\omega)/2}\cos(\theta/2) \end{bmatrix}.\end{split}\]- Parameters:
q_machine – 量子虚拟机设备。
wire – 量子比特索引。
params – 表示参数 \([\phi, \theta, \omega]\)。
- Returns:
输出QTensor。
Example:
from pyvqnet.qnn.vqc import VQC_RotCircuit, QMachine from pyvqnet.tensor import QTensor qm = QMachine(3) VQC_RotCircuit(q_machine=qm, wire=[1],params=QTensor([2.0,1.5,2.1])) print(qm.states) # [[[[-0.3373617-0.6492732j 0. +0.j ] # [ 0.6807868-0.0340677j 0. +0.j ]] # # [[ 0. +0.j 0. +0.j ] # [ 0. +0.j 0. +0.j ]]]]
VQC_CRotCircuit
- pyvqnet.qnn.vqc.VQC_CRotCircuit(para, control_qubits, rot_wire, q_machine)
受控Rot操作符。
\[\begin{split}CR(\phi, \theta, \omega) = \begin{bmatrix} 1 & 0 & 0 & 0 \\ 0 & 1 & 0 & 0\\ 0 & 0 & e^{-i(\phi+\omega)/2}\cos(\theta/2) & -e^{i(\phi-\omega)/2}\sin(\theta/2)\\ 0 & 0 & e^{-i(\phi-\omega)/2}\sin(\theta/2) & e^{i(\phi+\omega)/2}\cos(\theta/2) \end{bmatrix}.\end{split}\]- Parameters:
para – 表示参数的数组。
control_qubits – 控制量子比特索引。
rot_wire – Rot量子比特索引。
q_machine – 量子虚拟机设备。
- Returns:
输出QTensor。
Example:
from pyvqnet.tensor import QTensor from pyvqnet.qnn.vqc.qcircuit import VQC_CRotCircuit from pyvqnet.qnn.vqc import QMachine, MeasureAll p = QTensor([2, 3, 4.0]) qm = QMachine(2) VQC_CRotCircuit(p, 0, 1, qm) m = MeasureAll(obs={"Z0": 1}) exp = m(q_machine=qm) print(exp) # [[0.9999999]]
VQC_Controlled_Hadamard
- pyvqnet.qnn.vqc.VQC_Controlled_Hadamard(wires, q_machine)
受控Hadamard逻辑门
\[\begin{split}CH = \begin{bmatrix} 1 & 0 & 0 & 0 \\ 0 & 1 & 0 & 0 \\ 0 & 0 & \frac{1}{\sqrt{2}} & \frac{1}{\sqrt{2}} \\ 0 & 0 & \frac{1}{\sqrt{2}} & -\frac{1}{\sqrt{2}} \end{bmatrix}.\end{split}\]- Parameters:
wires – 量子比特索引列表, 第一位是控制比特, 列表长度为2。
q_machine – 量子虚拟机设备。
- Returns:
输出QTensor。
Examples:
from pyvqnet.tensor import QTensor from pyvqnet.qnn.vqc.qcircuit import VQC_Controlled_Hadamard from pyvqnet.qnn.vqc import QMachine, MeasureAll p = QTensor([0.2, 3, 4.0]) qm = QMachine(3) VQC_Controlled_Hadamard([1, 0], qm) m = MeasureAll(obs={"Z0": 1}) exp = m(q_machine=qm) print(exp) # [[1.]]
VQC_CCZ
- pyvqnet.qnn.vqc.VQC_CCZ(wires, q_machine)
受控-受控-Z (controlled-controlled-Z) 逻辑门。
\[\begin{split}CCZ = \begin{pmatrix} 1 & 0 & 0 & 0 & 0 & 0 & 0 & 0\\ 0 & 1 & 0 & 0 & 0 & 0 & 0 & 0\\ 0 & 0 & 1 & 0 & 0 & 0 & 0 & 0\\ 0 & 0 & 0 & 1 & 0 & 0 & 0 & 0\\ 0 & 0 & 0 & 0 & 1 & 0 & 0 & 0\\ 0 & 0 & 0 & 0 & 0 & 1 & 0 & 0\\ 0 & 0 & 0 & 0 & 0 & 0 & 1 & 0\\ 0 & 0 & 0 & 0 & 0 & 0 & 0 & -1 \end{pmatrix}\end{split}\]- Parameters:
wires – 量子比特下标列表,第一位是控制比特。列表长度为3。
q_machine – 量子虚拟机设备。
- Returns:
输出QTensor。
Example:
from pyvqnet.tensor import QTensor from pyvqnet.qnn.vqc.qcircuit import VQC_CCZ from pyvqnet.qnn.vqc import QMachine, MeasureAll p = QTensor([0.2, 3, 4.0]) qm = QMachine(3) VQC_CCZ([1, 0, 2], qm) m = MeasureAll(obs={"Z0": 1}) exp = m(q_machine=qm) print(exp) # [[0.9999999]]
VQC_FermionicSingleExcitation
- pyvqnet.qnn.vqc.VQC_FermionicSingleExcitation(weight, wires, q_machine)
对泡利矩阵的张量积求幂的耦合簇单激励算子。矩阵形式下式给出:
\[\hat{U}_{pr}(\theta) = \mathrm{exp} \{ \theta_{pr} (\hat{c}_p^\dagger \hat{c}_r -\mathrm{H.c.}) \},\]- Parameters:
weight – 量子比特p上的参数, 只有一个元素.
wires – 表示区间[r, p]中的量子比特索引子集。最小长度必须为2。第一索引值被解释为r,最后一个索引值被解释为p。 中间的索引被CNOT门作用,以计算量子位集的奇偶校验。
q_machine – 量子虚拟机设备。
- Returns:
输出QTensor。
Examples:
from pyvqnet.tensor import QTensor from pyvqnet.qnn.vqc.qcircuit import VQC_FermionicSingleExcitation from pyvqnet.qnn.vqc import QMachine, MeasureAll qm = QMachine(3) p0 = QTensor([0.5]) VQC_FermionicSingleExcitation(p0, [1, 0, 2], qm) m = MeasureAll(obs={"Z0": 1}) exp = m(q_machine=qm) print(exp) # [[0.9999998]]
VQC_FermionicDoubleExcitation
- pyvqnet.qnn.vqc.VQC_FermionicDoubleExcitation(weight, wires1, wires2, q_machine)
对泡利矩阵的张量积求幂的耦合聚类双激励算子,矩阵形式由下式给出:
\[\hat{U}_{pqrs}(\theta) = \mathrm{exp} \{ \theta (\hat{c}_p^\dagger \hat{c}_q^\dagger \hat{c}_r \hat{c}_s - \mathrm{H.c.}) \},\]其中 \(\hat{c}\) 和 \(\hat{c}^\dagger\) 是费米子湮灭和 创建运算符和索引 \(r, s\) 和 \(p, q\) 在占用的和 分别为空分子轨道。 使用 Jordan-Wigner 变换 上面定义的费米子算子可以写成 根据 Pauli 矩阵(有关更多详细信息,请参见 arXiv:1805.04340)
\[\begin{split}\hat{U}_{pqrs}(\theta) = \mathrm{exp} \Big\{ \frac{i\theta}{8} \bigotimes_{b=s+1}^{r-1} \hat{Z}_b \bigotimes_{a=q+1}^{p-1} \hat{Z}_a (\hat{X}_s \hat{X}_r \hat{Y}_q \hat{X}_p + \hat{Y}_s \hat{X}_r \hat{Y}_q \hat{Y}_p +\\ \hat{X}_s \hat{Y}_r \hat{Y}_q \hat{Y}_p + \hat{X}_s \hat{X}_r \hat{X}_q \hat{Y}_p - \mathrm{H.c.} ) \Big\}\end{split}\]- Parameters:
weight – 可变参数
wires1 – 代表的量子比特的索引列表区间 [s, r] 中占据量子比特的子集。第一个索引被解释为 s,最后一索引被解释为 r。 CNOT 门对中间的索引进行操作,以计算一组量子位的奇偶性。
wires2 – 代表的量子比特的索引列表区间 [q, p] 中占据量子比特的子集。第一根索引被解释为 q,最后一索引被解释为 p。 CNOT 门对中间的索引进行操作,以计算一组量子位的奇偶性。
q_machine – 量子虚拟机设备。
- Returns:
输出QTensor。
Examples:
from pyvqnet.tensor import QTensor from pyvqnet.qnn.vqc.qcircuit import VQC_FermionicDoubleExcitation from pyvqnet.qnn.vqc import QMachine, MeasureAll qm = QMachine(5) p0 = QTensor([0.5]) VQC_FermionicDoubleExcitation(p0, [0, 1], [2, 3], qm) m = MeasureAll(obs={"Z0": 1}) exp = m(q_machine=qm) print(exp) # [[0.9999998]]
VQC_UCCSD
- pyvqnet.qnn.vqc.VQC_UCCSD(weights, wires, s_wires, d_wires, init_state, q_machine)
实现酉耦合簇单激发和双激发拟设(UCCSD)。UCCSD 是 VQE 拟设,通常用于运行量子化学模拟。
在一阶 Trotter 近似内,UCCSD 酉函数由下式给出:
\[\hat{U}(\vec{\theta}) = \prod_{p > r} \mathrm{exp} \Big\{\theta_{pr} (\hat{c}_p^\dagger \hat{c}_r-\mathrm{H.c.}) \Big\} \prod_{p > q > r > s} \mathrm{exp} \Big\{\theta_{pqrs} (\hat{c}_p^\dagger \hat{c}_q^\dagger \hat{c}_r \hat{c}_s-\mathrm{H.c.}) \Big\}\]其中 \(\hat{c}\) 和 \(\hat{c}^\dagger\) 是费米子湮灭和 创建运算符和索引 \(r, s\) 和 \(p, q\) 在占用的和 分别为空分子轨道。(更多细节见 arXiv:1805.04340):
- Parameters:
weights – 包含参数的大小
(len(s_wires)+ len(d_wires))
张量 \(\theta_{pr}\) 和 \(\theta_{pqrs}\) 输入 Z 旋转FermionicSingleExcitation
和FermionicDoubleExcitation
。wires – 模板作用的量子比特索引
s_wires – 包含量子比特索引的列表序列
[r,...,p]
由单一激发产生 \(\vert r, p \rangle = \hat{c}_p^\dagger \hat{c}_r \vert \mathrm{HF} \rangle\), 其中 \(\vert \mathrm{HF} \rangle\) 表示 Hartee-Fock 参考态。d_wires – 列表序列,每个列表包含两个列表 指定索引
[s, ...,r]
和[q,..., p]
定义双激励 \(\vert s, r, q, p \rangle = \hat{c}_p^\dagger \hat{c}_q^\dagger \hat{c}_r\hat{c}_s \vert \mathrm{HF} \rangle\) 。init_state – 长度
len(wires)
occupation-number vector 表示 高频状态。init_state
在量子比特初始化状态。q_machine – 量子虚拟机设备。
- Returns:
输出QTensor。
Examples:
from pyvqnet.qnn.vqc import VQC_UCCSD, QMachine, MeasureAll from pyvqnet.tensor import QTensor p0 = QTensor([2, 0.5, -0.2, 0.3, -2, 1, 3, 0]) s_wires = [[0, 1, 2], [0, 1, 2, 3, 4], [1, 2, 3], [1, 2, 3, 4, 5]] d_wires = [[[0, 1], [2, 3]], [[0, 1], [2, 3, 4, 5]], [[0, 1], [3, 4]], [[0, 1], [4, 5]]] qm = QMachine(6) VQC_UCCSD(p0, range(6), s_wires, d_wires, QTensor([1.0, 1, 0, 0, 0, 0]), qm) m = MeasureAll(obs={"Z1": 1}) exp = m(q_machine=qm) print(exp) # [[0.963802]]
VQC_ZFeatureMap
- pyvqnet.qnn.vqc.VQC_ZFeatureMap(input_feat, q_machine: QMachine, data_map_func=None, rep: int = 2)
一阶泡利 Z 演化电路。
对于 3 个量子位和 2 次重复,电路表示为:
┌───┐┌──────────────┐┌───┐┌──────────────┐ ┤ H ├┤ U1(2.0*x[0]) ├┤ H ├┤ U1(2.0*x[0]) ├ ├───┤├──────────────┤├───┤├──────────────┤ ┤ H ├┤ U1(2.0*x[1]) ├┤ H ├┤ U1(2.0*x[1]) ├ ├───┤├──────────────┤├───┤├──────────────┤ ┤ H ├┤ U1(2.0*x[2]) ├┤ H ├┤ U1(2.0*x[2]) ├ └───┘└──────────────┘└───┘└──────────────┘
泡利弦固定为
Z
。 因此,一阶展开将是一个没有纠缠门的电路。- Parameters:
input_feat – 表示输入参数的数组。
q_machine – 量子虚拟机。
data_map_func – 参数映射矩阵, 为可调用函数, 设计方式为:
data_map_func = lambda x: x
。rep – 模块重复次数。
Example:
from pyvqnet.qnn.vqc import VQC_ZFeatureMap, QMachine,hadamard from pyvqnet.tensor import QTensor qm = QMachine(3) for i in range(3): hadamard(q_machine=qm, wires=[i]) VQC_ZFeatureMap(input_feat=QTensor([[0.1,0.2,0.3]]),q_machine = qm) print(qm.states) # [[[[0.3535534+0.j 0.2918002+0.1996312j] # [0.3256442+0.1376801j 0.1910257+0.2975049j]] # # [[0.3465058+0.0702402j 0.246323 +0.2536236j] # [0.2918002+0.1996312j 0.1281128+0.3295255j]]]]
VQC_ZZFeatureMap
- pyvqnet.qnn.vqc.VQC_ZZFeatureMap(input_feat, q_machine: QMachine, data_map_func=None, entanglement: Union[str, List[List[int]], Callable[[int], List[int]]] = 'full', rep: int = 2)
二阶 Pauli-Z 演化电路。
对于 3 个量子位、1 个重复和线性纠缠,电路表示为:
┌───┐┌─────────────────┐ ┤ H ├┤ U1(2.0*φ(x[0])) ├──■────────────────────────────■──────────────────────────────────── ├───┤├─────────────────┤┌─┴─┐┌──────────────────────┐┌─┴─┐ ┤ H ├┤ U1(2.0*φ(x[1])) ├┤ X ├┤ U1(2.0*φ(x[0],x[1])) ├┤ X ├──■────────────────────────────■── ├───┤├─────────────────┤└───┘└──────────────────────┘└───┘┌─┴─┐┌──────────────────────┐┌─┴─┐ ┤ H ├┤ U1(2.0*φ(x[2])) ├──────────────────────────────────┤ X ├┤ U1(2.0*φ(x[1],x[2])) ├┤ X ├ └───┘└─────────────────┘ └───┘└──────────────────────┘└───┘
其中
φ
是经典的非线性函数,如果输入两个值则φ(x,y) = (pi - x)(pi - y)
, 输入一个则为φ(x) = x
, 用data_map_func
表示如下:def data_map_func(x): coeff = x if x.shape[-1] == 1 else ft.reduce(lambda x, y: (np.pi - x) * (np.pi - y), x) return coeff
- Parameters:
input_feat – 表示输入参数的数组。
q_machine – 量子虚拟机。
data_map_func – 参数映射矩阵, 为可调用函数。
entanglement – 指定的纠缠结构。
rep – 模块重复次数。
Example:
from pyvqnet.qnn.vqc import VQC_ZZFeatureMap, QMachine from pyvqnet.tensor import QTensor qm = QMachine(3) VQC_ZZFeatureMap(q_machine=qm, input_feat=QTensor([[0.1,0.2,0.3]])) print(qm.states) # [[[[-0.4234843-0.0480578j -0.144067 +0.1220178j] # [-0.0800646+0.0484439j -0.5512857-0.2947832j]] # # [[ 0.0084012-0.0050071j -0.2593993-0.2717131j] # [-0.1961917-0.3470543j 0.2786197+0.0732045j]]]]
VQC_AllSinglesDoubles
- pyvqnet.qnn.vqc.VQC_AllSinglesDoubles(weights, q_machine: QMachine, hf_state, wires, singles=None, doubles=None)
在这种情况下,我们有四个单激发和双激发来保留 Hartree-Fock 态的总自旋投影。
single_exitation
门 \(G\) 作用于量子位[0, 2], [0, 4], [1, 3], [1, 5]
, 而double_exitation
运算 \(G^{(2)}\) 应用于量子位[0, 1, 2, 3] , [0, 1, 2, 5], [0, 1, 2, 4], [0, 1, 4, 5]
。由此产生的酉保留了粒子数量,并在初始 Hartree-Fock 状态和编码多激发配置的其他状态的叠加中准备了n量子位系统。
- Parameters:
weights – 大小为
(len(singles) + len(doubles),)
的QTensor,包含按顺序进入 vqc.qCircuit.single_excitation 和 vqc.qCircuit.double_excitation 操作的角度q_machine – 量子虚拟机。
hf_state – 代表 Hartree-Fock 状态的长度
len(wires)
占用数向量,hf_state
用于初始化线路。wires – 作用的量子位。
singles – 具有single_exitation操作所作用的两个量子位索引的列表序列。
doubles – 具有double_exitation操作所作用的两个量子位索引的列表序列。
例如,两个电子和六个量子位情况下的量子电路如下图所示:
Example:
from pyvqnet.qnn.vqc import VQC_AllSinglesDoubles, QMachine from pyvqnet.tensor import QTensor qubits = 4 qm = QMachine(qubits) VQC_AllSinglesDoubles(q_machine=qm, weights=QTensor([0.55, 0.11, 0.53]), hf_state = QTensor([1,1,0,0]), singles=[[0, 2], [1, 3]], doubles=[[0, 1, 2, 3]], wires=[0,1,2,3]) print(qm.states) # [ 0. +0.j 0. +0.j 0. +0.j -0.23728043+0.j # 0. +0.j 0. +0.j -0.27552837+0.j 0. +0.j # 0. +0.j -0.12207296+0.j 0. +0.j 0. +0.j # 0.9235152 +0.j 0. +0.j 0. +0.j 0. +0.j]
VQC_BasisRotation
- pyvqnet.qnn.vqc.VQC_BasisRotation(q_machine: QMachine, wires, unitary_matrix: QTensor, check=False)
实现一个电路,提供可用于执行精确的单体基础旋转的整体。
VQC_BasisRotation
执行以下由 arXiv:1711.04789中给出的单粒子费米子确定的酉变换 \(U(u)\)\[U(u) = \exp{\left( \sum_{pq} \left[\log u \right]_{pq} (a_p^\dagger a_q - a_q^\dagger a_p) \right)}.\]\(U(u)\) 通过使用论文 Optica, 3, 1460 (2016)中给出的方案。 将输入酉矩阵分解后,由一系列
phaseshift
和single_exitation
门来有效实现。- Parameters:
q_machine – 量子虚拟机。
wires – 作用的量子位。
unitary_matrix – 指定基础变换的矩阵。
check – 检测 unitary_matrix 是否为酉矩阵。
Example:
from pyvqnet.qnn.vqc import VQC_BasisRotation, QMachine, hadamard, isingzz from pyvqnet.tensor import QTensor import numpy as np V = np.array([[0.73678+0.27511j, -0.5095 +0.10704j, -0.06847+0.32515j], [0.73678+0.27511j, -0.5095 +0.10704j, -0.06847+0.32515j], [-0.21271+0.34938j, -0.38853+0.36497j, 0.61467-0.41317j]]) eigen_vals, eigen_vecs = np.linalg.eigh(V) umat = eigen_vecs.T wires = range(len(umat)) qm = QMachine(len(umat)) for i in range(len(umat)): hadamard(q_machine=qm, wires=i) isingzz(q_machine=qm, params=QTensor([0.55]), wires=[0,2]) VQC_BasisRotation(q_machine=qm, wires=wires,unitary_matrix=QTensor(umat,dtype=qm.state.dtype)) print(qm.states) # [[[[ 0.3402686-0.0960063j 0.4140436-0.3069579j] # [ 0.1206574+0.1982292j 0.5662895-0.0949503j]] # # [[-0.1715559-0.1614315j 0.1624039-0.0598041j] # [ 0.0608986-0.1078906j -0.305845 +0.1773662j]]]]
VQC_QuantumPoolingCircuit
- pyvqnet.qnn.vqc.VQC_QuantumPoolingCircuit(ignored_wires, sinks_wires, params, q_machine)
对数据进行降采样的量子电路。
为了减少电路中的量子位数量,首先在系统中创建成对的量子位。在最初配对所有量子位之后,将广义2量子位酉元应用于每一对量子位上。并在应用这两个量子位酉元之后,在神经网络的其余部分忽略每对量子位中的一个量子位。
- Parameters:
sources_wires – 将被忽略的源量子位索引。
sinks_wires – 将保留的目标量子位索引。
params – 输入参数。
q_machine – 量子虚拟机设备。
- Returns:
输出QTensor。
Examples:
from pyvqnet.qnn.vqc import VQC_QuantumPoolingCircuit, QMachine, MeasureAll from pyvqnet import tensor p = tensor.full([6], 0.35) qm = QMachine(4) VQC_QuantumPoolingCircuit(q_machine=qm, ignored_wires=[0, 1], sinks_wires=[2, 3], params=p) m = MeasureAll(obs={"Z1": 1}) exp = m(q_machine=qm) print(exp) #
VQC_Purity
- class pyvqnet.qnn.vqc.VQC_Purity(state, qubits_idx, num_wires)
从态矢中计算特定量子比特上的纯度。
\[\gamma = \text{Tr}(\rho^2)\]式中 \(\rho\) 为密度矩阵。标准化量子态的纯度满足 \(\frac{1}{d} \leq \gamma \leq 1\) , 其中 \(d\) 是希尔伯特空间的维数。 纯态的纯度是1。
- Parameters:
state – 从pyqpanda get_qstate()获取的量子态
qubits_idx – 要计算纯度的量子比特位索引
num_wires – 量子比特数
- Returns:
纯度
Example:
from pyvqnet.qnn.vqc import VQC_Purity, rx, ry, cnot, QMachine from pyvqnet.tensor import kfloat64, QTensor x = QTensor([[0.7, 0.4], [1.7, 2.4]], requires_grad=True) qm = QMachine(3) qm.reset_states(2) rx(q_machine=qm, wires=0, params=x[:, [0]]) ry(q_machine=qm, wires=1, params=x[:, [1]]) ry(q_machine=qm, wires=2, params=x[:, [1]]) cnot(q_machine=qm, wires=[0, 1]) cnot(q_machine=qm, wires=[2, 1]) y = VQC_Purity(qm.states, [0, 1], num_wires=3) y.backward() print(y) # [0.9356751 0.875957]
VQC_VarMeasure
- class pyvqnet.qnn.vqc.VQC_VarMeasure(q_machine, obs)
提供的可观察量的方差。
- Parameters:
q_machine – 从pyqpanda get_qstate()获取的量子态
obs – 构建的量子线路
- Returns:
方差值
Example:
from pyvqnet.tensor import QTensor from pyvqnet.qnn.vqc import VQC_VarMeasure, rx, cnot, hadamard, QMachine,PauliY x = QTensor([[0.5]], requires_grad=True) qm = QMachine(3) rx(q_machine=qm, wires=0, params=x) var_result = VQC_VarMeasure(q_machine= qm, obs=PauliY(wires=0)) var_result.backward() print(var_result) # [[0.7701511]]
VQC_DensityMatrixFromQstate
- class pyvqnet.qnn.vqc.VQC_DensityMatrixFromQstate(state, indices)
计算量子态在一组特定量子比特上的密度矩阵。
- Parameters:
state – 一维列表状态向量。 这个列表的大小应该是
(2**N,)
对于量子比特个数N
,qstate 应该从 000 ->111 开始。indices – 所考虑子系统中的量子比特索引列表。
- Returns:
大小为“(2**len(indices), 2**len(indices))”的密度矩阵。
Example:
from pyvqnet.qnn.vqc import VQC_DensityMatrixFromQstate,rx,ry,cnot,QMachine from pyvqnet.tensor import kfloat64, QTensor x = QTensor([[0.7,0.4],[1.7,2.4]],requires_grad=True) qm = QMachine(3) qm.reset_states(2) rx(q_machine=qm,wires=0,params=x[:,[0]]) ry(q_machine=qm,wires=1,params=x[:,[1]]) ry(q_machine=qm,wires=2,params=x[:,[1]]) cnot(q_machine=qm,wires=[0,1]) cnot(q_machine=qm,wires=[2, 1]) y = VQC_DensityMatrixFromQstate(qm.states,[0,1]) print(y) # [[[0.8155131+0.j 0.1718155+0.j 0. +0.0627175j # 0. +0.2976855j] # [0.1718155+0.j 0.0669081+0.j 0. +0.0244234j # 0. +0.0627175j] # [0. -0.0627175j 0. -0.0244234j 0.0089152+0.j # 0.0228937+0.j ] # [0. -0.2976855j 0. -0.0627175j 0.0228937+0.j # 0.1086637+0.j ]] # # [[0.3362115+0.j 0.1471083+0.j 0. +0.1674582j # 0. +0.3827205j] # [0.1471083+0.j 0.0993662+0.j 0. +0.1131119j # 0. +0.1674582j] # [0. -0.1674582j 0. -0.1131119j 0.1287589+0.j # 0.1906232+0.j ] # [0. -0.3827205j 0. -0.1674582j 0.1906232+0.j # 0.4356633+0.j ]]]
Probability
- class pyvqnet.qnn.vqc.Probability(wires=None, name='')
计算量子线路在特定比特上概率测量结果。
- Parameters:
wires – 测量比特的索引,列表、元组或者整数。
name – 模块的名字,默认:””。
- Returns:
测量结果,QTensor。
Example:
from pyvqnet.qnn.vqc import Probability,rx,ry,cnot,QMachine,rz from pyvqnet.tensor import kfloat64, QTensor x = QTensor([[0.56, 0.1],[0.56, 0.1]],requires_grad=True) qm = QMachine(4) qm.reset_states(2) rz(q_machine=qm,wires=0,params=x[:,[0]]) rz(q_machine=qm,wires=1,params=x[:,[0]]) cnot(q_machine=qm,wires=[0,1]) ry(q_machine=qm,wires=2,params=x[:,[1]]) cnot(q_machine=qm,wires=[0,2]) rz(q_machine=qm,wires=3,params=x[:,[1]]) ma = Probability(wires=1) y =ma(q_machine=qm) # [[1.0000002 0. ] # [1.0000002 0. ]]
MeasureAll
- class pyvqnet.qnn.vqc.MeasureAll(obs=None, name='')
计算量子线路的测量结果,支持输入obs为多个或单个泡利算子或这哈密顿量。 例如:
{'wires': [0, 1], 'observables': ['x', 'i'],'coefficient':[0.23,-3.5]} 或: {'X0': 0.23} 或: [{'wires': [0, 2, 3],'observables': ['X', 'Y', 'Z'],'coefficient': [1, 0.5, 0.4]}, {'wires': [0, 1, 2],'observables': ['X', 'Y', 'Z'],'coefficient': [1, 0.5, 0.4]}]
- Parameters:
obs – observable。
name – 模块的名字,默认:””。
- Returns:
测量结果,QTensor。
Example:
from pyvqnet.qnn.vqc import MeasureAll,rx,ry,cnot,QMachine,rz from pyvqnet.tensor import kfloat64, QTensor x = QTensor([[0.56, 0.1],[0.56, 0.1]],requires_grad=True) qm = QMachine(4) qm.reset_states(2) rz(q_machine=qm,wires=0,params=x[:,[0]]) rz(q_machine=qm,wires=1,params=x[:,[0]]) cnot(q_machine=qm,wires=[0,1]) ry(q_machine=qm,wires=2,params=x[:,[1]]) cnot(q_machine=qm,wires=[0,2]) rz(q_machine=qm,wires=3,params=x[:,[1]]) obs_list = [{ 'wires': [0, 2, 3], 'observables': ['X', 'Y', 'Z'], 'coefficient': [1, 0.5, 0.4] }, { 'wires': [0, 1, 2], 'observables': ['X', 'Y', 'Z'], 'coefficient': [1, 0.5, 0.4] }] ma = MeasureAll(obs = obs_list) y = ma(q_machine=qm) print(y) # [[0.4000001 0.3980018] # [0.4000001 0.3980018]]
SparseHamiltonian
- class pyvqnet.qnn.vqc.SparseHamiltonian(obs=None, name='')
计算观测量的稀疏哈密顿量,例如 {“observables”:H,”wires”:[0,2,3]}。
- Parameters:
obs – 稀疏哈密顿量,使用 tensor.dense_to_csr() 函数获取稠密函数的稀疏格式。
name – 模块的名字,默认:””。
- Returns:
期望结果,QTensor。
Example:
import pyvqnet pyvqnet.utils.set_random_seed(42) from pyvqnet import tensor from pyvqnet.nn import Module from pyvqnet.qnn.vqc import QMachine,CRX,PauliX,paulix,crx,SparseHamiltonian H = tensor.QTensor( [[ 0.+0.j, 0.+0.j, 0.+0.j, 0.+0.j, 0.+0.j, 0.+0.j, 0.+0.j, 0.+0.j, 0.+0.j, 0.+0.j, 0.+0.j, 0.+0.j, 0.+0.j, 0.+0.j, 0.+0.j, -1.+0.j,], [ 0.+0.j, 0.+0.j, 0.+0.j, 0.+0.j, 0.+0.j, 0.+0.j, 0.+0.j, 0.+0.j, 0.+0.j, 0.+0.j, 0.+0.j, 0.+0.j, 0.+0.j, 0.+0.j, 1.+0.j, 0.+0.j,], [ 0.+0.j, 0.+0.j, 0.+0.j, 0.+0.j, 0.+0.j, 0.+0.j, 0.+0.j, 0.+0.j, 0.+0.j, 0.+0.j, 0.+0.j, 0.+0.j, 0.+0.j, 1.+0.j, 0.+0.j, 0.+0.j,], [ 0.+0.j, 0.+0.j, 0.+0.j, 0.+0.j, 0.+0.j, 0.+0.j, 0.+0.j, 0.+0.j, 0.+0.j, 0.+0.j, 0.+0.j, 0.+0.j, -1.+0.j, 0.+0.j, 0.+0.j, 0.+0.j,], [ 0.+0.j, 0.+0.j, 0.+0.j, 0.+0.j, 0.+0.j, 0.+0.j, 0.+0.j, 0.+0.j, 0.+0.j, 0.+0.j, 0.+0.j, -1.+0.j, 0.+0.j, 0.+0.j, 0.+0.j, 0.+0.j,], [ 0.+0.j, 0.+0.j, 0.+0.j, 0.+0.j, 0.+0.j, 0.+0.j, 0.+0.j, 0.+0.j, 0.+0.j, 0.+0.j, 1.+0.j, 0.+0.j, 0.+0.j, 0.+0.j, 0.+0.j, 0.+0.j,], [ 0.+0.j, 0.+0.j, 0.+0.j, 0.+0.j, 0.+0.j, 0.+0.j, 0.+0.j, 0.+0.j, 0.+0.j, 1.+0.j, 0.+0.j, 0.+0.j, 0.+0.j, 0.+0.j, 0.+0.j, 0.+0.j,], [ 0.+0.j, 0.+0.j, 0.+0.j, 0.+0.j, 0.+0.j, 0.+0.j, 0.+0.j, 0.+0.j, -1.+0.j, 0.+0.j, 0.+0.j, 0.+0.j, 0.+0.j, 0.+0.j, 0.+0.j, 0.+0.j,], [ 0.+0.j, 0.+0.j, 0.+0.j, 0.+0.j, 0.+0.j, 0.+0.j, 0.+0.j, -1.+0.j, 0.+0.j, 0.+0.j, 0.+0.j, 0.+0.j, 0.+0.j, 0.+0.j, 0.+0.j, 0.+0.j,], [ 0.+0.j, 0.+0.j, 0.+0.j, 0.+0.j, 0.+0.j, 0.+0.j, 1.+0.j, 0.+0.j, 0.+0.j, 0.+0.j, 0.+0.j, 0.+0.j, 0.+0.j, 0.+0.j, 0.+0.j, 0.+0.j,], [ 0.+0.j, 0.+0.j, 0.+0.j, 0.+0.j, 0.+0.j, 1.+0.j, 0.+0.j, 0.+0.j, 0.+0.j, 0.+0.j, 0.+0.j, 0.+0.j, 0.+0.j, 0.+0.j, 0.+0.j, 0.+0.j,], [ 0.+0.j, 0.+0.j, 0.+0.j, 0.+0.j, -1.+0.j, 0.+0.j, 0.+0.j, 0.+0.j, 0.+0.j, 0.+0.j, 0.+0.j, 0.+0.j, 0.+0.j, 0.+0.j, 0.+0.j, 0.+0.j,], [ 0.+0.j, 0.+0.j, 0.+0.j, -1.+0.j, 0.+0.j, 0.+0.j, 0.+0.j, 0.+0.j, 0.+0.j, 0.+0.j, 0.+0.j, 0.+0.j, 0.+0.j, 0.+0.j, 0.+0.j, 0.+0.j,], [ 0.+0.j, 0.+0.j, 1.+0.j, 0.+0.j, 0.+0.j, 0.+0.j, 0.+0.j, 0.+0.j, 0.+0.j, 0.+0.j, 0.+0.j, 0.+0.j, 0.+0.j, 0.+0.j, 0.+0.j, 0.+0.j,], [ 0.+0.j, 1.+0.j, 0.+0.j, 0.+0.j, 0.+0.j, 0.+0.j, 0.+0.j, 0.+0.j, 0.+0.j, 0.+0.j, 0.+0.j, 0.+0.j, 0.+0.j, 0.+0.j, 0.+0.j, 0.+0.j,], [-1.+0.j, 0.+0.j, 0.+0.j, 0.+0.j, 0.+0.j, 0.+0.j, 0.+0.j, 0.+0.j, 0.+0.j, 0.+0.j, 0.+0.j, 0.+0.j, 0.+0.j, 0.+0.j, 0.+0.j, 0.+0.j,]],dtype=pyvqnet.kcomplex64) cpu_csr = tensor.dense_to_csr(H) class QModel(Module): def __init__(self, num_wires, dtype,grad_mode=""): super(QModel, self).__init__() self._num_wires = num_wires self._dtype = dtype self.qm = QMachine(num_wires) self.measure = SparseHamiltonian(obs = {"observables":cpu_csr, "wires":[2, 1, 3, 5]}) def forward(self, x, *args, **kwargs): self.qm.reset_states(x.shape[0]) paulix(q_machine=self.qm, wires= 0) paulix(q_machine=self.qm, wires = 2) crx(q_machine=self.qm,wires=[0, 1],params=tensor.full((x.shape[0],1),0.1,dtype=pyvqnet.kcomplex64)) crx(q_machine=self.qm,wires=[2, 3],params=tensor.full((x.shape[0],1),0.2,dtype=pyvqnet.kcomplex64)) crx(q_machine=self.qm,wires=[1, 2],params=tensor.full((x.shape[0],1),0.3,dtype=pyvqnet.kcomplex64)) crx(q_machine=self.qm,wires=[2, 4],params=tensor.full((x.shape[0],1),0.3,dtype=pyvqnet.kcomplex64)) crx(q_machine=self.qm,wires=[5, 3],params=tensor.full((x.shape[0],1),0.3,dtype=pyvqnet.kcomplex64)) rlt = self.measure(q_machine=self.qm) return rlt model = QModel(6,pyvqnet.kcomplex64) y = model(tensor.ones([1,1])) print(y) #[0.]
HermitianExpval
- class pyvqnet.qnn.vqc.HermitianExpval(obs=None, name='')
计算量子线路某个厄密特量的期望。
- Parameters:
obs – 厄密特量。
name – 模块的名字,默认:””。
- Returns:
期望结果,QTensor。
Example:
from pyvqnet.qnn.vqc import qcircuit from pyvqnet.qnn.vqc import QMachine, RX, RY, CNOT, PauliX, qmatrix, PauliZ, VQC_RotCircuit,HermitianExpval from pyvqnet.tensor import QTensor, tensor import pyvqnet from pyvqnet.nn import Parameter import numpy as np bsz = 3 H = np.array([[8, 4, 0, -6], [4, 0, 4, 0], [0, 4, 8, 0], [-6, 0, 0, 0]]) class QModel(pyvqnet.nn.Module): def __init__(self, num_wires, dtype): super(QModel, self).__init__() self.rot_param = Parameter((3, )) self.rot_param.copy_value_from(tensor.QTensor([-0.5, 1, 2.3])) self._num_wires = num_wires self._dtype = dtype self.qm = QMachine(num_wires, dtype=dtype) self.rx_layer1 = VQC_RotCircuit self.ry_layer2 = RY(has_params=True, trainable=True, wires=0, init_params=tensor.QTensor([-0.5])) self.xlayer = PauliX(wires=0) self.cnot = CNOT(wires=[0, 1]) self.measure = HermitianExpval(obs = {'wires':(1,0),'observables':tensor.to_tensor(H)}) def forward(self, x, *args, **kwargs): self.qm.reset_states(x.shape[0]) qcircuit.rx(q_machine=self.qm, wires=0, params=x[:, [1]]) qcircuit.ry(q_machine=self.qm, wires=1, params=x[:, [0]]) self.xlayer(q_machine=self.qm) self.rx_layer1(params=self.rot_param, wire=1, q_machine=self.qm) self.ry_layer2(q_machine=self.qm) self.cnot(q_machine=self.qm) rlt = self.measure(q_machine = self.qm) return rlt input_x = tensor.arange(1, bsz * 2 + 1, dtype=pyvqnet.kfloat32).reshape([bsz, 2]) input_x.requires_grad = True qunatum_model = QModel(num_wires=2, dtype=pyvqnet.kcomplex64) batch_y = qunatum_model(input_x) batch_y.backward() print(batch_y) # [[5.3798223], # [7.1294155], # [0.7028297]]
常用量子变分线路模板
VQC_HardwareEfficientAnsatz
- class pyvqnet.qnn.vqc.VQC_HardwareEfficientAnsatz(n_qubits, single_rot_gate_list, entangle_gate='CNOT', entangle_rules='linear', depth=1)
论文介绍的Hardware Efficient Ansatz的实现: Hardware-efficient Variational Quantum Eigensolver for Small Molecules 。
- Parameters:
n_qubits – 量子比特数。
single_rot_gate_list – 单个量子位旋转门列表由一个或多个作用于每个量子位的旋转门构成。目前支持 Rx、Ry、Rz。
entangle_gate – 非参数化纠缠门。支持CNOT、CZ。默认: CNOT。
entangle_rules – 电路中如何使用纠缠门。
linear
意味着纠缠门将作用于每个相邻的量子位。all
意味着纠缠门将作用于任何两个 qbuits。 默认值:linear
。depth – ansatz 的深度,默认:1。
Example:
from pyvqnet.nn import Module,Linear,ModuleList from pyvqnet.qnn.vqc.qcircuit import VQC_HardwareEfficientAnsatz,RZZ,RZ from pyvqnet.qnn.vqc import Probability,QMachine from pyvqnet import tensor class QM(Module): def __init__(self, name=""): super().__init__(name) self.linearx = Linear(4,2) self.ansatz = VQC_HardwareEfficientAnsatz(4, ["rx", "RY", "rz"], entangle_gate="cnot", entangle_rules="linear", depth=2) self.encode1 = RZ(wires=0) self.encode2 = RZ(wires=1) self.measure = Probability(wires=[0,2]) self.device = QMachine(4) def forward(self, x, *args, **kwargs): self.device.reset_states(x.shape[0]) y = self.linearx(x) self.encode1(params = y[:, [0]],q_machine = self.device,) self.encode2(params = y[:, [1]],q_machine = self.device,) self.ansatz(q_machine =self.device) return self.measure(q_machine =self.device) bz =3 inputx = tensor.arange(1.0,bz*4+1).reshape([bz,4]) inputx.requires_grad= True qlayer = QM() y = qlayer(inputx) y.backward() print(y) # [[0.3075959 0.2315064 0.2491432 0.2117545] # [0.3075958 0.2315062 0.2491433 0.2117546] # [0.3075958 0.2315062 0.2491432 0.2117545]]
VQC_BasicEntanglerTemplate
- class pyvqnet.qnn.vqc.VQC_BasicEntanglerTemplate(num_layer=1, num_qubits=1, rotation='RX', initial=None, dtype=None)
由每个量子位上的单参数单量子位旋转组成的层,后跟一个闭合链或环组合的多个CNOT 门。
CNOT 门环将每个量子位与其邻居连接起来,最后一个量子位被认为是第一个量子位的邻居。
- Parameters:
num_layer – 量子比特线路层数。
num_qubits – 量子比特数,默认为1。
rotation – 使用单参数单量子比特门,
RX
被用作默认值。
Example:
from pyvqnet.nn import Module, Linear, ModuleList from pyvqnet.qnn.vqc.qcircuit import VQC_BasicEntanglerTemplate, RZZ, RZ from pyvqnet.qnn.vqc import Probability, QMachine from pyvqnet import tensor class QM(Module): def __init__(self, name=""): super().__init__(name) self.ansatz = VQC_BasicEntanglerTemplate(2, 4, "rz", initial=tensor.ones([1, 1])) self.measure = Probability(wires=[0, 2]) self.device = QMachine(4) def forward(self,x, *args, **kwargs): self.ansatz(q_machine=self.device) return self.measure(q_machine=self.device) bz = 1 inputx = tensor.arange(1.0, bz * 4 + 1).reshape([bz, 4]) qlayer = QM() y = qlayer(inputx) y.backward() print(y) # [[1.0000002 0. 0. 0. ]]
VQC_StronglyEntanglingTemplate
- class pyvqnet.qnn.vqc.VQC_StronglyEntanglingTemplate(weights=None, num_qubits=1, ranges=None)
由单个量子比特旋转和纠缠器组成的层,参考 circuit-centric classifier design .
参数
weights
包含每一层的权重。 因此得出层数 \(L\) 等于weights
的第一个维度。其包含2-qubit CNOT 门,作用于 \(M\) 个量子比特上,\(i = 1,...,M\)。 每个门的第二个量子位标号由公式 \((i+r)\mod M\) 给出,其中 \(r\) 是一个称为
range
的超参数,并且 \(0 < r < M\)。- Parameters:
weights – 形状为
(L, M, 3)
的权重张量,默认值:None,使用形状为(1,1,3)
的随机张量。num_qubits – 量子比特数,默认值:1。
ranges – 确定每个后续层的范围超参数的序列; 默认值:None,使用 \(r=l \ mod M\) 作为ranges 的值。
Example:
from pyvqnet.nn import Module from pyvqnet.qnn.vqc.qcircuit import VQC_StronglyEntanglingTemplate from pyvqnet.qnn.vqc import Probability, QMachine from pyvqnet import tensor class QM(Module): def __init__(self, name=""): super().__init__(name) self.ansatz = VQC_StronglyEntanglingTemplate(2, 4, None, initial=tensor.ones([1, 1])) self.measure = Probability(wires=[0, 1]) self.device = QMachine(4) def forward(self,x, *args, **kwargs): self.ansatz(q_machine=self.device) return self.measure(q_machine=self.device) bz = 1 inputx = tensor.arange(1.0, bz * 4 + 1).reshape([bz, 4]) qlayer = QM() y = qlayer(inputx) y.backward() print(y) # [[0.3745951 0.154298 0.059156 0.4119509]]
VQC_QuantumEmbedding
- class pyvqnet.qnn.vqc.VQC_QuantumEmbedding(qubits, machine, num_repetitions_input, depth_input, num_unitary_layers, num_repetitions)
使用 RZ,RY,RZ 创建变分量子电路,将经典数据编码为量子态。 参考 Quantum embeddings for machine learning。 在初始化该类后,其成员函数
compute_circuit
为运行函数,可作为参数输入QuantumLayerV2
类构成量子机器学习模型的一层。- Parameters:
qubits – 使用pyqpanda 申请的量子比特。
machine – 使用pyqpanda 申请的量子虚拟机。
num_repetitions_input – 在子模块中对输入进行编码的重复次数。
depth_input – 输入数据的特征维度。
num_unitary_layers – 每个子模块中变分量子门的重复次数。
num_repetitions – 子模块的重复次数。
Example:
from pyvqnet.nn import Module from pyvqnet.qnn.vqc.qcircuit import VQC_QuantumEmbedding from pyvqnet.qnn.vqc import QMachine,MeasureAll from pyvqnet import tensor import pyvqnet depth_input = 2 num_repetitions = 2 num_repetitions_input = 2 num_unitary_layers = 2 nq = depth_input * num_repetitions_input bz = 12 class QM(Module): def __init__(self, name=""): super().__init__(name) self.ansatz = VQC_QuantumEmbedding(num_repetitions_input, depth_input, num_unitary_layers, num_repetitions, pyvqnet.kfloat64, initial=tensor.full([1],12.0)) self.measure = MeasureAll(obs = {f"Z{nq-1}":1}) self.device = QMachine(nq,dtype=pyvqnet.kcomplex128) def forward(self, x, *args, **kwargs): self.device.reset_states(x.shape[0]) self.ansatz(x,q_machine=self.device) return self.measure(q_machine=self.device) inputx = tensor.arange(1.0, bz * depth_input + 1, dtype=pyvqnet.kfloat64).reshape([bz, depth_input]) qlayer = QM() y = qlayer(inputx) y.backward() print(y) # [[-0.2539548] # [-0.1604787] # [ 0.1492931] # [-0.1711956] # [-0.1577133] # [ 0.1396999] # [ 0.016864 ] # [-0.0893069] # [ 0.1897014] # [ 0.0941301] # [ 0.0550722] # [ 0.2408579]]
ExpressiveEntanglingAnsatz
- class pyvqnet.qnn.vqc.ExpressiveEntanglingAnsatz(type, num_wires)
论文 Expressibility and entangling capability of parameterized quantum circuits for hybrid quantum-classical algorithms 中的 19 种不同的ansatz。
- Parameters:
type – 电路类型从 1 到 19。
num_wires – 量子比特数。
depth – 电路深度。
name – 名字,默认””.
- Returns:
一个 ExpressiveEntanglingAnsatz 实例
Example:
from pyvqnet.qnn.vqc import * import pyvqnet pyvqnet.utils.set_random_seed(42) from pyvqnet.nn import Module class QModel(Module): def __init__(self, num_wires, dtype,grad_mode=""): super(QModel, self).__init__() self._num_wires = num_wires self._dtype = dtype self.qm = QMachine(num_wires, dtype=dtype,grad_mode=grad_mode,save_ir=True) self.c1 = ExpressiveEntanglingAnsatz(13,3,2) self.measure = MeasureAll(obs = { 'wires': [1], 'observables': ['z'], 'coefficient': [1] }) def forward(self, x, *args, **kwargs): self.qm.reset_states(x.shape[0]) self.c1(q_machine = self.qm) rlt = self.measure(q_machine=self.qm) return rlt input_x = tensor.QTensor([[0.1, 0.2, 0.3]]) #input_x = tensor.broadcast_to(input_x,[2,3]) input_x.requires_grad = True qunatum_model = QModel(num_wires=3, dtype=pyvqnet.kcomplex64) batch_y = qunatum_model(input_x) z = vqc_to_originir_list(qunatum_model) for zi in z: print(zi) batch_y.backward() print(batch_y)
其他函数
QuantumLayerAdjoint
- class pyvqnet.qnn.vqc.QuantumLayerAdjoint(general_module: pyvqnet.nn.Module, q_machine: QMachine, name='')
使用伴随矩阵方式进行梯度计算的可自动微分的QuantumLayer层,参考 Efficient calculation of gradients in classical simulations of variational quantum algorithms 。
- Parameters:
general_module – 一个仅使用 pyvqnet.qnn.vqc 下量子线路接口搭建的 pyvqnet.nn.Module 实例。
q_machine – 来自general_module中定义的QMachine。
name – 该层名字,默认为””。
Note
general_module 的 QMachine 应设置 grad_method = “adjoint”.
当前支持由如下含参逻辑门 RX, RY, RZ, PhaseShift, RXX, RYY, RZZ, RZX, U1, U2, U3 以及其他不含参逻辑门构成的变分线路。
Example:
from pyvqnet import tensor from pyvqnet.qnn.vqc import QuantumLayerAdjoint, QMachine, RX, RY, CNOT, PauliX, qmatrix, PauliZ, T, MeasureAll, RZ, VQC_RotCircuit, VQC_HardwareEfficientAnsatz import pyvqnet class QModel(pyvqnet.nn.Module): def __init__(self, num_wires, dtype, grad_mode=""): super(QModel, self).__init__() self._num_wires = num_wires self._dtype = dtype self.qm = QMachine(num_wires, dtype=dtype, grad_mode=grad_mode) self.rx_layer = RX(has_params=True, trainable=False, wires=0) self.ry_layer = RY(has_params=True, trainable=False, wires=1) self.rz_layer = RZ(has_params=True, trainable=False, wires=1) self.rz_layer2 = RZ(has_params=True, trainable=True, wires=1) self.rot = VQC_HardwareEfficientAnsatz(6, ["rx", "RY", "rz"], entangle_gate="cnot", entangle_rules="linear", depth=5) self.tlayer = T(wires=1) self.cnot = CNOT(wires=[0, 1]) self.measure = MeasureAll(obs = { 'wires': [1], 'observables': ['x'], 'coefficient': [1] }) def forward(self, x, *args, **kwargs): self.qm.reset_states(x.shape[0]) self.rx_layer(params=x[:, [0]], q_machine=self.qm) self.cnot(q_machine=self.qm) self.ry_layer(params=x[:, [1]], q_machine=self.qm) self.tlayer(q_machine=self.qm) self.rz_layer(params=x[:, [2]], q_machine=self.qm) self.rz_layer2(q_machine=self.qm) self.rot(q_machine=self.qm) rlt = self.measure(q_machine=self.qm) return rlt input_x = tensor.QTensor([[0.1, 0.2, 0.3]]) input_x = tensor.broadcast_to(input_x, [40, 3]) input_x.requires_grad = True qunatum_model = QModel(num_wires=6, dtype=pyvqnet.kcomplex64, grad_mode="adjoint") adjoint_model = QuantumLayerAdjoint(qunatum_model, qunatum_model.qm) batch_y = adjoint_model(input_x) batch_y.backward() # [[-0.0511386 -0.2238654 0.0133047] # [-0.0511386 -0.2238654 0.0133047] # [-0.0511386 -0.2238654 0.0133047] # [-0.0511386 -0.2238654 0.0133047] # [-0.0511386 -0.2238654 0.0133047] # [-0.0511386 -0.2238654 0.0133047] # [-0.0511386 -0.2238654 0.0133047] # [-0.0511386 -0.2238654 0.0133047] # [-0.0511386 -0.2238654 0.0133047] # [-0.0511386 -0.2238654 0.0133047] # [-0.0511386 -0.2238654 0.0133047] # [-0.0511386 -0.2238654 0.0133047] # [-0.0511386 -0.2238654 0.0133047] # [-0.0511386 -0.2238654 0.0133047] # [-0.0511386 -0.2238654 0.0133047] # [-0.0511386 -0.2238654 0.0133047] # [-0.0511386 -0.2238654 0.0133047] # [-0.0511386 -0.2238654 0.0133047] # [-0.0511386 -0.2238654 0.0133047] # [-0.0511386 -0.2238654 0.0133047] # [-0.0511386 -0.2238654 0.0133047] # [-0.0511386 -0.2238654 0.0133047] # [-0.0511386 -0.2238654 0.0133047] # [-0.0511386 -0.2238654 0.0133047] # [-0.0511386 -0.2238654 0.0133047] # [-0.0511386 -0.2238654 0.0133047] # [-0.0511386 -0.2238654 0.0133047] # [-0.0511386 -0.2238654 0.0133047] # [-0.0511386 -0.2238654 0.0133047] # [-0.0511386 -0.2238654 0.0133047] # [-0.0511386 -0.2238654 0.0133047] # [-0.0511386 -0.2238654 0.0133047] # [-0.0511386 -0.2238654 0.0133047] # [-0.0511386 -0.2238654 0.0133047] # [-0.0511386 -0.2238654 0.0133047] # [-0.0511386 -0.2238654 0.0133047] # [-0.0511386 -0.2238654 0.0133047] # [-0.0511386 -0.2238654 0.0133047] # [-0.0511386 -0.2238654 0.0133047] # [-0.0511386 -0.2238654 0.0133047]]
QuantumLayerES
- class pyvqnet.qnn.vqc.QuantumLayerES(general_module: nn.Module, q_machine: QMachine, name='', sigma=np.pi / 24)
根据进化策略进行梯度计算的可自动微分的QuantumLayer层,参考 Learning to learn with an evolutionary strategy Learning to learn with an evolutionary strategy 。
- Parameters:
general_module – 一个仅使用 pyvqnet.qnn.vqc 下量子线路接口搭建的 pyvqnet.nn.QModule 实例。
q_machine – 来自general_module中定义的QMachine。
name – 该层名字,默认为””。
sigma – 多元正太分布的采样方差.
Note
general_module 的 QMachine 应设置 grad_method = “ES”.
当前支持由如下含参逻辑门 RX, RY, RZ, PhaseShift, RXX, RYY, RZZ, RZX, U1, U2, U3 以及其他不含参逻辑门构成的变分线路。
Example:
from pyvqnet import tensor from pyvqnet.qnn.vqc import QuantumLayerES, QMachine, RX, RY, CNOT, T, MeasureAll, RZ, VQC_HardwareEfficientAnsatz import pyvqnet class QModel(pyvqnet.nn.Module): def __init__(self, num_wires, dtype, grad_mode=""): super(QModel, self).__init__() self._num_wires = num_wires self._dtype = dtype self.qm = QMachine(num_wires, dtype=dtype, grad_mode=grad_mode) self.rx_layer = RX(has_params=True, trainable=False, wires=0) self.ry_layer = RY(has_params=True, trainable=False, wires=1) self.rz_layer = RZ(has_params=True, trainable=False, wires=1) self.rz_layer2 = RZ(has_params=True, trainable=True, wires=1) self.rot = VQC_HardwareEfficientAnsatz(6, ["rx", "RY", "rz"], entangle_gate="cnot", entangle_rules="linear", depth=5) self.tlayer = T(wires=1) self.cnot = CNOT(wires=[0, 1]) self.measure = MeasureAll(obs = { 'wires': [1], 'observables': ['x'], 'coefficient': [1] }) def forward(self, x, *args, **kwargs): self.qm.reset_states(x.shape[0]) self.rx_layer(params=x[:, [0]], q_machine=self.qm) self.cnot(q_machine=self.qm) self.ry_layer(params=x[:, [1]], q_machine=self.qm) self.tlayer(q_machine=self.qm) self.rz_layer(params=x[:, [2]], q_machine=self.qm) self.rz_layer2(q_machine=self.qm) self.rot(q_machine=self.qm) rlt = self.measure(q_machine=self.qm) return rlt input_x = tensor.QTensor([[0.1, 0.2, 0.3]]) input_x = tensor.broadcast_to(input_x, [40, 3]) input_x.requires_grad = True qunatum_model = QModel(num_wires=6, dtype=pyvqnet.kcomplex64, grad_mode="ES") ES_model = QuantumLayerES(qunatum_model, qunatum_model.qm) batch_y = ES_model(input_x) batch_y.backward() # [[-0.0511386 -0.2238654 0.0133047] # [-0.0511386 -0.2238654 0.0133047] # [-0.0511386 -0.2238654 0.0133047] # [-0.0511386 -0.2238654 0.0133047] # [-0.0511386 -0.2238654 0.0133047] # [-0.0511386 -0.2238654 0.0133047] # [-0.0511386 -0.2238654 0.0133047] # [-0.0511386 -0.2238654 0.0133047] # [-0.0511386 -0.2238654 0.0133047] # [-0.0511386 -0.2238654 0.0133047] # [-0.0511386 -0.2238654 0.0133047] # [-0.0511386 -0.2238654 0.0133047] # [-0.0511386 -0.2238654 0.0133047] # [-0.0511386 -0.2238654 0.0133047] # [-0.0511386 -0.2238654 0.0133047] # [-0.0511386 -0.2238654 0.0133047] # [-0.0511386 -0.2238654 0.0133047] # [-0.0511386 -0.2238654 0.0133047] # [-0.0511386 -0.2238654 0.0133047] # [-0.0511386 -0.2238654 0.0133047] # [-0.0511386 -0.2238654 0.0133047] # [-0.0511386 -0.2238654 0.0133047] # [-0.0511386 -0.2238654 0.0133047] # [-0.0511386 -0.2238654 0.0133047] # [-0.0511386 -0.2238654 0.0133047] # [-0.0511386 -0.2238654 0.0133047] # [-0.0511386 -0.2238654 0.0133047] # [-0.0511386 -0.2238654 0.0133047] # [-0.0511386 -0.2238654 0.0133047] # [-0.0511386 -0.2238654 0.0133047] # [-0.0511386 -0.2238654 0.0133047] # [-0.0511386 -0.2238654 0.0133047] # [-0.0511386 -0.2238654 0.0133047] # [-0.0511386 -0.2238654 0.0133047] # [-0.0511386 -0.2238654 0.0133047] # [-0.0511386 -0.2238654 0.0133047] # [-0.0511386 -0.2238654 0.0133047] # [-0.0511386 -0.2238654 0.0133047] # [-0.0511386 -0.2238654 0.0133047] # [-0.0511386 -0.2238654 0.0133047]]
vqc_to_originir_list
- pyvqnet.qnn.vqc.vqc_to_originir_list(vqc_model: pyvqnet.nn.Module)
将 VQNet vqc 模块转换为 originIR 。
vqc_model 应在此函数之前运行前向函数以获取输入数据。 如果输入数据是批量数据。 对于每个输入,它将返回多个 IR 字符串。
- Parameters:
vqc_model – VQNet vqc 模块,应该先向前运行。
- Returns:
originIR 字符串或 originIR 字符串列表。
Example:
import pyvqnet import pyvqnet.tensor as tensor from pyvqnet.qnn.vqc import * from pyvqnet.nn import Module class QModel(Module): def __init__(self, num_wires, dtype,grad_mode=""): super(QModel, self).__init__() self._num_wires = num_wires self._dtype = dtype self.qm = QMachine(num_wires, dtype=dtype,grad_mode=grad_mode,save_ir=True) self.rx_layer = RX(has_params=True, trainable=False, wires=0) self.ry_layer = RY(has_params=True, trainable=False, wires=1) self.rz_layer = RZ(has_params=True, trainable=False, wires=1) self.u1 = U1(has_params=True,trainable=True,wires=[2]) self.u2 = U2(has_params=True,trainable=True,wires=[3]) self.u3 = U3(has_params=True,trainable=True,wires=[1]) self.i = I(wires=[3]) self.s = S(wires=[3]) self.x1 = X1(wires=[3]) self.y1 = Y1(wires=[3]) self.z1 = Z1(wires=[3]) self.x = PauliX(wires=[3]) self.y = PauliY(wires=[3]) self.z = PauliZ(wires=[3]) self.swap = SWAP(wires=[2,3]) self.cz = CZ(wires=[2,3]) self.cr = CR(has_params=True,trainable=True,wires=[2,3]) self.rxx = RXX(has_params=True,trainable=True,wires=[2,3]) self.rzz = RYY(has_params=True,trainable=True,wires=[2,3]) self.ryy = RZZ(has_params=True,trainable=True,wires=[2,3]) self.rzx = RZX(has_params=True,trainable=False, wires=[2,3]) self.toffoli = Toffoli(wires=[2,3,4],use_dagger=True) #self.rz_layer2 = RZ(has_params=True, trainable=True, wires=1) self.h =Hadamard(wires=[1]) self.rot = VQC_HardwareEfficientAnsatz(6, ["rx", "RY", "rz"], entangle_gate="cnot", entangle_rules="linear", depth=5) self.iSWAP = iSWAP(True,True,wires=[0,2]) self.tlayer = T(wires=1) self.cnot = CNOT(wires=[0, 1]) self.measure = MeasureAll(obs = { 'wires': [1], 'observables': ['x'], 'coefficient': [1] }) def forward(self, x, *args, **kwargs): self.qm.reset_states(x.shape[0]) self.i(q_machine=self.qm) self.s(q_machine=self.qm) self.swap(q_machine=self.qm) self.cz(q_machine=self.qm) self.x(q_machine=self.qm) self.x1(q_machine=self.qm) self.y(q_machine=self.qm) self.y1(q_machine=self.qm) self.z(q_machine=self.qm) self.z1(q_machine=self.qm) self.ryy(q_machine=self.qm) self.rxx(q_machine=self.qm) self.rzz(q_machine=self.qm) self.rzx(q_machine=self.qm,params = x[:,[1]]) self.cr(q_machine=self.qm) self.u1(q_machine=self.qm) self.u2(q_machine=self.qm) self.u3(q_machine=self.qm) self.rx_layer(params = x[:,[0]], q_machine=self.qm) self.cnot(q_machine=self.qm) self.h(q_machine=self.qm) self.iSWAP(q_machine=self.qm) self.ry_layer(params = x[:,[1]], q_machine=self.qm) self.tlayer(q_machine=self.qm) self.rz_layer(params = x[:,[2]], q_machine=self.qm) self.toffoli(q_machine=self.qm) rlt = self.measure(q_machine=self.qm) return rlt input_x = tensor.QTensor([[0.1, 0.2, 0.3]]) input_x = tensor.broadcast_to(input_x,[2,3]) input_x.requires_grad = True qunatum_model = QModel(num_wires=6, dtype=pyvqnet.kcomplex64) batch_y = qunatum_model(input_x) batch_y.backward() ll = vqc_to_originir_list(qunatum_model) from pyqpanda import CPUQVM,convert_originir_str_to_qprog,convert_qprog_to_originir for l in ll : print(l) machine = CPUQVM() machine.init_qvm() prog, qv, cv = convert_originir_str_to_qprog(l, machine) print(machine.prob_run_dict(prog,qv)) # QINIT 6 # CREG 6 # I q[3] # S q[3] # SWAP q[2],q[3] # CZ q[2],q[3] # X q[3] # X1 q[3] # Y q[3] # Y1 q[3] # Z q[3] # Z1 q[3] # ISWAPTHETA q[2],q[3],(0.9916799664497375) # ISWAPTHETA q[2],q[3],(5.76633358001709) # ISWAPTHETA q[2],q[3],(0.45163241028785706) # ISWAPTHETA q[2],q[3],(0.20000000298023224) # CR q[2],q[3],(6.129976272583008) # U1 q[2],(5.1650896072387695) # U2 q[3],(0.672031581401825,4.012712001800537) # U3 q[1],(1.2062039375305176,5.261843204498291,3.8955893516540527) # RX q[0],(0.10000000149011612) # CNOT q[0],q[1] # H q[1] # ISWAPTHETA q[0],q[2],(3.298604726791382) # RY q[1],(0.20000000298023224) # T q[1] # RZ q[1],(0.30000001192092896) # DAGGER # TOFFOLI q[2],q[3],q[4] # ENDDAGGER # {'000000': 0.305050924775766, '000001': 0.0009450719636359255, '000010': 0.12846598944342266, '000011': 0.002890791669957549, '000100': 0.14294840895133598, '000101': 0.0003942920949765717, '000110': 0.05759773036056239, '000111': 0.00011479719450177659, '001000': 0.11075158748630215, '001001': 0.002333114548298535, '001010': 0.04664077736960161, '001011': 0.002162103757935423, '001100': 0.0, '001101': 0.0, '001110': 0.0, '001111': 0.0, '010000': 0.0, '010001': 0.0, '010010': 0.0, '010011': 0.0, '010100': 0.0, '010101': 0.0, '010110': 0.0, '010111': 0.0, '011000': 0.0, '011001': 0.0, '011010': 0.0, '011011': 0.0, '011100': 0.1410248245365744, '011101': 0.0003942920949765718, '011110': 0.05817049655765043, '011111': 0.0001147971945017766, '100000': 0.0, '100001': 0.0, '100010': 0.0, '100011': 0.0, '100100': 0.0, '100101': 0.0, '100110': 0.0, '100111': 0.0, '101000': 0.0, '101001': 0.0, '101010': 0.0, '101011': 0.0, '101100': 0.0, '101101': 0.0, '101110': 0.0, '101111': 0.0, '110000': 0.0, '110001': 0.0, '110010': 0.0, '110011': 0.0, '110100': 0.0, '110101': 0.0, '110110': 0.0, '110111': 0.0, '111000': 0.0, '111001': 0.0, '111010': 0.0, '111011': 0.0, '111100': 0.0, '111101': 0.0, '111110': 0.0, '111111': 0.0} # QINIT 6 # CREG 6 # I q[3] # S q[3] # SWAP q[2],q[3] # CZ q[2],q[3] # X q[3] # X1 q[3] # Y q[3] # Y1 q[3] # Z q[3] # Z1 q[3] # ISWAPTHETA q[2],q[3],(0.9916799664497375) # ISWAPTHETA q[2],q[3],(5.76633358001709) # ISWAPTHETA q[2],q[3],(0.45163241028785706) # ISWAPTHETA q[2],q[3],(0.20000000298023224) # CR q[2],q[3],(6.129976272583008) # U1 q[2],(5.1650896072387695) # U2 q[3],(0.672031581401825,4.012712001800537) # U3 q[1],(1.2062039375305176,5.261843204498291,3.8955893516540527) # RX q[0],(0.10000000149011612) # CNOT q[0],q[1] # H q[1] # ISWAPTHETA q[0],q[2],(3.298604726791382) # RY q[1],(0.20000000298023224) # T q[1] # RZ q[1],(0.30000001192092896) # DAGGER # TOFFOLI q[2],q[3],q[4] # ENDDAGGER # {'000000': 0.305050924775766, '000001': 0.0009450719636359255, '000010': 0.12846598944342266, '000011': 0.002890791669957549, '000100': 0.14294840895133598, '000101': 0.0003942920949765717, '000110': 0.05759773036056239, '000111': 0.00011479719450177659, '001000': 0.11075158748630215, '001001': 0.002333114548298535, '001010': 0.04664077736960161, '001011': 0.002162103757935423, '001100': 0.0, '001101': 0.0, '001110': 0.0, '001111': 0.0, '010000': 0.0, '010001': 0.0, '010010': 0.0, '010011': 0.0, '010100': 0.0, '010101': 0.0, '010110': 0.0, '010111': 0.0, '011000': 0.0, '011001': 0.0, '011010': 0.0, '011011': 0.0, '011100': 0.1410248245365744, '011101': 0.0003942920949765718, '011110': 0.05817049655765043, '011111': 0.0001147971945017766, '100000': 0.0, '100001': 0.0, '100010': 0.0, '100011': 0.0, '100100': 0.0, '100101': 0.0, '100110': 0.0, '100111': 0.0, '101000': 0.0, '101001': 0.0, '101010': 0.0, '101011': 0.0, '101100': 0.0, '101101': 0.0, '101110': 0.0, '101111': 0.0, '110000': 0.0, '110001': 0.0, '110010': 0.0, '110011': 0.0, '110100': 0.0, '110101': 0.0, '110110': 0.0, '110111': 0.0, '111000': 0.0, '111001': 0.0, '111010': 0.0, '111011': 0.0, '111100': 0.0, '111101': 0.0, '111110': 0.0, '111111': 0.0}
originir_to_vqc
- pyvqnet.qnn.vqc.originir_to_vqc(originir, tmp='code_tmp.py', verbose=False)
将 originIR 解析为 vqc 模型代码。 代码创建一个没有 Measure 的变分量子线路 pyvqnet.nn.Module ,返回是量子态的态矢形式,如 [b,2,…,2]。 该函数将在“./origin_ir_gen_code/” + tmp +“.py”中生成一个定义对应VQNet模型的代码文件。
- Parameters:
originir – 原始IR。
tmp – 代码文件名,默认
code_tmp.py
。verbose – 如果显示生成代码,默认 = False
- Returns:
生成可运行代码。
Example:
from pyvqnet.qnn.vqc import originir_to_vqc ss = "QINIT 3\nCREG 3\nH q[1]" Z = originir_to_vqc(ss,verbose=True) exec(Z) m =Exported_Model() print(m(2)) # from pyvqnet.nn import Module # from pyvqnet.tensor import QTensor # from pyvqnet.qnn.vqc import * # class Exported_Model(Module): # def __init__(self, name=""): # super().__init__(name) # self.q_machine = QMachine(num_wires=3) # self.H_0 = Hadamard(wires=1, use_dagger = False) # def forward(self, x, *args, **kwargs): # x = self.H_0(q_machine=self.q_machine) # return self.q_machine.states # [[[[0.7071068+0.j 0. +0.j] # [0.7071068+0.j 0. +0.j]] # [[0. +0.j 0. +0.j] # [0. +0.j 0. +0.j]]]]
model_summary
- pyvqnet.model_summary(vqc_module)
打印在 vqc_module 中注册的经典层和量子门运算符的信息。
- Parameters:
vqc_module – vqc 模块
- Returns:
摘要字符串
Example:
from pyvqnet.qnn.vqc import QMachine, RX, RY, CNOT, PauliX, qmatrix, PauliZ,MeasureAll from pyvqnet.tensor import QTensor, tensor,kcomplex64 import pyvqnet from pyvqnet.nn import LSTM,Linear from pyvqnet import model_summary class QModel(pyvqnet.nn.Module): def __init__(self, num_wires, dtype): super(QModel, self).__init__() self._num_wires = num_wires self._dtype = dtype self.qm = QMachine(num_wires, dtype=dtype) self.rx_layer1 = RX(has_params=True, trainable=True, wires=1, init_params=tensor.QTensor([0.5])) self.ry_layer2 = RY(has_params=True, trainable=True, wires=0, init_params=tensor.QTensor([-0.5])) self.xlayer = PauliX(wires=0) self.cnot = CNOT(wires=[0, 1]) self.measure = MeasureAll(obs = PauliZ) self.linear = Linear(24,2) self.lstm =LSTM(23,5) def forward(self, x, *args, **kwargs): return super().forward(x, *args, **kwargs) Z = QModel(4,kcomplex64) print(model_summary(Z)) # ###################QModel Summary####################### # classic layers: {'Linear': 1, 'LSTM': 1} # total classic parameters: 650 # ========================================= # qubits num: 4 # gates: {'RX': 1, 'RY': 1, 'PauliX': 1, 'CNOT': 1} # total quantum gates: 4 # total quantum parameter gates: 2 # total quantum parameters: 2 # #########################################################
QNG
- class pyvqnet.qnn.vqc.qng.QNG(qmodel, stepsize=0.01)
量子自然梯度法(Quantum Nature Gradient) 借鉴经典自然梯度法的概念 Amari (1998) , 我们改为将优化问题视为给定输入的可能输出值的概率分布(即,最大似然估计),则更好的方法是在分布 空间中执行梯度下降,它相对于参数化是无量纲和不变的. 因此,无论参数化如何,每个优化步骤总是会为每个参数选择最佳步长。 在量子机器学习任务中,量子态空间拥有一个独特的不变度量张量,称为 Fubini-Study 度量张量 \(g_{ij}\)。 该张量将量子线路参数空间中的最速下降转换为分布空间中的最速下降。 量子自然梯度的公式如下:
\[\theta_{t+1} = \theta_t - \eta g^{+}(\theta_t)\nabla \mathcal{L}(\theta),\]其中 \(g^{+}\) 是伪逆。
wrapper_calculate_qng 是需要加到待计算量子自然梯度的模型的forward函数的装饰器。仅对模型注册的 Parameter 类型的参数优化。
- Parameters:
qmodel – 量子变分线路模型,需要使用 wrapper_calculate_qng 作为forward函数的装饰器。
stepsize – 梯度下降法的步长,默认0.01。
Note
仅在非批处理数据上进行了测试。 仅支持纯变分量子电路。 step() 将更新输入和参数的梯度。 step() 仅会更新模型参数的数值。
Example:
from pyvqnet.qnn.vqc import QMachine, RX, RY, RZ, CNOT, rz, PauliX, qmatrix, PauliZ, Probability, rx, ry, MeasureAll, U2 from pyvqnet.tensor import QTensor, tensor import pyvqnet import numpy as np from pyvqnet.qnn.vqc import wrapper_calculate_qng class QModel(pyvqnet.nn.Module): def __init__(self, num_wires, dtype): super(QModel, self).__init__() self._num_wires = num_wires self._dtype = dtype self.qm = QMachine(num_wires, dtype=dtype) self.rz_layer1 = RZ(has_params=True, trainable=False, wires=0) self.rz_layer2 = RZ(has_params=True, trainable=False, wires=1) self.u2_layer1 = U2(has_params=True, trainable=False, wires=0) self.l_train1 = RY(has_params=True, trainable=True, wires=1) self.l_train1.params.init_from_tensor( QTensor([333], dtype=pyvqnet.kfloat32)) self.l_train2 = RX(has_params=True, trainable=True, wires=2) self.l_train2.params.init_from_tensor( QTensor([4444], dtype=pyvqnet.kfloat32)) self.xlayer = PauliX(wires=0) self.cnot01 = CNOT(wires=[0, 1]) self.cnot12 = CNOT(wires=[1, 2]) self.measure = MeasureAll(obs={'Y0': 1}) @wrapper_calculate_qng def forward(self, x, *args, **kwargs): self.qm.reset_states(x.shape[0]) ry(q_machine=self.qm, wires=0, params=np.pi / 4) ry(q_machine=self.qm, wires=1, params=np.pi / 3) ry(q_machine=self.qm, wires=2, params=np.pi / 7) self.rz_layer1(q_machine=self.qm, params=x[:, [0]]) self.rz_layer2(q_machine=self.qm, params=x[:, [1]]) self.u2_layer1(q_machine=self.qm, params=x[:, [3, 4]]) # self.cnot01(q_machine=self.qm) self.cnot12(q_machine=self.qm) ry(q_machine=self.qm, wires=0, params=np.pi / 7) self.l_train1(q_machine=self.qm) self.l_train2(q_machine=self.qm) #rx(q_machine=self.qm, wires=2, params=x[:, [3]]) rz(q_machine=self.qm, wires=1, params=x[:, [2]]) ry(q_machine=self.qm, wires=0, params=np.pi / 7) rz(q_machine=self.qm, wires=1, params=x[:, [2]]) self.cnot01(q_machine=self.qm) self.cnot12(q_machine=self.qm) rlt = self.measure(q_machine=self.qm) return rlt qmodel = QModel(3, pyvqnet.kcomplex64) x = QTensor([[1111.0, 2222, 444, 55, 666]]) qng = pyvqnet.qnn.vqc.QNG(qmodel,0.01) qng.step(x) print(qmodel.parameters()) #[[[333.0084]], [[4443.9985]]]
wrapper_single_qubit_op_fuse
- pyvqnet.qnn.vqc.wrapper_single_qubit_op_fuse(f)
一个用于将单比特运算融合到 Rot 运算中的装饰器。
Note
f 是模块的前向函数,需要运行一次模型的前向函数才能生效。 此处定义的模型继承自 pyvqnet.qnn.vqc.QModule,该类是 pyvqnet.nn.Module 的子类。
Example:
from pyvqnet import tensor from pyvqnet.qnn.vqc import QMachine, Operation, apply_unitary_bmm from pyvqnet import kcomplex128 from pyvqnet.tensor import adjoint import numpy as np from pyvqnet.qnn.vqc import single_qubit_ops_fuse, wrapper_single_qubit_op_fuse, QModule,op_history_summary from pyvqnet.qnn.vqc import QMachine, RX, RY, CNOT, PauliX, qmatrix, PauliZ, T, MeasureAll, RZ from pyvqnet.tensor import QTensor, tensor import pyvqnet import numpy as np from pyvqnet.utils import set_random_seed set_random_seed(42) class QModel(QModule): def __init__(self, num_wires, dtype): super(QModel, self).__init__() self._num_wires = num_wires self._dtype = dtype self.qm = QMachine(num_wires, dtype=dtype) self.rx_layer = RX(has_params=True, trainable=False, wires=0, dtype=dtype) self.ry_layer = RY(has_params=True, trainable=False, wires=1, dtype=dtype) self.rz_layer = RZ(has_params=True, trainable=False, wires=1, dtype=dtype) self.rz_layer2 = RZ(has_params=True, trainable=False, wires=1, dtype=dtype) self.tlayer = T(wires=1) self.cnot = CNOT(wires=[0, 1]) self.measure = MeasureAll(obs={ 'wires': [1], 'observables': ['x'], 'coefficient': [1] }) @wrapper_single_qubit_op_fuse def forward(self, x, *args, **kwargs): self.qm.reset_states(x.shape[0]) self.rx_layer(params=x[:, [0]], q_machine=self.qm) self.cnot(q_machine=self.qm) self.ry_layer(params=x[:, [1]], q_machine=self.qm) self.tlayer(q_machine=self.qm) self.rz_layer(params=x[:, [2]], q_machine=self.qm) self.rz_layer2(params=x[:, [3]], q_machine=self.qm) rlt = self.measure(q_machine=self.qm) return rlt input_x = tensor.QTensor([[0.1, 0.2, 0.3, 0.4], [0.1, 0.2, 0.3, 0.4]], dtype=pyvqnet.kfloat64) input_xt = tensor.tile(input_x, (100, 1)) input_xt.requires_grad = True qunatum_model = QModel(num_wires=2, dtype=pyvqnet.kcomplex128) batch_y = qunatum_model(input_xt) print(op_history_summary(qunatum_model.qm.op_history)) # ###################Summary####################### # qubits num: 2 # gates: {'rot': 2, 'cnot': 1} # total gates: 3 # total parameter gates: 2 # total parameters: 6 # #################################################
wrapper_commute_controlled
- pyvqnet.qnn.vqc.wrapper_commute_controlled(f, direction='right')
装饰器用于进行受控门交换 这是一个量子变换,用于将可交换的门移动到受控操作的控制比特和目标比特之前。 控制比特两侧的对角门不会影响受控门的结果;因此,我们可以将所有作用在第一个比特上的单比特门一起推到右边(如果需要,可以进行融合)。 类似地,X 门与 CNOT 和 Toffoli 的目标比特可交换(PauliY 与 CRY 也是如此)。 我们可以使用此变换将单比特门尽可能推到受控操作的深处。
Note
f 是模块的前向函数,需要运行一次模型的前向函数才能生效。 此处定义的模型继承自 pyvqnet.qnn.vqc.QModule,该类是 pyvqnet.nn.Module 的子类。
- Parameters:
f – 前向函数。
direction – 移动单比特门的方向,可选值为 “left” 或 “right”,默认为 “right”。
Example:
from pyvqnet import tensor from pyvqnet.qnn.vqc import QMachine from pyvqnet import kcomplex128 from pyvqnet.tensor import adjoint import numpy as np from pyvqnet.qnn.vqc import wrapper_commute_controlled, pauliy, QModule,op_history_summary from pyvqnet.qnn.vqc import QMachine, RX, RY, CNOT, S, CRY, PauliZ, PauliX, T, MeasureAll, RZ, CZ, PhaseShift, Toffoli, cnot, cry, toffoli from pyvqnet.tensor import QTensor, tensor import pyvqnet import numpy as np from pyvqnet.utils import set_random_seed from pyvqnet.qnn import expval, QuantumLayerV2 import time from functools import partial set_random_seed(42) class QModel(QModule): def __init__(self, num_wires, dtype): super(QModel, self).__init__() self._num_wires = num_wires self._dtype = dtype self.qm = QMachine(num_wires, dtype=dtype) self.cz = CZ(wires=[0, 2]) self.paulix = PauliX(wires=2) self.s = S(wires=0) self.ps = PhaseShift(has_params=True, trainable= True, wires=0, dtype=dtype) self.t = T(wires=0) self.rz = RZ(has_params=True, wires=1, dtype=dtype) self.measure = MeasureAll(obs={ 'wires': [0], 'observables': ['z'], 'coefficient': [1] }) @partial(wrapper_commute_controlled, direction="left") def forward(self, x, *args, **kwargs): self.qm.reset_states(x.shape[0]) self.cz(q_machine=self.qm) self.paulix(q_machine=self.qm) self.s(q_machine=self.qm) cnot(q_machine=self.qm, wires=[0, 1]) pauliy(q_machine=self.qm, wires=1) cry(q_machine=self.qm, params=1 / 2, wires=[0, 1]) self.ps(q_machine=self.qm) toffoli(q_machine=self.qm, wires=[0, 1, 2]) self.t(q_machine=self.qm) self.rz(q_machine=self.qm) rlt = self.measure(q_machine=self.qm) return rlt import pyvqnet import pyvqnet.tensor as tensor input_x = tensor.QTensor([[0.1, 0.2, 0.3, 0.4], [0.1, 0.2, 0.3, 0.4]], dtype=pyvqnet.kfloat64) input_xt = tensor.tile(input_x, (100, 1)) input_xt.requires_grad = True qunatum_model = QModel(num_wires=3, dtype=pyvqnet.kcomplex128) batch_y = qunatum_model(input_xt) for d in qunatum_model.qm.op_history: name = d["name"] wires = d["wires"] p = d["params"] print(f"name: {name} wires: {wires}, params = {p}") # name: s wires: (0,), params = None # name: phaseshift wires: (0,), params = [[4.744782]] # name: t wires: (0,), params = None # name: cz wires: (0, 2), params = None # name: paulix wires: (2,), params = None # name: cnot wires: (0, 1), params = None # name: pauliy wires: (1,), params = None # name: cry wires: (0, 1), params = [[0.5]] # name: rz wires: (1,), params = [[4.7447823]] # name: toffoli wires: (0, 1, 2), params = None # name: MeasureAll wires: [0], params = None
wrapper_merge_rotations
- pyvqnet.qnn.vqc.wrapper_merge_rotations(f)
合并相同类型的旋转门的装饰器,包括 “rx”、”ry”、”rz”、”phaseshift”、”crx”、”cry”、”crz”、”controlledphaseshift”、”isingxx”、 “isingyy”、”isingzz”、”rot”。
Note
f 是模块的前向函数,需要运行一次模型的前向函数才能生效。 此处定义的模型继承自 pyvqnet.qnn.vqc.QModule,该类是 pyvqnet.nn.Module 的子类。
- Parameters:
f – 前向函数。
Example:
import pyvqnet from pyvqnet.tensor import tensor from pyvqnet import tensor from pyvqnet.qnn.vqc import QMachine,op_history_summary from pyvqnet import kcomplex128 from pyvqnet.tensor import adjoint import numpy as np from pyvqnet.qnn.vqc import * from pyvqnet.qnn.vqc import QModule from pyvqnet.tensor import QTensor, tensor import pyvqnet import numpy as np from pyvqnet.utils import set_random_seed set_random_seed(42) class QModel(QModule): def __init__(self, num_wires, dtype): super(QModel, self).__init__() self._num_wires = num_wires self._dtype = dtype self.qm = QMachine(num_wires, dtype=dtype) self.measure = MeasureAll(obs={ 'wires': [0], 'observables': ['z'], 'coefficient': [1] }) @wrapper_merge_rotations def forward(self, x, *args, **kwargs): self.qm.reset_states(x.shape[0]) rx(q_machine=self.qm, params=x[:, [1]], wires=(0, )) rx(q_machine=self.qm, params=x[:, [1]], wires=(0, )) rx(q_machine=self.qm, params=x[:, [1]], wires=(0, )) rot(q_machine=self.qm, params=x, wires=(1, ), use_dagger=True) rot(q_machine=self.qm, params=x, wires=(1, ), use_dagger=True) isingxy(q_machine=self.qm, params=x[:, [2]], wires=(0, 1)) isingxy(q_machine=self.qm, params=x[:, [0]], wires=(0, 1)) cnot(q_machine=self.qm, wires=[1, 2]) ry(q_machine=self.qm, params=x[:, [1]], wires=(1, )) hadamard(q_machine=self.qm, wires=(2, )) crz(q_machine=self.qm, params=x[:, [2]], wires=(2, 0)) ry(q_machine=self.qm, params=-x[:, [1]], wires=1) return self.measure(q_machine=self.qm) input_x = tensor.QTensor([[1, 2, 3], [1, 2, 3]], dtype=pyvqnet.kfloat64) input_x.requires_grad = True qunatum_model = QModel(num_wires=3, dtype=pyvqnet.kcomplex128) qunatum_model.use_merge_rotations = True batch_y = qunatum_model(input_x) print(op_history_summary(qunatum_model.qm.op_history)) # ###################Summary####################### # qubits num: 3 # gates: {'rx': 1, 'rot': 1, 'isingxy': 2, 'cnot': 1, 'hadamard': 1, 'crz': 1} # total gates: 7 # total parameter gates: 5 # total parameters: 7 # #################################################
wrapper_compile
- pyvqnet.qnn.vqc.wrapper_compile(f, compile_rules=[commute_controlled_right, merge_rotations, single_qubit_ops_fuse])
使用编译规则来优化 QModule 的电路。
Note
f 是模块的前向函数,需要运行一次模型的前向函数才能生效。 此处定义的模型继承自 pyvqnet.qnn.vqc.QModule,该类是 pyvqnet.nn.Module 的子类。
- Parameters:
f – 前向函数。
Example:
from functools import partial from pyvqnet.qnn.vqc import op_history_summary from pyvqnet.qnn.vqc import QModule from pyvqnet import tensor from pyvqnet.qnn.vqc import QMachine, wrapper_compile from pyvqnet.qnn.vqc import pauliy from pyvqnet.qnn.vqc import QMachine, ry,rz, ControlledPhaseShift, \ rx, S, rot, isingxy,CSWAP, PauliX, T, MeasureAll, RZ, CZ, PhaseShift, u3, cnot, cry, toffoli, cy from pyvqnet.tensor import QTensor, tensor import pyvqnet class QModel_before(QModule): def __init__(self, num_wires, dtype): super(QModel_before, self).__init__() self._num_wires = num_wires self._dtype = dtype self.qm = QMachine(num_wires, dtype=dtype) self.qm.set_save_op_history_flag(True) self.cswap = CSWAP(wires=(0, 2, 1)) self.cz = CZ(wires=[0, 2]) self.paulix = PauliX(wires=2) self.s = S(wires=0) self.ps = PhaseShift(has_params=True, trainable=True, wires=0, dtype=dtype) self.cps = ControlledPhaseShift(has_params=True, trainable=True, wires=(1, 0), dtype=dtype) self.t = T(wires=0) self.rz = RZ(has_params=True, wires=1, dtype=dtype) self.measure = MeasureAll(obs={ 'wires': [0], 'observables': ['z'], 'coefficient': [1] }) def forward(self, x, *args, **kwargs): self.qm.reset_states(x.shape[0]) self.cz(q_machine=self.qm) self.paulix(q_machine=self.qm) rx(q_machine=self.qm,wires=1,params = x[:,[0]]) ry(q_machine=self.qm,wires=1,params = x[:,[1]]) rz(q_machine=self.qm,wires=1,params = x[:,[2]]) rot(q_machine=self.qm, params=x[:, 0:3], wires=(1, ), use_dagger=True) rot(q_machine=self.qm, params=x[:, 1:4], wires=(1, ), use_dagger=True) isingxy(q_machine=self.qm, params=x[:, [2]], wires=(0, 1)) u3(q_machine=self.qm, params=x[:, 0:3], wires=1) self.s(q_machine=self.qm) self.cswap(q_machine=self.qm) cnot(q_machine=self.qm, wires=[0, 1]) ry(q_machine=self.qm,wires=2,params = x[:,[1]]) pauliy(q_machine=self.qm, wires=1) cry(q_machine=self.qm, params=1 / 2, wires=[0, 1]) self.ps(q_machine=self.qm) self.cps(q_machine=self.qm) ry(q_machine=self.qm,wires=2,params = x[:,[1]]) rz(q_machine=self.qm,wires=2,params = x[:,[2]]) toffoli(q_machine=self.qm, wires=[0, 1, 2]) self.t(q_machine=self.qm) cy(q_machine=self.qm, wires=(2, 1)) ry(q_machine=self.qm,wires=1,params = x[:,[1]]) self.rz(q_machine=self.qm) rlt = self.measure(q_machine=self.qm) return rlt class QModel(QModule): def __init__(self, num_wires, dtype): super(QModel, self).__init__() self._num_wires = num_wires self._dtype = dtype self.qm = QMachine(num_wires, dtype=dtype) self.cswap = CSWAP(wires=(0, 2, 1)) self.cz = CZ(wires=[0, 2]) self.paulix = PauliX(wires=2) self.s = S(wires=0) self.ps = PhaseShift(has_params=True, trainable=True, wires=0, dtype=dtype) self.cps = ControlledPhaseShift(has_params=True, trainable=True, wires=(1, 0), dtype=dtype) self.t = T(wires=0) self.rz = RZ(has_params=True, wires=1, dtype=dtype) self.measure = MeasureAll(obs={ 'wires': [0], 'observables': ['z'], 'coefficient': [1] }) @partial(wrapper_compile) def forward(self, x, *args, **kwargs): self.qm.reset_states(x.shape[0]) self.cz(q_machine=self.qm) self.paulix(q_machine=self.qm) rx(q_machine=self.qm,wires=1,params = x[:,[0]]) ry(q_machine=self.qm,wires=1,params = x[:,[1]]) rz(q_machine=self.qm,wires=1,params = x[:,[2]]) rot(q_machine=self.qm, params=x[:, 0:3], wires=(1, ), use_dagger=True) rot(q_machine=self.qm, params=x[:, 1:4], wires=(1, ), use_dagger=True) isingxy(q_machine=self.qm, params=x[:, [2]], wires=(0, 1)) u3(q_machine=self.qm, params=x[:, 0:3], wires=1) self.s(q_machine=self.qm) self.cswap(q_machine=self.qm) cnot(q_machine=self.qm, wires=[0, 1]) ry(q_machine=self.qm,wires=2,params = x[:,[1]]) pauliy(q_machine=self.qm, wires=1) cry(q_machine=self.qm, params=1 / 2, wires=[0, 1]) self.ps(q_machine=self.qm) self.cps(q_machine=self.qm) ry(q_machine=self.qm,wires=2,params = x[:,[1]]) rz(q_machine=self.qm,wires=2,params = x[:,[2]]) toffoli(q_machine=self.qm, wires=[0, 1, 2]) self.t(q_machine=self.qm) cy(q_machine=self.qm, wires=(2, 1)) ry(q_machine=self.qm,wires=1,params = x[:,[1]]) self.rz(q_machine=self.qm) rlt = self.measure(q_machine=self.qm) return rlt import pyvqnet import pyvqnet.tensor as tensor input_x = tensor.QTensor([[0.1, 0.2, 0.3, 0.4], [0.1, 0.2, 0.3, 0.4]], dtype=pyvqnet.kfloat64) input_x.requires_grad = True num_wires = 3 qunatum_model = QModel(num_wires=num_wires, dtype=pyvqnet.kcomplex128) qunatum_model_before = QModel_before(num_wires=num_wires, dtype=pyvqnet.kcomplex128) batch_y = qunatum_model(input_x) batch_y = qunatum_model_before(input_x) flatten_oph_names = [] print("before") print(op_history_summary(qunatum_model_before.qm.op_history)) flatten_oph_names = [] for d in qunatum_model.compiled_op_historys: if "compile" in d.keys(): oph = d["op_history"] for i in oph: n = i["name"] w = i["wires"] p = i["params"] flatten_oph_names.append({"name":n,"wires":w, "params": p}) print("after") print(op_history_summary(qunatum_model.qm.op_history)) # ###################Summary####################### # qubits num: 3 # gates: {'cz': 1, 'paulix': 1, 'rx': 1, 'ry': 4, 'rz': 3, 'rot': 2, 'isingxy': 1, 'u3': 1, 's': 1, 'cswap': 1, 'cnot': 1, 'pauliy': 1, 'cry': 1, 'phaseshift': 1, 'controlledphaseshift': 1, 'toffoli': 1, 't': 1, 'cy': 1} # total gates: 24 # total parameter gates: 15 # total parameters: 21 # ################################################# # after # ###################Summary####################### # qubits num: 3 # gates: {'cz': 1, 'rot': 7, 'isingxy': 1, 'u3': 1, 'cswap': 1, 'cnot': 1, 'cry': 1, 'controlledphaseshift': 1, 'toffoli': 1, 'cy': 1} # total gates: 16 # total parameter gates: 11 # total parameters: 27 # #################################################